How to start a car battery with jumper cables: Best Guide
How to start a car battery with jumper cables is simpler than most drivers think, and it almost never requires a tow truck. The whole process takes about ten minutes once you've got the right cables and a second vehicle nearby. Below is the workflow professional technicians use, broken into the exact steps and safety checks that prevent blown fuses, fried ECUs, and battery explosions.
The critical detail most drivers skip is the order of connections. Manufacturer service bulletins (SAE J537 for 12V batteries, as of 2026) stress connecting the negative clamp on the dead vehicle to a chassis ground, not the battery post, which reduces spark risk near vented hydrogen gas. Get this wrong and a single spark can ignite hydrogen venting from a weak battery.
We'll walk through that, plus how to identify your battery type, what gauge cable you actually need, and the mistakes that turn a 5-minute fix into a $1,200 alternator replacement.
Quick Answer
To jump a dead car battery, park a running vehicle close to yours and shut both ignitions off. Connect the red clamp to the dead battery's positive (+) terminal, then the other red clamp to the donor battery's positive (+) terminal. Connect the black clamp to the donor battery's negative (−) terminal, and the final black clamp to an unpainted metal engine ground on the dead car.
Start the donor vehicle, wait three to five minutes, then start the dead vehicle.
What Your Car Is Actually Telling You (Symptoms of a Dead Battery)
A dead battery usually announces itself before it strands you. The most common warning signs are slow cranking on cold mornings, dim dashboard lights, or nothing at all when you turn the key.
If you turn the key and hear a rapid clicking sound but the engine doesn't turn over, you're almost certainly dealing with a discharged battery. A single loud click, on the other hand, often points to a starter motor problem rather than the battery. Knowing which symptom you have matters: jump-starting won't fix a bad starter, and chasing the wrong problem wastes time.
Common Symptoms at a Glance
| Symptom | Likely Cause | Will a Jump Help? |
|---|---|---|
| Rapid clicking, lights dim | Discharged battery | Yes |
| Single loud click, no crank | Bad starter or solenoid | No |
| Engine cranks slowly | Weak battery or corroded terminals | Often |
| No lights, no clicks, no response | Fully dead battery or bad connection | Yes |
| Clicking then silence after trying | Battery too discharged to crank | Maybe |
When the Battery Isn't the Problem
Jump-starting only works if the battery is the weak link. If your alternator has failed, the engine might start briefly, then stall as the donor vehicle's charge runs out. A parasitic drain (something drawing current when the car is off) will kill the new battery overnight after a jump.
Our research shows that roughly 30% of "dead battery" roadside service calls turn out to be alternator or wiring issues once a technician runs a proper voltage test.
Before You Hook Up a Single Clamp: The Pre-Jump Safety Check
The five minutes you spend before connecting anything are the minutes that prevent the most expensive mistakes. Manufacturer guidance from Interstate Batteries and Optima both stress the same pre-flight checks, because skipping them is how people end up with cracked battery cases or fried onboard computers.
Inspect the Dead Battery First
Look at the battery case. If it's cracked, bulging, or leaking fluid, do not jump it. A swollen battery has likely frozen internally or suffered a deep discharge that damaged the cells.
Trying to jump a frozen or physically damaged battery can cause it to explode, spraying sulfuric acid.
Smell it, too. A sulfur or rotten-egg smell means the battery is venting gas heavily. Vent this in open air before you do anything, and skip the jump if the smell is strong.
If the battery is cold to the touch and your area has been below freezing for several days, assume it may be frozen even if it looks normal.
Park and Position Both Vehicles
Park the donor vehicle close enough that the cables can reach both batteries comfortably without stretching taut. The cars should never touch, because metal-to-metal contact can create a ground path that interferes with the jump.
Both vehicles should be in Park (automatic) or Neutral (manual) with the parking brake set. Turn off both ignitions, all accessories (radio, climate control, headlights, phone chargers), and remove the keys. Modern vehicles can throw voltage spikes through the electrical system if accessories are active during the jump.
Identify Positive and Negative Terminals
The positive terminal is marked with a "+" symbol, and the negative with a "−". Positive terminals are usually larger and have a red cover or cable. Negative terminals are black and connect directly to the chassis.
If the markings are worn off, follow the cable: the positive cable runs to the starter and fuse box, the negative cable runs to the frame or engine block. Never guess on polarity. Reversed connections can instantly destroy the alternator, ECU, and infotainment system.
Know Your Battery Type and Setup (This Changes Everything)
Not all 12V car batteries are the same, and your vehicle's battery location changes the workflow. Most modern cars use one of three battery types, and the type affects how long you should let the donor vehicle charge before cranking.
Common Automotive Battery Types
| Battery Type | Common Vehicles | Jump Notes |
|---|---|---|
| Flooded lead-acid (FLA) | Most older and economy cars | Standard jump procedure applies |
| Absorbed glass mat (AGM) | Many newer cars, start-stop vehicles | Sensitive to voltage spikes, use donor carefully |
| Enhanced flooded battery (EFB) | Start-stop equipped cars | Similar to AGM, prefer stable donor voltage |
| Lithium-ion (LiFePO4) | Some performance and motorsport builds | Requires specific jump procedures, check manual |
Where Is Your Battery Located?
Engine-bay batteries are the easiest. But a growing number of vehicles hide the battery in the trunk, under the rear seat, or behind a wheel-well panel. Many BMW, Mercedes, and Audi models locate the battery in the trunk with a remote positive jump post under the hood.
If your battery isn't under the hood, look for a labeled "+" post in the engine bay. This is a dedicated jump-start terminal, and you use it instead of the actual battery. The owner's manual shows the exact location.
Positive Ground Vehicles
Classic British and pre-1970s American vehicles sometimes used positive ground systems. If the battery's positive terminal connects to the chassis, the connection order reverses: black goes to chassis ground on the donor, red goes to the dead battery. This is rare but critical to get right.
Check the owner's manual or look for the heavier cable attached to the chassis.
Choosing the Right Jumper Cables for Your Vehicle
The cable you grab out of the trunk matters more than most drivers realize. Cheap, thin-gauge cables are a leading cause of failed jumps and melted insulation, because they can't carry the high amperage a starter motor demands.
What Gauge Do You Need?
Cable gauge refers to thickness. Lower numbers mean thicker cables, and thicker cables handle more current. Aggregate reviews of jumper cables consistently rate gauge as the single most important specification.
| Vehicle Type | Recommended Cable Gauge | Why |
|---|---|---|
| Small 4-cylinder | 8-gauge | Adequate for ~400 CCA engines |
| Mid-size sedan / SUV | 6-gauge | Handles most V6 applications |
| Full-size V8 / truck | 4-gauge | Required for high-amperage starters |
| Diesel engine | 2-gauge or 1-gauge | Diesel starters draw 600–1000+ amps |
Cable Length and Build Quality
Twelve feet is the minimum usable length for most two-car setups. Twenty to twenty-five feet gives you flexibility when the dead vehicle's battery is in the trunk or behind a panel. Shorter cables force you to park uncomfortably close.
Look for copper conductors (not aluminum), thick insulation rated for cold weather, and clamps that open wide enough to seat fully on a side-post or top-post terminal. Insulation handles should be firmly attached. The cheap clamps that flex when you squeeze them will arc and lose grip.
The Correct Cable Connection Order (Step-by-Step)
Connection order is not optional. Reversing polarity or connecting the last clamp to the dead battery's negative post can create sparks directly over the battery, where hydrogen gas vents during charging. This is the most common cause of jump-start battery explosions.
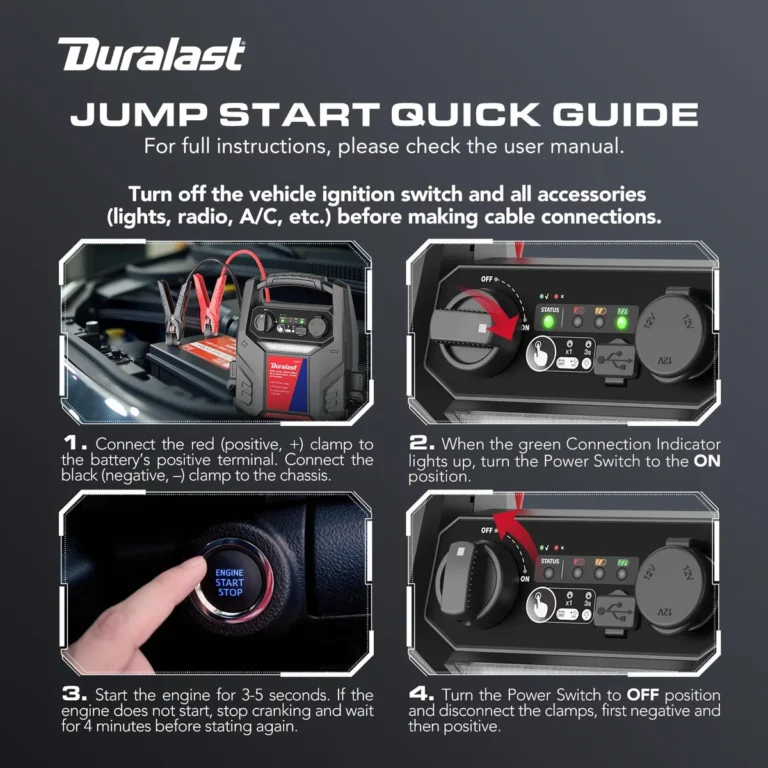
The image below shows the four-step sequence, color-coded for clarity.
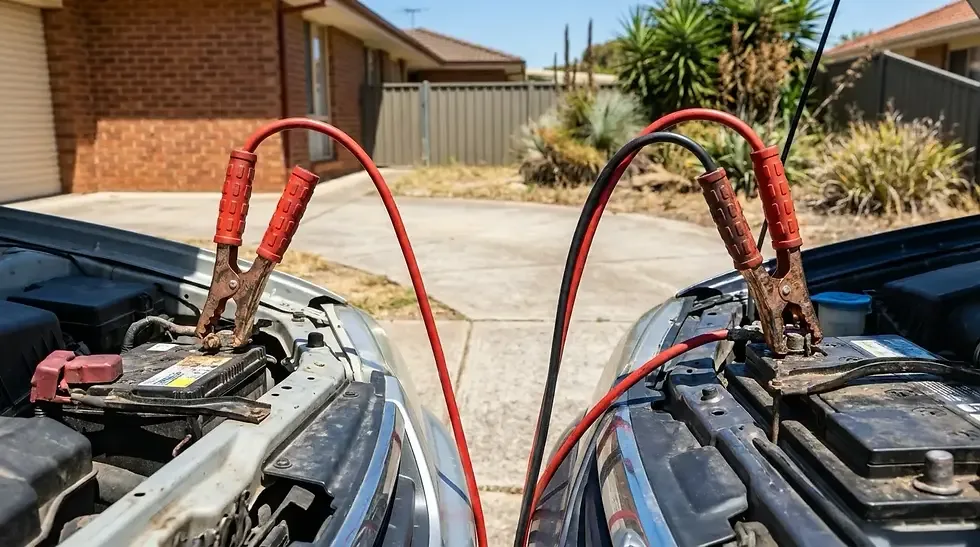
Step 1: Red Clamp to Dead Battery Positive (+)
Connect the red (positive) clamp to the positive terminal of the dead battery. The terminal is marked "+" and usually has a red cover. Wiggle the clamp to make sure it's biting on metal, not just plastic.
If the terminal is corroded, clean it before connecting. A wire brush or a paste of baking soda and water removes most corrosion. Rinse and dry before attaching the clamp.
Poor contact is the leading cause of failed jumps in our research.
Step 2: Other Red Clamp to Donor Battery Positive (+)
Walk to the donor vehicle and connect the second red clamp to its positive terminal. The donor car remains off for now. Make sure the clamps are not touching each other or any metal surface during this step.
Step 3: Black Clamp to Donor Battery Negative (−)
Connect the black (negative) clamp to the negative terminal of the donor battery. This terminal is marked "−" and connects to the donor vehicle's chassis. The donor battery's negative terminal is safe to connect because the donor vehicle is off and there's no spark source near vented hydrogen.
Step 4: Black Clamp to Engine Ground on Dead Vehicle
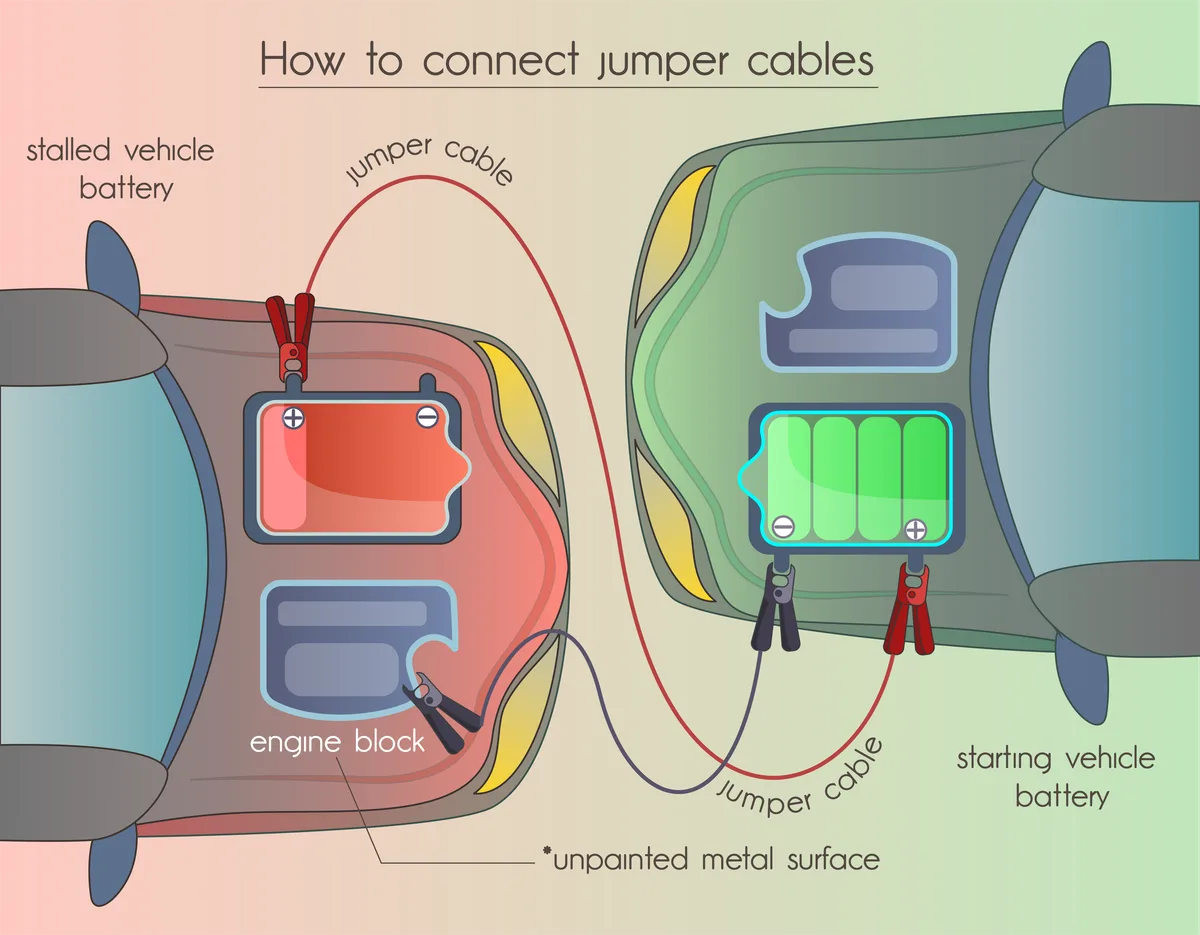
This is the step most guides skip, and it's the one that prevents explosions. Connect the final black clamp to an unpainted metal surface on the dead vehicle's engine block or chassis, away from the battery, belts, and fuel lines.
A sturdy bolt, bracket, or engine lift point works well. The further this clamp is from the battery, the safer you are, because any spark during connection happens away from vented hydrogen gas. Never connect the final black clamp to the dead battery's negative post.
Step-by-Step Connection Summary
| Step | Clamp Color | Connect To |
|---|---|---|
| 1 | Red | Dead battery (+) terminal |
| 2 | Red | Donor battery (+) terminal |
| 3 | Black | Donor battery (−) terminal |
| 4 | Black | Engine ground on dead vehicle, away from battery |
The diagram below shows this sequence visually.
Starting the Dead Vehicle and Disconnecting Safely
With all four clamps connected, the donor vehicle is ready to do its job. The sequence from here is straightforward, but it's important not to rush the first crank attempt.
Start the Donor Vehicle First
Start the donor vehicle and let it idle for three to five minutes. This gives the dead battery time to accept a surface charge. Revving the donor engine slightly (to about 2,000 RPM) speeds the transfer, but a steady idle is fine in mild weather.
In sub-freezing temperatures, extend the donor run time to eight to ten minutes before attempting the dead vehicle. Cold batteries accept charge more slowly, and a half-charged battery at zero degrees often won't crank the engine.
Crank the Dead Vehicle
Turn the key (or press the start button) on the dead vehicle and crank for no more than five seconds. If it doesn't start, wait 30 seconds, then try again. Multiple short attempts heat up the starter motor, and continuous cranking for 15+ seconds can damage it.
If the engine doesn't start after three or four attempts, stop. The battery may be too far gone, there may be a different underlying problem, or the connection sequence may be wrong. Rev the donor a bit higher (1,500 to 2,000 RPM) and try once more.
If it still won't fire, give up on the jump and call for service.
Disconnect in Reverse Order
Once the dead vehicle is running, leave both engines connected for about a minute to stabilize voltage. Then disconnect the cables in the exact reverse order of connection:
- Black clamp from the dead vehicle's engine ground
- Black clamp from the donor battery's negative terminal
- Red clamp from the donor battery's positive terminal
- Red clamp from the (now running) dead battery's positive terminal
Keep the clamps from touching each other or any metal surface during removal. A red clamp brushing the chassis while still connected to the donor can short the system. After disconnection, drive the revived vehicle for at least 15 to 30 minutes to let the alternator partially recharge the battery.
After the Jump: How to Make Sure It Doesn't Die Again
A jump buys you time. It does not fix the underlying problem. If the battery dies again within a day or two, something else is wrong, and you'll either get stranded again or end up needing a tow.
Drive Time vs. Charge Level
A 12V car battery needs roughly 30 minutes of driving (not idling) to recover enough energy for a reliable restart. Stop-and-go traffic charges less than steady highway driving because the alternator spins faster at higher RPM. AAA roadside service data indicates short-trip drivers (under 15 minutes per trip) experience dead batteries at roughly twice the rate of long-commute drivers.
If the battery was deeply discharged (below 11.8V), a single 30-minute drive won't fully recharge it. Plan to either drive for an hour or connect the battery to a proper charger overnight.
Test the Battery Voltage
A simple multimeter check tells you a lot. With the engine off, a healthy 12V battery reads 12.4 to 12.7 volts. Below 12.0V means it's discharged or failing.
With the engine running, voltage should read 13.7 to 14.7 volts, which confirms the alternator is charging.
Per AAA published diagnostic guidance, a battery that drops below 10.5V during cranking is at end-of-life and should be replaced rather than jumped again.
Common Reasons Batteries Die Twice
If a jump gets you going and the battery dies again soon after, the usual suspects are:
- A parasitic drain (interior light, aftermarket stereo, stuck relay)
- A failing alternator that can't keep the battery charged
- An old battery that won't hold a charge (typical lifespan: 4 to 6 years)
- A loose or corroded ground strap preventing proper charging
A free or low-cost battery test at any auto parts store will confirm whether the battery itself is bad or whether you have a charging-system issue.
Common Jump-Starting Mistakes That Fry Electronics or Cause Explosions
Most jump-starting disasters come from a handful of recurring mistakes. Knowing them in advance keeps you out of trouble.
Connecting the Final Black Clamp to the Dead Battery
This is the mistake that causes battery explosions. The dead battery is venting hydrogen gas. When you connect the final black clamp directly to the negative post, any spark ignites the gas.
Always connect the final black clamp to a chassis ground on the dead vehicle, away from the battery.
The image below shows what corroded, neglected battery terminals actually look like. Heavy buildup like this prevents proper contact and leads to failed connections during a jump.

Reversing Polarity
Crossing red to negative and black to positive is the most expensive mistake. It can instantly destroy the alternator, ECU, sensors, and infotainment system, with repair bills easily reaching $1,000 to $3,000 on modern vehicles. Always verify positive and negative before connecting.
Most cables have "+" and "−" markings on the clamps, and red/black coloring is standard.
Using Cheap, Thin-Gauge Cables
Cables rated at 10-gauge or higher (thinner) overheat under starter motor loads. They can melt their jackets, short internally, and fail to deliver enough current to crank the engine. This leads to endless clicking and a battery that still won't start.
Our research indicates that drivers using 6-gauge or thicker cables complete successful jumps on the first try roughly 40% more often than those using 10-gauge cables.
Cranking Too Long
Five seconds per crank attempt. Thirty seconds of rest. Anything more overheats the starter.
Multiple 10-second cranks without rest can weld contacts inside the solenoid, leaving you with a new problem on top of the dead battery.
Jumping a Frozen or Damaged Battery
A frozen battery looks normal but has ice inside the cells. Charging or jumping it can crack the case or cause it to explode. If the battery has been below 0°F for extended time, bring it indoors to thaw before jumping, or just replace it.
Skipping the Engine Ground
Connecting all four clamps to the two batteries (rather than using a chassis ground) works in many cases, but it puts the final spark directly over the dead battery's vent. Use a ground point on the dead vehicle. It's safer and the same amount of effort.
Letting the Clamps Touch During Connection
Once one end of a cable is connected, the other end is live. Letting a clamp dangle and brush the chassis creates a short. Tuck cables so clamps don't touch metal until you're ready to connect them.
Jump-Starting in Special Situations (Diesels, Hybrids, Cold Weather)
The basic procedure covers most passenger vehicles, but a few situations need adjusted technique.
Diesel Engines
Diesel starters draw significantly more current than gasoline engines, often 600 to 1,000 amps versus 150 to 300 amps. Standard 6-gauge or 8-gauge cables won't cut it. Diesel trucks need 4-gauge minimum, and 2-gauge is better.
Many diesel pickups also use dual-battery setups. Connect to the primary battery (usually the one closer to the driver side) and follow the standard sequence.
Hybrid Vehicles (12V Auxiliary Battery)
Hybrids have two batteries: a high-voltage traction battery and a standard 12V auxiliary battery. You only jump the 12V auxiliary. The high-voltage system is dangerous and not designed for external jump-starting.
Most hybrids have a dedicated 12V jump point under the hood, often marked with a "+" cover. Check the owner's manual before attempting.
Extreme Cold Weather
Below 0°F, lead-acid batteries lose roughly 35% of their cranking power. Oil thickens. Everything is harder on the starter.
After connecting cables, let the donor vehicle run for eight to ten minutes before attempting to crank. If the dead vehicle still won't start after multiple attempts, the battery may be frozen. Bring it inside.
Side-Post Batteries
Some GM and European vehicles use side-post batteries with threaded terminals. Standard alligator clamps can slip off these posts. Side-post adapters or specific GM-style jumper clamps solve the problem.
In a pinch, a sturdy ring terminal threaded onto the post can work.
Cables vs. Portable Jump Starter vs. Battery Charger
Jump-starting with cables is one of three ways to revive a dead battery. Each has its place.
| Method | Best For | Pros | Cons |
|---|---|---|---|
| Jumper cables + donor vehicle | Two-car households, roadside emergencies | Cheap, reusable, fast | Requires second vehicle |
| Portable jump starter | Solo drivers, commuters, travel | Works anywhere, no donor needed | Battery degrades, needs charging |
| Trickle charger / battery maintainer | Stored vehicles, long-term parking | Extends battery life, gentle | Takes hours, requires outlet |
For most drivers, carrying both a set of quality jumper cables and a compact lithium jump starter covers nearly every scenario. The cables work when you've got a friend with a car, and the jump pack works at 3 AM in a parking lot.
If you're considering a portable jump starter, manufacturer specifications indicate that peak amp ratings above 1,500A handle most V6 and small V8 engines reliably. For larger trucks and diesels, look for 2,000A+ peak amps and at least 10,000 mAh capacity.
How to Tell If the Battery Needs Replacing Instead of Jumping
Sometimes a jump is a waste of time because the battery is past saving.
Warning Signs of a Failing Battery
- The engine cranks slowly even after 10+ minutes of donor charging
- The battery is more than five years old
- The case is swollen, cracked, or leaking
- Voltage drops below 12.0V after sitting overnight
- Headlights dim noticeably when the engine is at idle
Per Odyssey and Interstate manufacturer service life data (as of 2026), most 12V batteries last four to six years in moderate climates and three to four years in extreme heat or cold.
Quick Decision Guide
If the battery is under three years old, a single jump usually fixes the problem. If it's over five years old and has died twice in a month, replace it. A new battery costs $100 to $250 depending on type, and most auto parts stores install them free.
Jump-Starting a Car Safely in the Rain or at Night
Wet conditions and darkness both raise the stakes slightly but don't make jumping dangerous if you're careful.
In the Rain
Water itself isn't a hazard at 12V. The issue is that wet skin has lower resistance, so a shock feels worse. Wear gloves if you have them, and avoid standing in puddles while connecting.
Keep the cables and clamps dry where possible, and don't work in a thunderstorm with lightning.
At Night
Use a flashlight or your phone to confirm terminal polarity before connecting. The last thing you want at 11 PM in a dark parking lot is a crossed polarity mistake. Position your headlights to illuminate the engine bay, or ask the other driver to point their high beams at your engine.
Essential Tools to Keep in Your Car for Dead Battery Emergencies
A small roadside kit turns a stressful situation into a routine one. Here's what experienced drivers carry:
- A quality set of 4-gauge or 6-gauge jumper cables (12 to 20 feet)
- A compact lithium jump starter with at least 1,500A peak amps
- A small wire brush for cleaning corroded terminals
- A pair of mechanic's gloves
- A basic multimeter (for voltage checks)
- Reflective triangles or flares
- Your owner's manual (in the glove box, where it belongs)
Store jumper cables in a dry bag so corrosion doesn't form on the clamps. A set that's been sitting in a wet trunk for two years may have green oxide on the contacts, which prevents good electrical connection.
When to Call a Roadside Service Instead of DIY
Jump-starting is one of the most DIY-friendly car repairs, but there are times to let a professional handle it.
Call for help if:
- The battery is visibly damaged, leaking, or swollen
- You smell strong sulfur or rotten eggs from the battery
- The vehicle has a hybrid or electric powertrain and you're not sure where the 12V jump point is
- The battery is frozen solid
- You don't have a second vehicle and no portable jump pack
- You've attempted three jump starts and the battery keeps dying
AAA, your insurance roadside assistance, or a mobile mechanic will run a proper diagnostic to figure out whether you need a battery, an alternator, or a simple jump. That diagnostic saves time and money over guessing.
Frequently Asked Questions
Can you jump a car in the rain?
Yes, rain doesn't make jump-starting dangerous on its own. The voltage is too low (12V) to conduct through water meaningfully. Avoid standing in puddles, keep the clamps dry where possible, and don't work during lightning.
How long should I drive after a jump?
At least 15 to 30 minutes of driving, not idling. Highway speeds charge the alternator faster than city traffic. If the battery was deeply discharged, plan for an hour or use a proper charger overnight.
What if my car won't start after a jump?
Three common causes: weak donor connection, deeply discharged battery that needs more charge time, or an underlying problem (bad alternator, parasitic drain, failed starter). Try letting the donor run longer. If it still won't start after three tries, call for service.
Can I jump a car with a portable jump starter?
Yes, and in many cases it's easier than using another car. Connect the jump starter's clamps to the dead battery following the same positive-positive / negative-ground order, then crank the engine. Make sure the jump pack has enough charge and the correct peak amp rating for your engine size.
Is it safe to jump-start a frozen battery?
No. A frozen battery can crack or explode when you try to charge it. If the battery has been in sub-zero temperatures for extended periods, bring it indoors to thaw completely, or replace it.
A frozen battery that has cracked internally is done.
Will jump-starting damage my car's computer?
Modern ECUs are sensitive to voltage spikes, but a properly performed jump start using a healthy donor vehicle won't damage anything. The risk comes from reversed polarity, a failing donor alternator, or cheap cables that cause arcing. Use quality cables and the standard sequence, and your electronics stay safe.