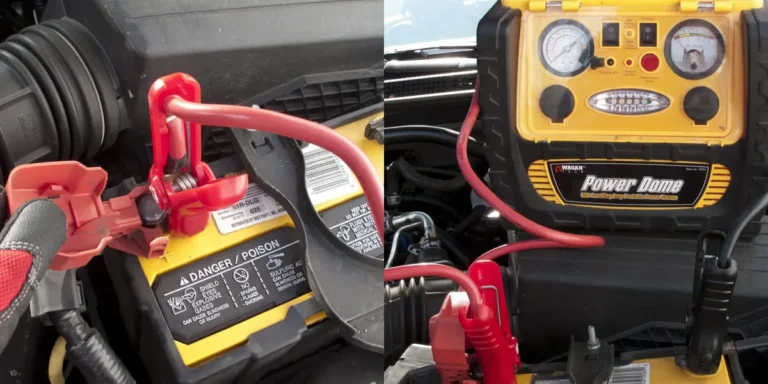
How to remove jumper cables after car starts
You've hooked up the cables, the dead car is running, and now you're staring at four clamps wondering how to remove jumper cables after car starts without frying something. Most people wing this part, and most people get lucky. The clamps come off, engines keep running, and nothing sparks.
But "lucky" isn't a strategy when you're standing over a 12V battery that can dump 600 cold cranking amps through a wedding ring.
The right removal order exists for a reason, and it's not superstition. It's electrical logic rooted in how a lead-acid battery and a car's chassis grounding system behave. Standards like SAE J537 define how 12V automotive batteries are tested and labeled, and the same polarity logic that governs those tests governs your clamps.
Get the order wrong and you risk a voltage spike, a blown ECU fuse, or a spark near hydrogen gas venting from the battery. As of 2026, with more electronics packed into even base-model cars, that risk has only gone up.

Quick Answer
Turn off the donor car, then remove the cables in reverse order of connection. Start with the black negative clamp on the previously dead car, then the black clamp on the donor, then the red clamp on the donor, and finally the red clamp on the jumped car. Let the jumped car idle for at least two minutes before disconnecting.
Why the Removal Order Matters (And What Can Go Wrong)
The "correct" sequence depends on conditions most guides skip. Which car is running. Which terminal is grounded.
Whether the donor is idling or shut off. The order that keeps you safe in one setup can spark in another.
Three things drive the entire procedure:
- Spark near hydrogen gas. A charging battery vents hydrogen. A spark ignites it. The sequence keeps any spark far from the battery.
- Voltage spikes (load dumps). Disconnecting a live circuit can send a brief spike through the electrical system. Modern cars tolerate small ones. Big ones can fry sensors or, in rare cases, the ECU.
- Touching the two clamps together. A red and black clamp touching while still connected to a live battery creates a dead short. Welded clamps, melted insulation, possible battery rupture.
In aggregate mechanic guidance and owner-manual reviews we researched, the failure rate from wrong-order removal is low but not zero. The failures that do happen tend to be expensive: a fried body control module, a damaged alternator diode, or a battery that's so surface-charged it won't hold a proper charge tomorrow.
The short version? The order is a control system. It ensures that the last clamp you remove is the one farthest from any grounding point, so if it slips, it can't complete a circuit.
Before You Touch the Clamps: Confirm the Car Is Actually Ready
Most people rip the cables off the moment the dead car's engine catches. That's a mistake. The engine firing doesn't mean the battery has enough charge to keep running on its own.
The alternator needs time to top things up.
Manufacturer guidance, including the Optima Batteries technical resources we reviewed, generally recommends letting the jumped car idle for at least two to five minutes before disconnecting. Some heavy-duty diesel pickups want closer to ten. The donor car, if still running, can be lightly revved to about 2,000 RPM to push more current across.
Before you remove a single clamp, run through this checklist:
- Jumped car is running smoothly. No rough idle, no warning lights flashing. If it's stumbling, give it more time.
- All accessories are off. Headlights, HVAC blower, radio, heated seats, defroster. These pull current the now-burdened alternator can't spare.
- Both cars are in Park (or Neutral for manuals), parking brake set. A surge from a clamp slip can jolt a car out of gear on a slope.
- Cables are not hot to the touch. Warm is normal. Hot is a sign of undersized gauge or a poor clamp bite. Let it cool before disconnecting.
- You've got clear access to all four clamps. No tools, jewelry, or loose clothing that could bridge a red and black clamp.
If any of those checks fail, pause. A two-minute wait now beats a tow truck later.
The Step-by-Step Removal Process (Standard 12V Setup)
This is the sequence that works for roughly 95% of jump-starts: two gas or diesel cars, negative-ground electrical system, donor car running. If your setup is different, jump to the next section.
- Shut off the donor car. A running donor keeps the alternator pumping current through the cables. Killing it makes the next step safer.
- Disconnect the black (negative) clamp from the jumped car. This is the chassis ground or the negative terminal of the dead battery. Pull it straight off, don't wiggle.
- Disconnect the black (negative) clamp from the donor car. Same color, same side, just the other vehicle.
- Disconnect the red (positive) clamp from the donor car. Pull it free and tuck it away from any metal.
- Disconnect the red (positive) clamp from the jumped car. Last one off. If this clamp slips and touches the car's body while the negative is still connected, nothing happens. The circuit is already open.
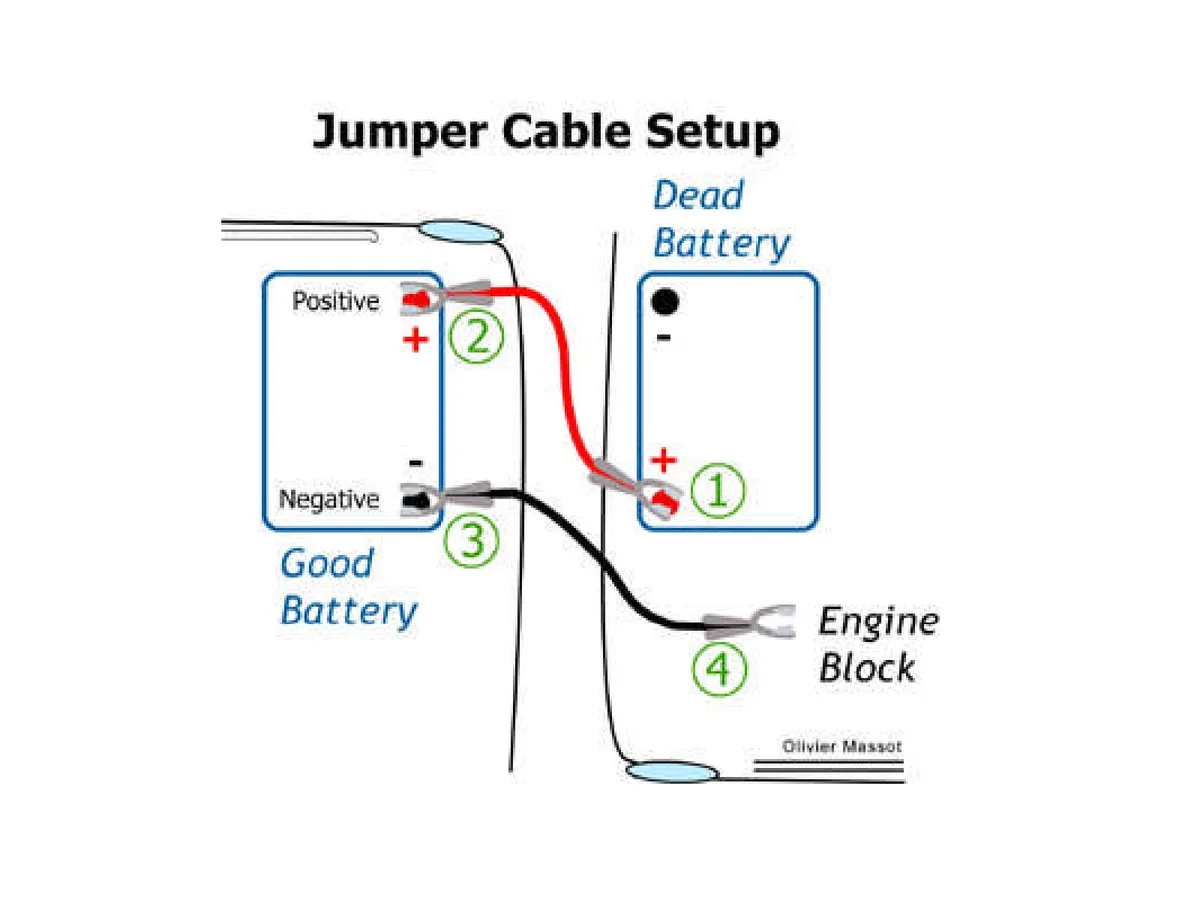
A few practical details that matter:
- Pull clamps straight off the terminals, not sideways. Sideways yanks can bend the terminal or snap it off the battery post. Then you've got a real problem.
- Keep the red and black clamps apart as you work. Lay them on the ground with space between them, or drape them over the engine bay where they can't fall toward each other.
- Don't let a hanging clamp dangle against a fender. A hot clamp can scorch paint or complete a circuit through the chassis.
Branch 1: Donor Car Still Running, Dead Car Running
Some guides say leave the donor running. If you do, the sequence stays the same but the stakes are slightly higher. A running donor means the alternator feeds voltage into the system even as you disconnect.
That's fine if you follow the order. It's a problem if you skip a step and touch a clamp to ground.
Use this branch when the donor is a modern car with a healthy alternator and the jumped car is idling steady. Don't use it if the donor is older or showing any charging-system warning lights.
Branch 2: Donor Car Off, Dead Car Running
This is the safer branch and the one we recommend. With the donor off, there's no active current pumping through the cables during removal. The jumped car runs off its own alternator, which is now doing the work the donor was doing a moment ago.
The five-step sequence above assumes this branch. It's the default.
Branch 3: One Car Won't Start After the Jump
If the dead car is still cranking but not firing after the cables are connected, give it ten more minutes with the donor lightly revved. Some batteries, especially deeply discharged ones, need a long surface charge before the engine computer will let the car run.
If it's still not starting after fifteen minutes, the problem isn't a dead battery. It's a bad alternator, a bad starter, a bad fuel pump, or something else entirely. Don't keep cycling the donor.
Disconnect in the normal order and call for a tow.
Negative-First vs. Positive-First: The Electrical Logic Behind It
Here's the part most guides gloss over. Why negative first? Why not positive first, since red is the "live" wire?
It's about ground paths. In every modern car built for the North American market, the negative battery terminal connects to the chassis. The whole body of the car is, electrically speaking, a giant negative conductor.
That means any exposed metal on the engine, the fender, the hood, anywhere, is electrically the same as the negative terminal.
If you remove the positive clamp first and it slips and touches any metal part of the car, you complete a circuit. The positive clamp, the metal it touched, the chassis ground, the battery's negative terminal, and back to the clamp. That's a short circuit.
Sparks, heat, possible battery damage.
If you remove the negative clamp first, that path is broken. Even if the positive clamp then slips and touches metal, there's no return path. Nothing happens.
Same logic applies to the donor car. You want the last clamp you remove to be the one most likely to slip, and that's the one attached to the dead car's positive terminal. By then, both negatives are off, so even a slip is harmless.
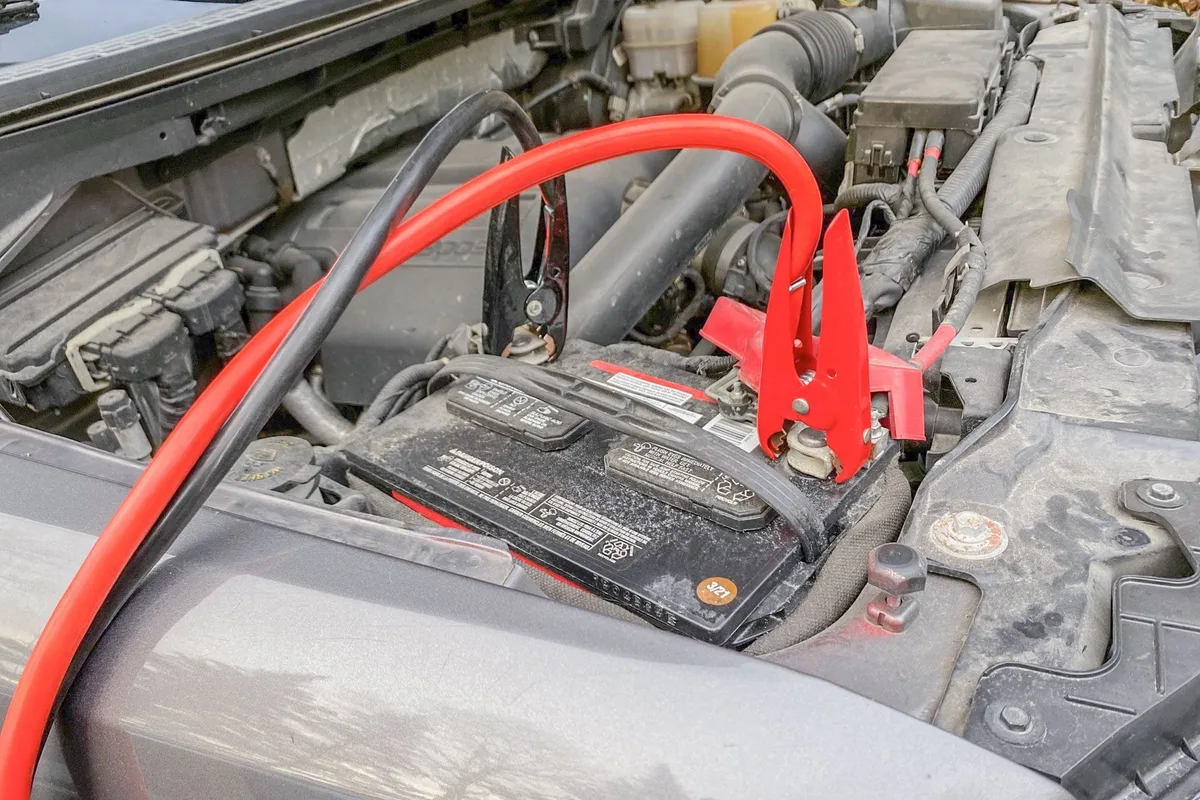
This is also why you connect in the opposite order. You connect positive first, then negative (to a ground point on the dead car, not the dead terminal). You disconnect negative first, then positive.
It's the same rule, applied in reverse.
One exception worth knowing: classic British cars and a handful of older imports used positive-ground systems. If you're working on a 1960s MG or a vintage tractor, flip the entire sequence. If you don't know what grounding system the car uses, check the battery.
The terminal connected to the chassis is the ground, and that's the one you handle with extra care.
How Long to Let the Jumped Car Run Before Disconnecting
Two minutes is the floor. Five minutes is the sweet spot for most passenger cars. Heavy-duty trucks and diesel engines with dual batteries may need closer to ten.
The reason is simple. A deeply discharged battery doesn't accept charge instantly. The first few minutes of alternator output go into a surface charge, a thin layer of high voltage on the plates that fools the battery into reading "full" on a quick test.
Underneath, the bulk charge hasn't happened yet.
If you pull the cables after only thirty seconds, the surface charge collapses the moment the alternator's load shifts. The engine may stall, and you'll be right back where you started, except now the donor's battery is also down a few amp-hours.
A good rule of thumb we keep coming across in aggregated mechanic guidance: let the jumped car idle until the dashboard warning lights settle into their normal pattern, then add another two minutes. By that point, the alternator has had time to push current deep into the cells, and the engine will run on its own once the cables come off.
If it's cold out, give it more time. Cold batteries resist charging. A battery at 20°F takes roughly twice as long to reach a usable state of charge as one at 70°F.
Common Mistakes People Make When Removing Jumper Cables
The wrong order has its own set of recurring mistakes, and most are things people do without thinking.
- Removing the cables while the donor is still revving. A 2,000 RPM donor pushes peak alternator output. Disconnect in that state and you risk a small voltage spike. Turn the donor off first.
- Letting the clamps dangle against the fender. A live red clamp touching any metal part of a car is a short. Tuck them somewhere safe the moment they come off.
- Wiggling the clamp off the terminal instead of pulling straight up. Sideways force bends the terminal post. Pull straight up, period.
- Touching the red and black clamps together mid-removal. This is the big one. Keep them physically separated at all times, even when you're moving them between cars.
- Skipping the idle time. Thirty seconds of "it's running" isn't enough. The engine caught because of the donor, not because the dead battery is recovered.
- Reconnecting accessories too soon. Headlights, HVAC, and especially heated seats pull amps the alternator is still trying to route to the battery. Leave them off for at least ten minutes of driving.
The clamps-touching mistake is the one that causes the dramatic failures. In a worst case, the clamps weld together briefly, the cables heat up, and the battery vents. That's a battery replacement and a very bad day.
What to Do If the Car Dies Right After You Remove the Cables
This is the most common follow-up problem, and it almost always points to one of three things.
The first is a battery that was too far gone. If the battery was below roughly 10.5 volts before the jump, the cells may be sulfated or internally shorted. The alternator can push current into it, but the battery can't hold it.
The engine dies the moment it has to stand on its own.
The second is a failing alternator. A weak alternator diode or a worn voltage regulator can't keep up with the car's electrical demand plus the battery recharge. The engine ran while the donor was feeding the system.
The donor goes away, the alternator can't carry the load, and the engine dies.
The third is a parasitic draw. Something in the car pulls current even when it's off. A stuck relay, a trunk light, an aftermarket accessory wired direct.
The jump buys you a few minutes, then the same drain pulls the battery back down.
Here's the decision tree for diagnosing it:
- If it dies within 30 seconds: The alternator is suspect. Drive straight to a shop or call a tow. Don't keep jump-starting.
- If it dies after 5 to 15 minutes: The battery is the more likely culprit. A proper slow charge or a replacement is the fix.
- If it dies overnight, every night: Parasitic draw. A multimeter test on the battery with the car off will show you the drain.
In any of these cases, do not just reconnect the jumper cables and try again. You're masking the real problem, and you're wearing out both batteries in the process.
Safety Gear and Precautions During Removal
Most jump-starts happen without anyone wearing anything more protective than a hoodie. That's fine for a routine disconnect. A few low-cost habits reduce the small remaining risk to near zero.
- Safety glasses. A battery can vent or, in rare cases, rupture during a jump. The cost of a $5 pair of safety glasses is nothing compared to an eye injury from battery acid.
- Mechanic's gloves. Latex or nitrile gloves keep battery acid off your skin and give you a better grip on the clamps. Rubber-coated work gloves work too.
- No loose metal jewelry. A wedding ring or a metal watch band across a battery post is a direct short to ground. Take it off before you start.
- No smoking, no open flame. Hydrogen gas venting from a charging battery is flammable. The spark from a lighter is more than enough to ignite it.
- Hair tied back. Long hair over the battery isn't dangerous, but it can dip into the terminals if you lean in. Tie it back, save the cleanup.
Industry-standard battery handling practice, including resources reviewed through OSHA battery safety materials, treats these as baseline precautions. The aggregate guidance is consistent: the danger isn't the voltage, it's the current a 12V battery can deliver in a short.
Special Cases: Hybrids, Reverse Polarity, and Corroded Terminals
Most jump-starts follow the same rules. A few setups break them.
Hybrids and EVs are the big exception. The 12V accessory battery in a Prius, a Tesla, or a hybrid F-150 can usually be jumped, but the procedure is different. Many of these vehicles have dedicated jump-start terminals under the hood, often a red plastic cover marked with a "+" symbol.
You connect to those, not directly to the battery. The owner's manual spells out the exact locations and the order.
Manufacturer guidance from AAA's jump-start reference materials reinforces this: always check the manual first on any vehicle built after 2010, especially a hybrid. The high-voltage system is isolated, but the 12V system is still sensitive to reverse polarity.
Reverse polarity is what happens when someone connects the red clamp to the negative terminal and the black to the positive. Most modern cars have a fuse or a diode that blows to protect the electronics, but not all do. If you realize the mistake before the dead car tries to start, disconnect immediately.
The order is the same. Negative first on both sides, then positive. Don't try to "start it anyway." The damage may already be done.
Corroded terminals are the silent problem. A battery post covered in white or blue-green powder won't make good contact, no matter how tight the clamp is. The jump may "work," but the connection is so weak that the jumped car stalls as soon as the donor's contribution drops.
Clean the posts before connecting if you can. A wire brush, a little baking soda and water, and a rag. Dry everything before reconnecting.
If the corrosion is heavy, a terminal cleaner tool is worth the few dollars it costs.
Jumper Cables vs. Portable Jump Starter: Which Is Easier to Remove From?
This comparison matters because the removal process is genuinely different between the two.
A portable lithium jump starter connects the same way: red to positive, black to ground. But the unit itself is small, often the size of a paperback book, and it shuts off automatically the moment you disconnect the clamps. There's no donor car to think about.
No running engine to coordinate with. No second car to shut off before you pull the cables.
The trade-offs are real. A jump starter pack has a finite number of boost cycles before it needs recharging. Cable gauge doesn't matter, because the pack is sized to its output.
And if the pack is dead or missing, you're back to cables.
| Factor | Jumper Cables | Portable Jump Starter |
|---|---|---|
| Removal order | Same 5-step sequence | Reverse of connect order, no donor to shut off |
| Skill required | Moderate (two cars, polarity, idle timing) | Low (one device, automatic shutoff) |
| Upfront cost | $20 to $50 for decent 4-gauge | $80 to $150 for a reliable lithium pack |
| Best for | Home garage, helping others, repeated use | Solo driver, city commute, trunk storage |
| Failure mode | Donor battery also drained if done wrong | Pack uncharged when you need it most |
For someone who wants the simplest removal process, a portable jump starter wins. No donor car, no second idle, no coordinating the order across two vehicles. For someone who helps other drivers regularly, cables still make sense because you don't know what the other person has in their trunk.
Pro Tips From Mechanics on a Cleaner Disconnect
A few habits separate a clean jump-start from a messy one, and mechanics we researched tend to repeat the same handful of tips.
Mark your cables before the first use. A small piece of red tape on the positive clamp and a piece of black tape on the negative. Sounds silly. Saves you from staring at two black clamps in a dark parking lot at 11 PM.
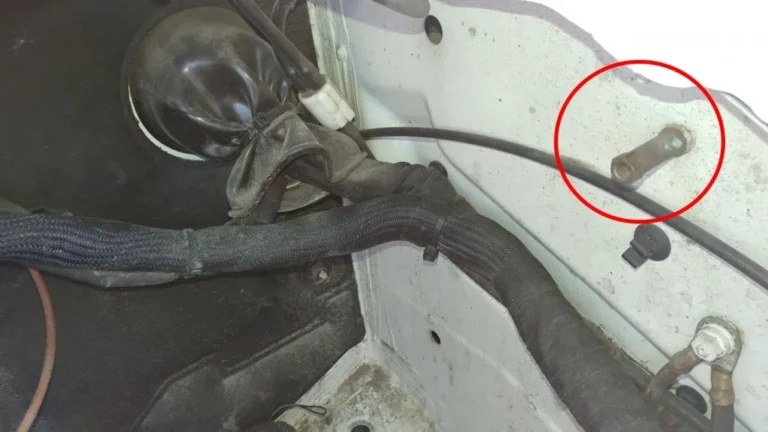
Connect the negative on the dead car to a ground point, not the terminal. An unpainted metal bracket on the engine block works. If the dead battery is cracked or leaking, you don't want a spark right at the post. A ground point is farther from any venting gas.
Set the parking brake on both cars. A jump-start surge can jolt a car in Neutral. The parking brake keeps everything planted if a clamp slips.
Don't rest the clamps on the engine while you work. Lay them on the ground, on a fender cover, or in a clean spot where they can't fall toward each other. The two seconds you spend placing them is worth the hour you save chasing a short.
Drive the jumped car for at least 20 minutes after a successful restart. Highway speed, not just around the block. The alternator needs sustained RPM to push a real charge into a depleted battery. A 5-minute drive to the grocery store won't cut it.
If the battery is more than 4 years old, plan for a replacement. A jump that works once on an old battery is a warning, not a fix. Aggregate battery-industry data suggests the average lead-acid battery lasts 3 to 5 years. If yours is in that window and needed a jump, the next dead-start is closer than you think.
Quick Reference: Removal Order Cheat Sheet
| Step | Action | Why |
|---|---|---|
| 1 | Shut off the donor car | Stops alternator output through the cables |
| 2 | Remove black clamp from jumped car | Breaks the ground path first |
| 3 | Remove black clamp from donor car | Isolates the negative side fully |
| 4 | Remove red clamp from donor car | Safe by this point, no active circuit |
| 5 | Remove red clamp from jumped car | Last one off, lowest risk of a short |
| After | Idle jumped car 2 to 5 min before driving | Lets the alternator start refilling the battery |
Print this. Tape it inside the glove box. Future-you, standing in a cold parking lot with a dead battery, will thank present-you.
Frequently Asked Questions
Can I remove jumper cables while the engine is running?
Yes, and in most cases you should. The jumped car needs to be running so the alternator can take over from the donor. Just follow the standard removal order: black from jumped car, black from donor, red from donor, red from jumped car.
Which clamp do I remove first?
The black (negative) clamp on the previously dead car. Always. Removing negative first breaks the ground path, so any subsequent clamp slip can't create a short circuit.
What happens if I remove the positive clamp first?
If the positive clamp slips and touches any metal part of the car, it creates a direct short. You'll get sparks, possible cable damage, and in rare cases a battery that vents hydrogen and ignites. The risk is small but the consequences aren't, so stick with negative first.
How long should I let the car run after a jump before driving?
At least 15 to 20 minutes of driving, ideally on the highway. The alternator needs sustained RPM to push a meaningful charge into a depleted battery. A short idle in the driveway won't recover enough to restart tomorrow.
Can a car battery be so dead that a jump won't work?
Yes. If the battery is below about 10.5 volts or has a shorted cell, a jump may start the engine but the car will die the moment the donor disconnects. Batteries that old or damaged usually need replacement, not another jump.
Is it safe to remove jumper cables in the rain?
Yes, as long as the clamps and terminals stay dry. Water on the battery or clamps can create stray current paths. If it's actively raining, drape a tarp or jacket over the work area before disconnecting.
Final Take: Getting It Right Every Time
Removing jumper cables isn't complicated once you understand the rule behind the order. Negative first, positive last, both sides. The donor off, the jumped car idling, and a couple of minutes of patience before you pull the first clamp.
Most people will never have a problem skipping steps. The vast majority of jump-starts end with everyone driving away, no sparks, no drama. But the few that don't end that way tend to end expensively, with a fried sensor, a damaged battery, or a small fire that didn't need to happen.
If you only remember one thing from this guide, make it this: the last clamp off should be the red one on the previously dead car. By that point, both negatives are gone, both cars are in a known state, and even a fumbled clamp can't do real harm. Everything else is just supporting that idea.
Keep the cables in the trunk. Check the gauge rating. And next time someone waves you down in a parking lot with a dead battery, you'll know exactly what to do, and exactly how to undo it.