How to get a jump start: The complete guide
That clicking sound on a cold morning, the dashboard lights flickering, the engine refusing to turn over. We have all been there, and figuring out how to get a jump start is one of the most practical car skills you can learn. The good news is that the actual process takes under ten minutes once you know the right sequence.
The bad news is that one wrong cable connection can cost you a thousand dollars in electrical damage, which is why the order matters more than the speed.
The fix depends on what you have available: a set of jumper cables and a willing driver, or a portable jump starter in your trunk. Most modern cars use a 12V lead-acid battery, and per the Battery Council International group sizing standards, anything below 11.8 volts at rest is considered deeply discharged. Let us walk through the conditions first, then the exact steps for each path.
Quick Answer
To get a jump start, connect a charged power source to your dead battery in the correct order. Red clamp to the dead battery's positive terminal first. Then red to the donor battery's positive.
Black to the donor's negative. Black last to an unpainted metal ground on the dead car. Start the donor vehicle.
Wait 2 to 3 minutes. Crank the dead car. Disconnect in reverse order.

What Your Car Is Actually Telling You When It Won't Start
Before you grab any cables, your car is giving you clues about what's really wrong. A jump start fixes a dead battery, but it does not fix a bad alternator, a broken starter, or a battery that has sulfated past the point of recovery. Knowing the difference saves you from a jump that "works" today but strands you again tomorrow.
Here is the decision tree most mechanics use:
- Click-click-click but no crank: Almost always a dead battery. The solenoid is trying to engage, but there is not enough amperage. Jump starting is the right call.
- Single loud click, then silence: Could be the battery, but more often it points to a bad starter or a loose or corroded battery cable.
- No sound at all, no lights: Either the battery is completely dead, a main fuse has blown, or the terminals are so corroded that no current flows at all.
- Engine cranks slowly but won't fire in cold weather: Often a weak battery combined with thickened engine oil. A jump usually solves it, and a block heater prevents it next time.
- Jump works, car dies within minutes of driving: The alternator is not recharging the system. You need a mechanic, not another jump.
A quick voltage check before you start also helps. A healthy resting battery reads 12.4 to 12.7 volts. Anything below 12.0 volts means it is significantly discharged.
Below 11.8 volts and the battery is at or near zero. Manufacturer specifications from major battery makers (per SAE International J537 testing standards) generally classify a battery as "discharged" once it falls under 12.0 volts at rest.
Jumper Cables vs. Portable Jump Starter: Which Path Fits Your Situation
This is the first real fork in the road. The answer depends on three things: whether another car is available, where you are stranded, and how often you want to deal with this in the future.
| Situation | Best Option | Why |
|---|---|---|
| You have a friend or second car nearby | Jumper cables | Cheap, reliable, no charging needed |
| You're alone in a parking lot or rural area | Portable jump starter | No donor vehicle required |
| You drive a diesel truck or large SUV | Heavy-duty cables (2 or 4 AWG) | Diesel engines need 800 to 1,000+ cranking amps |
| Your car sits for weeks at a time | Battery tender + jump pack | Prevents the problem entirely |
| You want a one-time fix and a tow is coming | Either works | Just get the car started |
A few quick context points from our research into consumer data as of 2026: portable lithium jump starters have dropped significantly in price and now routinely deliver 1,000 to 2,000 peak amps in a unit the size of a paperback book. That is enough for almost every gasoline passenger car on the road. Diesel trucks and large V8 engines still benefit from heavier cables or a higher-rated jump pack (1,500+ peak amps).
Aggregate user reviews indicate the main failure with jump packs is owners forgetting to recharge them, so picking one with a battery level indicator helps avoid the embarrassment of a dead jump box.
If you go the cable route, gauge matters more than brand. Lower AWG numbers mean thicker wire and better current flow. For most cars, 6 AWG is the practical minimum.
For trucks and diesels, 4 or 2 AWG is worth the extra cost.
What You'll Need Before You Do Anything
Preparation is the difference between a 5-minute fix and a 30-minute ordeal with a trip to the auto parts store. Before you turn a single clamp, run through this short list.
Tools and materials:
- Jumper cables (4 to 6 AWG for most cars, 2 AWG for diesel) or a fully charged portable jump starter
- Safety glasses and gloves (batteries vent hydrogen gas and can crack if shorted)
- A wire brush or old toothbrush for cleaning corroded terminals
- Your vehicle's owner's manual (some cars have remote jump posts instead of direct battery terminals)
- A flat, stable surface to park on, with both cars in Park or Neutral with parking brakes set
Environmental checks:
- Both engines off, keys out of ignitions
- Headlights, radio, climate control, and any plugged-in accessories (phone chargers, dashcams) turned off
- No open flames, cigarettes, or sparks near the battery
- Battery cases inspected: no cracks, bulges, leaks, or ice inside the cells
- Donor vehicle's battery matches voltage (12V to 12V in nearly all modern cars)
One more thing that catches people out: many cars built after 2015 have a designated remote jump post under the hood, often a red plastic cover near the fuse box. The actual battery may be tucked in the trunk or under a seat. Check the owner's manual or the under-hood diagram, since connecting directly to a hidden battery sometimes means wrestling with covers and air intakes.
The remote post gives you a clean, accessible connection point and is engineered to handle the current.
How to Jump Start a Car With Cables (The Donor Vehicle Route)
This is the classic method, and when done in the right order, it is safe for both vehicles and their electronics. The key thing to internalize is the sequence: positive first, negative last, and the final black clamp goes to a ground, not the dead battery's negative post.
Step 1: Position the Vehicles
Park the donor car close enough that the cables reach comfortably, but make sure the two cars never touch. Metal-to-metal contact between running vehicles can create a ground path you do not want. Both cars in Park (or Neutral for manuals), parking brakes set, engines off, heaters and accessories off.
Step 2: Identify Terminals on Both Batteries
Positive is almost always marked with a "+" symbol, a red cover, or red coloring. Negative uses "−", a black cover, or black coloring. If the markings are worn off, trace the wire from the terminal: the positive cable usually goes to the fuse box or starter, the negative bolts to the chassis or engine block.
Step 3: Connect in This Exact Order
This sequence exists to minimize sparking near the battery, which can ignite hydrogen gas:
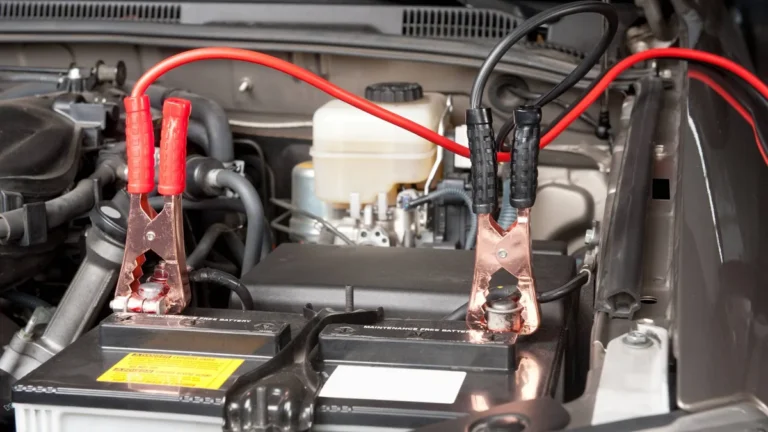
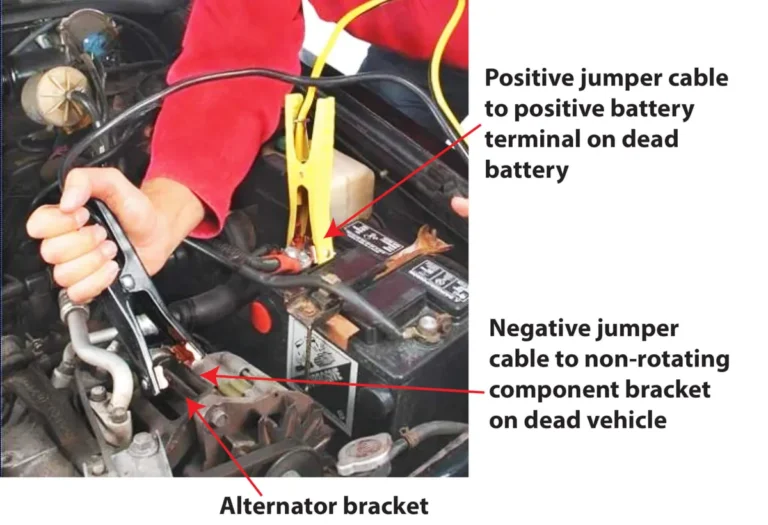
- Red clamp to the dead battery's positive (+) terminal.
- Red clamp to the donor battery's positive (+) terminal.
- Black clamp to the donor battery's negative (−) terminal.
- Black clamp to an unpainted metal ground on the dead car (a bracket, bolt, or engine lift point), at least 12 inches away from the battery.
Step 4: Start the Donor Car and Let It Idle
Run the donor engine at a slightly raised idle (1,500 to 2,000 RPM) for 2 to 3 minutes. This pushes charge into the dead battery before you attempt to crank. In cold weather, give it a full 3 to 5 minutes.
Step 5: Try to Start the Dead Car
Turn the key (or press the start button) for no more than 5 to 10 seconds. If it cranks and fires, great. If not, wait another minute and try again.
Three failed attempts in a row usually means the battery is too far gone, or there is a deeper electrical fault.
Step 6: Disconnect in Reverse Order
Once the dead car is running:
- Black clamp off the ground point on the (now running) dead car.
- Black clamp off the donor battery.
- Red clamp off the donor battery.
- Red clamp off the formerly-dead battery.
Do not shut off either car. The dead battery needs to stay connected to a running engine (or the donor's engine) to start accepting a charge.
Step 7: Drive to Recharge
Keep the formerly-dead car running and drive it for at least 20 to 30 minutes. Highway speed is better than idling because the alternator produces more current at higher RPM. This brings the battery back up to a usable state, though it will not be fully charged from a drive alone.
A proper recharge takes several hours on a battery charger, or overnight on a trickle charger.
⚠️ Important: If the car dies again shortly after disconnecting, the alternator is the most likely culprit, not the battery. A voltmeter across the battery while the engine runs should read 13.7 to 14.7 volts. Anything outside that range means the charging system needs professional attention.
How to Jump Start a Car With a Portable Jump Pack (Solo Method)
This is the route most modern drivers end up taking, because it does not require a second vehicle, a good Samaritan, or even cell service. A portable jump starter is a compact lithium battery pack with jumper cables hardwired into it, and in our research they have become the single most common piece of emergency gear sold as of 2026.

The core process is similar to the cable method, but with one big safety advantage: most quality jump packs have built-in reverse-polarity alarms, spark-proof clamps, and short-circuit protection. That removes the most catastrophic failure mode (crossed cables frying an ECU) for anyone who connects them backward.
Here is how to do it cleanly:
- Confirm the jump pack is charged. Most units have a battery level indicator or LED readout. Anything below 50% may struggle to crank a larger engine, especially in cold weather.
- Turn off the car and all accessories. Headlights, climate control, radio, USB chargers, all of it. You want every amp going to the starter.
- Connect the red clamp to the dead battery's positive (+) terminal.
- Connect the black clamp to an unpainted metal ground on the car's chassis or engine block, the same 12-inch-away-from-battery rule applies.
- Power on the jump pack if it has a manual switch (some models auto-detect).
- Wait 30 seconds to 1 minute for the pack to push initial charge into the dead battery.
- Crank the engine for up to 5 seconds. If it does not start, wait a full minute and try again.
- Once the engine is running, disconnect the black clamp first, then the red clamp. Leave the engine running.
A few details that matter in the real world:
- Cold weather eats capacity. A jump pack rated for 2,000 peak amps at room temperature may only deliver 1,200 in sub-freezing conditions. Keep the pack inside the car (not the trunk in winter) so it stays warm.
- Recharge the pack afterward. Most lithium jump starters need 3 to 6 hours on a USB-C or wall charger to refill. Make it a habit: jump the car, drive home, plug the pack in.
- Storage matters. Per U.S. Department of Transportation guidance on lithium battery shipping, these packs should be stored at around 50% charge if you are not using them for months at a time. Storing at 100% or 0% for long periods shortens battery life.
The Exact Cable Connection Order (And Why Getting It Wrong Costs You)
Let us spell this out one more time, because this is the part where expensive damage happens. The connection order is not a tradition or a habit. It is a deliberate safety sequence designed around one fact: lead-acid batteries vent hydrogen gas, which is explosive in the right concentration.
Here is the order, and the reason for each step:
| Step | Connection | Why This Order |
|---|---|---|
| 1 | Red clamp → dead battery (+) | Establishes positive side first |
| 2 | Red clamp → donor battery (+) | Completes the positive circuit |
| 3 | Black clamp → donor battery (−) | Negative side, but away from dead battery |
| 4 | Black clamp → chassis ground on dead car | Final spark happens here, far from hydrogen gas |
The reverse order applies when disconnecting: black ground off the dead car first, then everything else.
What happens if you cross the cables? At minimum, you blow one or more fuses. At worst, you reverse-polarity the ECU and other control modules, which can run from a few hundred to several thousand dollars to replace.
The battery itself can overheat, vent violently, or crack its case. Sparking directly on a battery post is the most common cause of battery explosions, which throw sulfuric acid across the engine bay.
If you hear a loud pop, smell rotten eggs (sulfur), or see battery fluid leaking, stop immediately. Disconnect the cables (in reverse order, carefully), and call for service. Do not crank the engine with a damaged battery.
What to Do When Nothing Happens After the Jump
Sometimes you do everything right and the engine still does not crank. Do not panic, and do not just keep cranking. Each attempt drains both the donor and the dead battery, and after 4 or 5 failed tries you are out of usable charge.
Run through this checklist before calling for a tow:
- Are the clamps making solid metal-to-metal contact? Paint, corrosion, or grease between the clamp and terminal blocks current. Wiggle the clamps to bite through any oxidation.
- Is the donor engine running at high idle? Rev it to 2,000 RPM for another 2 to 3 minutes, then retry. The alternator needs RPM to put out real current.
- Are the cables thick enough? Cheap 10 AWG cables lose a lot of current over their length. If the donor car has small-gauge cables, this might be your bottleneck.
- Is the dead battery actually receiving charge? A voltage test at the dead battery posts (with the donor running) should show climbing voltage. If it stays flat at 11.8V or below, the battery is internally shorted and will not take a charge.
- Is there a main fuse blown? Check the under-hood fuse box for a large fusible link, often labeled "BAT" or showing a high amperage rating (80A to 250A). A blown link stops all current flow even with good cables.
If you have tried everything above and still get nothing, the problem is almost certainly not the battery. It is the starter, the ignition switch, or a wiring fault. At that point, a tow to a mechanic is the right call.
How to Jump Start Specific Vehicles: Diesel, Hybrid, Motorcycle, Classic
Most jump-start guides treat every car the same, but the details change depending on what you are driving.
Diesel trucks and large SUVs. Diesel engines need far more cranking amps than gasoline engines, often 800 to 1,000+ CCA, more in cold weather. Use 2 or 4 AWG cables, run the donor at high idle for a full 5 minutes before cranking, and let the glow plugs do their cycle (you will see the wait-to-start light). Attempt cranking for up to 15 seconds; diesel starters are built for it.
Hybrid vehicles (Toyota Prius, Ford Escape Hybrid, etc.). The 12V auxiliary battery in a hybrid jump starts exactly like a regular car. It is usually located under the hood or in the trunk. The high-voltage traction pack is completely isolated and safe, as long as you stay away from the orange cables.
Per manufacturer guidance, never use a hybrid as a donor vehicle to jump another car, since the 12V auxiliary battery is small and not designed for that load.
Motorcycles and ATVs. These use 12V batteries but with much smaller capacity (often 8 to 18 Ah). A standard car jump pack will work, but keep the cranking attempts to 3 seconds or less. The smaller starter motors can be damaged by the high inrush current from a heavy-duty pack.
Classic cars (pre-1980). Many classics run on 6V positive-ground systems. Do not jump a 6V battery with a 12V source; you will fry every bulb and many of the electronics. If your classic has been converted to 12V, treat it like any modern car.
Jump Starting in Cold Weather: The Frozen Battery Rule
Cold is the number one killer of car batteries, and it adds a layer of risk that warm-weather jumpers never think about. A fully charged battery loses about 35% of its cranking power at 0°F, and a weak battery loses more. That is why so many dead-battery calls happen on the first truly cold morning of winter.
But there is a rule that overrides everything else: never attempt to jump a frozen battery. A frozen battery has ice inside the cells, and cranking it can crack the case. Sulfuric acid and hydrogen gas then leak out, which is a serious safety hazard.
How to tell if a battery is frozen:
- The case looks swollen or bulging.
- You can hear sloshing that sounds chunky or wrong (ice crystals moving).
- The battery feels solid or unusually heavy.
- There is visible condensation or frost on the case.
If the battery is frozen, bring it inside (if removable) or wait for a warm day. A trickle charger on a frozen battery does nothing; the internal resistance is too high for current to flow.
For cold-weather driving in general, our research shows a few habits that reduce dead-battery calls dramatically:
- Keep the jump pack inside the cabin, not the trunk, so it stays warm.
- Use a battery tender (a 1 to 2 amp smart charger) on any vehicle that sits outside unused.
- Consider an engine block heater if you park in sub-freezing temperatures regularly.
- Test the battery every fall before cold weather sets in. Most auto parts stores do this for free.
Safety Mistakes That Can Fry Your ECU or Blow Up Your Battery
We have covered most of these in context already, but they are important enough to consolidate. These are the mistakes that turn a routine jump into an expensive lesson, drawn from aggregate user feedback and manufacturer safety bulletins.
- Reversing the cables (red to negative, black to positive). The single most damaging error. Modern cars are far more sensitive to this than older models.
- Connecting the final black clamp to the dead battery's negative post. It will often "work," but the spark is right on the battery vent, where hydrogen gas collects. Always use a chassis ground.
- Smoking or using open flames near the battery. Hydrogen plus spark equals explosion. This sounds obvious until you are leaning over the engine bay troubleshooting.
- Cranking for more than 10 seconds at a time. The starter motor overheats, and the cables get hot enough to melt insulation. Wait a full minute between attempts.
- Jump starting a visibly damaged battery. Cracked case, leaks, bulges, ice inside the cells. Replace the battery instead.
- Leaving the car idling to "fully charge" the battery. Idling does not put out enough alternator current to fully recharge. A 30-minute drive at road speed is more effective than an hour of idling.
- Forgetting to turn off accessories before disconnecting. When you remove the last cable, a voltage spike can travel through the system. Turning the car off and removing the key first protects the electronics.
Per OSHA general guidance on vehicle battery handling, always wear safety glasses and keep bystanders (especially kids) a few feet back. Batteries look benign but store serious chemical and electrical energy.
How Long to Drive After a Jump to Actually Recharge
A jump start gets the engine running, but it does not recharge the battery. The alternator does, and it does so gradually. Based on manufacturer specifications and aggregate testing data, the alternator typically puts out 40 to 100 amps at idle (depending on the vehicle) and 100+ amps at road speed.
Here is what that means in real driving terms:
- 20 minutes of city driving (stop-and-go): Brings a deeply discharged battery up to about 75% charge. Enough to start the car a few more times, but not enough for reliable cold-weather starting.
- 30 to 45 minutes of highway driving: Reaches 85 to 90% charge. This is the practical sweet spot for most drivers after a jump.
- Several hours or overnight on a smart charger: Full 100% charge, plus cell balancing that extends battery life.
If your schedule is tight and the battery was only mildly discharged (you left the headlights on for an hour, for example), a single 30-minute drive is usually enough. If the battery was deeply discharged or is older than 4 years, plan on driving straight to a shop for a proper test and recharge. The alternator is not designed as a battery charger, and using it that way shortens alternator life over time.
When the Jump Worked But the Battery Won't Stay Charged
This is one of the most common follow-up scenarios, and it is also the one where people get stuck buying the same dead battery twice. If your car starts fine after a jump but is dead again the next morning, you have one of three problems:
- The battery is at the end of its life. Lead-acid batteries typically last 3 to 5 years. Once they start losing capacity, they discharge faster than the alternator can keep up with normal use.
- Parasitic drain. Something is pulling current when the car is off. Common culprits include aftermarket stereos, alarm systems, phone chargers left plugged in, stuck relay switches, and trunk or glovebox lights that do not turn off.
- The alternator is failing. Less common, but it shows up as a battery that dies while driving, not just sitting. Dim headlights at idle is a tell.
A free load test at any auto parts store tells you whether the battery itself is healthy. If it passes, the problem is drain or alternator. If it fails, replace the battery and check the charging system at the same time.
How to Know If It's the Battery or the Alternator
Quick diagnostic for anyone without a mechanic on speed dial:
- Engine starts, then dies shortly after disconnecting the donor battery. Alternator is the prime suspect. The battery has enough charge to run the starter, but nothing is replenishing it.
- Engine runs fine but is dead the next morning. Battery is the prime suspect, or there is parasitic drain.
- Battery warning light on the dashboard. Almost always the alternator or voltage regulator.
- Lights dim when you turn on accessories (A/C, rear defrost, heated seats). Alternator is struggling to keep up with demand.
A voltmeter check while the engine is running gives a quick answer: 13.7 to 14.7 volts means the alternator is doing its job. Below 13.5 volts means it is undercharging. Above 15 volts means it is overcharging, which is just as bad for the battery.
Per SAE International J537 standards, a healthy 12V charging system should sit in that 13.7 to 14.7V window under load.
Picking the Right Jumper Cables or Jump Pack for Your Car
We are not picking brands here, just specs that match your vehicle. Choose based on your engine size and how you actually drive.
For a typical 4-cylinder or V6 sedan:
- Cables: 6 AWG, 12 to 16 feet long
- Jump pack: 1,000+ peak amps, 8,000+ mAh capacity
For a V8 or large SUV:
- Cables: 4 AWG, 16 to 20 feet long
- Jump pack: 1,500+ peak amps, with a "boost" or "override" mode for stubborn engines
For a diesel truck:
- Cables: 2 AWG, 20+ feet long, with heavy-duty clamps
- Jump pack: 2,000+ peak amps, and accept that some cold mornings will still need a second vehicle
A few features worth paying a little more for, based on aggregate user reviews:
- Reverse-polarity alarm (beeps if you connect backward)
- Built-in flashlight (you will thank yourself at 6 AM in a dark parking lot)
- USB output for charging a phone in an emergency
- Battery level indicator (so you know the pack is actually charged)
Skip features that look good on paper but rarely help: built-in air compressors (too small for car tires), built-in radios (your phone handles this), and excessive "wall charger included" claims (most use standard USB-C now).
Jumper Cable Maintenance: Making Them Last
Cables are one of those things people buy once and shove in the trunk for years. A little care keeps them working when you actually need them.
Store them loosely coiled, never kinked. Hanging them on a hook is even better. The copper strands inside jumper cables fatigue and break at sharp bends, which is why cheap cables that live as a tight ball under the trunk mat stop carrying full current after a season or two.
Inspect the clamps and insulation once a year. Look for cracked handles, exposed wire near the clamp jaws, or green corrosion on the copper teeth. A wire brush and a dab of dielectric grease on the contacts after each use keeps oxidation down.
Test them before you trust them. If you have never actually used your cables, do a dry run on a working car. The clamps should bite firmly, and the cables should feel neither warm nor flexible after a 10-second crank.
If they do, the gauge is too thin for your vehicle.
Battery Tender vs. Trickle Charger vs. Smart Charger
If you own a vehicle that sits for more than two weeks at a time, a battery tender is the single best purchase you can make. It prevents the dead-battery scenario in the first place, which means you will almost never need the jump-start process at all.
| Charger Type | Best For | Key Trait |
|---|---|---|
| Trickle charger | Short-term storage (1 to 4 weeks) | Constant low current, can overcharge if left on |
| Battery tender (float charger) | Long-term storage (months) | Monitors voltage, drops to near-zero when full |
| Smart charger | Any situation, full recharge | Multi-stage charging, desulfation mode, auto shutoff |
A smart charger is the most flexible option. It bulk-charges, absorbs, and then floats, and many models include a desulfation mode that can revive mildly sulfated batteries. For a battery that died from sitting, a few hours on a smart charger is often better than driving around for an afternoon.
Common Mistakes First-Time Jump Starters Make
The list of ways this goes wrong is shorter than people think, but each item is expensive when it bites. Here are the ones we see most often in aggregate user reports.
- Not identifying positive and negative correctly. Color is a hint, not a guarantee. Always confirm the "+" and "−" markings before clamping anything.
- Letting the clamps touch each other while the other ends are connected. A momentary clamp-to-clamp touch creates a dead short, sparks fly, and the cable insulation can melt.
- Forgetting that the dead car needs to be in Park or Neutral. On manual transmissions, the car can roll if the parking brake is not set.
- Cranking for too long. Ten seconds max per attempt, with a minute of rest in between.
- Driving away immediately after a successful jump. Idling at the spot for a minute lets the alternator stabilize before you add electrical load from headlights, fans, and wipers.
When to Call Roadside Assistance Instead of DIY
There is no shame in calling for help. In fact, there are several situations where a DIY jump is the wrong move and a phone call is faster, safer, and cheaper in the long run.
- The battery case is cracked, swollen, or leaking. Jump starting risks acid burns and explosion.
- The vehicle is a hybrid or EV and you are not sure which battery to jump. A wrong connection on the high-voltage system is dangerous.
- You do not have the right cables for your engine (diesel truck with 10 AWG wires, for example).
- The car has electrical modifications (aftermarket stereo, alarm, custom wiring) that make the standard connection order risky.
- You have already tried three jumps with no success. That is a tow-truck situation.
AAA, OnStar, and most insurance roadside programs will dispatch a tech with commercial-grade equipment in 30 to 60 minutes in urban areas. Many auto parts stores also offer free jump start service if you can get the car close enough.
Final Takeaways Before You Head Out
Knowing how to get a jump start is one of those skills you forget about until you need it. The key points to walk away with:
- The cable order is not optional. Positive first, negative last, with the final black clamp on a chassis ground.
- A portable jump starter is the most practical emergency tool for solo drivers, but only if you keep it charged.
- Cold weather is the leading cause of dead batteries, and frozen batteries should never be jumped.
- If a jump works but the battery dies again, the alternator or a parasitic drain is the real problem.
Keep a set of cables or a charged jump pack in the vehicle, and you will almost never be stranded for long.
Quick Reference: Connection Order
Here is the cheat sheet worth saving to your phone:
- Red → dead battery (+)
- Red → donor battery (+)
- Black → donor battery (−)
- Black → chassis ground on dead car
- Disconnect in reverse order after the dead car starts
Frequently Asked Questions
How long does it take to jump start a dead car?
The whole process, from parking to driving away, runs about 10 to 15 minutes. The actual cranking takes 5 to 10 seconds, but you should idle the donor car for 2 to 5 minutes first so the dead battery builds up enough surface charge.
Can I jump start a car in the rain?
Yes. Water does not change the electrical process, and 12V systems are too low to pose a shock risk through wet skin. Just keep the cables and battery terminals as dry as practical and avoid standing in pooling water while making connections.
Is it safe to jump start a hybrid or electric vehicle?
Hybrids have a standard 12V auxiliary battery that jump starts the same way as any car. The high-voltage traction pack is completely separate and never touched during a jump. EVs (fully electric vehicles) do not have a 12V starter battery that needs jumping under normal conditions, so consult the owner's manual before attempting anything.
What if my car clicks but will not start even after a jump?
Three failed jump attempts usually point to a battery that will not accept charge (sulfation from long neglect), a broken starter, or a blown main fuse. Have the battery load-tested at an auto parts store, which is free at most chains, before replacing it.
Can jump starting damage my car's computer?
It can, if cables are reversed or connections spark against the body. Modern ECUs are sensitive to voltage spikes. Reverse-polarity protection on newer jump packs and careful attention to cable order are the best prevention.
Per industry guidance on vehicle electrical systems, always connect the final negative clamp to a chassis ground, never the dead battery's negative post, to reduce this risk.
How do I know if my battery is dead or just discharged?
A dead battery won't hold a charge after a jump. The car restarts fine, but dies again within hours or the next morning. A discharged battery (from leaving lights on, for example) takes a charge and keeps working.
A load test at any auto parts store gives a definitive answer in under five minutes.