How to jump start a riding mower: Easy guide
You walk out to the mower, turn the key, and hear one sad click instead of an engine. That's the moment most people search for how to jump start a riding mower, and the fix is usually simpler than you think. A riding lawn mower runs on a 12-volt battery, just like your car, so the same jump-start logic applies, with a few small-engine twists.
The big one: most riding mowers use a Group U1 battery rated around 230, 350 CCA. That's much smaller than a car battery, but the voltage is identical. Knowing that one spec lets you treat your mower like the small 12V system it actually is, and skip the rest of the guesswork.
Quick Answer
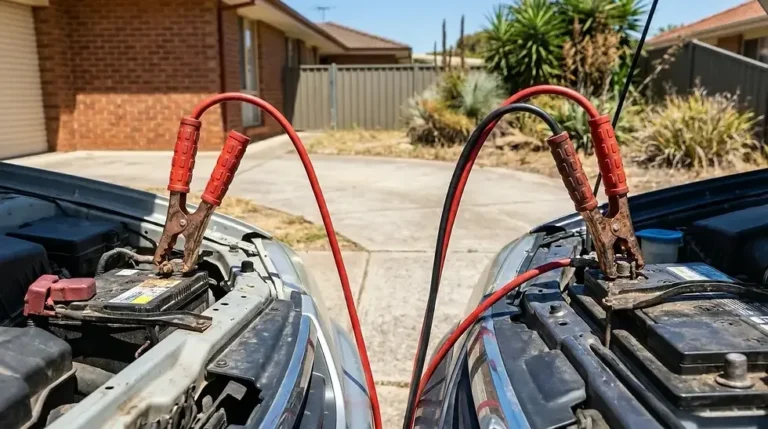
Yes, you can jump start a riding mower using jumper cables from a 12V source. The donor can be a car, a portable jump box, or another mower. Connect positive to positive, negative to chassis ground.
Wait 1, 2 minutes. Crank the mower. Disconnect in reverse order.
What to Know Before You Jump a Riding Mower
Before you crack a hood or pull out cables, a 60-second mental walkthrough prevents 90% of the mistakes we see in forums and repair shops.
It's a 12-Volt System, Not a 6V Tractor
Pretty much every modern riding mower from John Deere, Cub Cadet, Husqvarna, and Honda runs a 12V DC system. If your mower is from the last 25 years, you're safe with a standard 12V jump. The rare exceptions are very old garden tractors, and we cover those in the alternates section below.
The Battery Is Smaller Than You Think
A typical riding mower battery is a Group U1, somewhere between 230 and 350 cold cranking amps. That's why it dies after a winter of sitting. Lead-acid self-discharges at roughly 4, 6% per month, so a stored mower can drop below the 12.0V "dead" line in 3, 4 months with no charger.
Jump-Starting Won't Fix a Bad Battery
If the battery is sulfated, the jump gives it a surface charge and the mower dies again the next morning. As of 2026, average replacement batteries run $40, $120, so a jump is a great triage tool, not a permanent repair.
Find Your Mower's Battery and Confirm the System
If you've never poked around your mower's wiring, this is your first stop. Battery location varies by brand, and reaching for the wrong compartment wastes time.
Where the Battery Hides
Most riding mowers tuck the battery under the seat pan. Lift the seat, and you'll see a black or yellow rectangular box with two top-post terminals. A few models (some John Deere X300s and select Cub Cadets) mount the battery under the front hood or behind the dashboard panel.

Confirm It's 12V Before You Connect Anything
Look at the battery label. It should read "12V" somewhere near the model number. If the label is missing or painted over, count the vent caps.
Lead-acid batteries have either 3 or 6 cells, and each cell is 2 volts. Six caps means 12V. Three caps means 6V (rare, mostly older machines).
A 6V system gets jump-started differently, and using a 12V source will fry the electronics.
Quick Condition Check
Before you grab the cables, eyeball the battery for cracks, bulges, or wet acid. A swollen or cracked case means replace, don't jump. If you see white or bluish crust on the terminals, that's corrosion, and you'll clean it before connecting anything.
Know the Signs: Is It Really the Battery?
Not every "won't start" is a dead battery. Running through these signs saves you from jumping a mower that has a bad solenoid or a faulty safety switch instead.
One Loud Click = Battery or Solenoid
One click and nothing else usually means not enough amps are reaching the starter. In our research across small-engine forums, this is the most common dead-battery symptom, but a failing starter solenoid can mimic it. If a jump doesn't help, the solenoid is the next suspect.
No Sound at All = Likely Battery, But Check the Safety Switches
Silence with full lights and a good battery usually points to the brake/clutch switch, the seat switch, or the PTO switch. Most modern mowers refuse to crank unless you're in the seat, the brake is pressed, and the blades are off. If your battery tests good at 12.4V+ and the mower still does nothing, walk through those switches before chasing the electrical system.
Lights Dim When You Turn the Key = Weak Battery, Not Dead Alternator
If the headlights dim but the engine doesn't turn, the battery is too weak to crank the starter. A jump will get it going. If the headlights are bright and the engine still won't crank, the starter or solenoid is more likely.
Click but No Crank With a Known-Good Battery = Starter Motor
A starter that draws current but doesn't spin usually has failed brushes or a bad Bendix drive. The jump won't help here. You're looking at a starter replacement, which is a separate repair.
Gear You'll Need (And What to Skip)
You don't need much, but using the wrong tool makes the job harder or dangerous.
| Item | What to Use | What to Skip |
|---|---|---|
| Cables | 10–20 ft, 4- to 6-gauge jumper cables | Cheap 10-gauge "emergency" cables, they drop too much voltage over the run |
| Donor source | 12V car battery, portable jump box, or another mower | 18V tool batteries, they're not 12V and will damage the regulator |
| Safety gear | Safety glasses, nitrile gloves | Loose gloves, anything soaked in gas or oil |
| Terminal cleaner | Wire brush or baking soda + water paste | Steel wool, leaves shreds that cause corrosion |
| Multimeter (optional) | Any $15 meter from a hardware store | Test light only, less accurate on low-voltage batteries |
Why Gauge Matters
Thicker cable (lower gauge number) carries current with less resistance. A small U1 battery only needs a short burst, but a 20-foot 10-gauge cable can drop enough voltage to leave you clicking instead of starting. Standard 4- to 6-gauge booster cables from any auto parts store are perfect.
Portable Jump Box vs. Donor Vehicle
A modern lithium jump box rated 1000+ peak amps is enough to crank most riding mowers. As of 2026, popular models from NOCO, Antigravity, and Hulkman run 1500, 2500 peak amps and weigh 2, 4 pounds. They're safer than a car because there's no second running engine to overcharge the mower's small regulator.
Skip the Battery Charger for a Quick Start
A standard 1, 10 amp battery charger is too slow for an emergency start. It takes hours to bring a dead U1 back to a cranking state. Save the charger for overnight recovery, not the same-day fix.
Jump-Starting From a Car Battery
This is the most common method, because most homeowners already own the car and the cables. The process is straightforward, but the small-engine rules catch people out.
Park Both Machines Safely
Drive the car close enough that the cables reach without stretching. Both engines OFF. Parking brakes set on both vehicles.
If the mower is in tall grass, move it to bare ground first. Gasoline vapors sit low, and a hot exhaust near the mower is a fire risk.
Set the Mower Up for Cranking
Seat down. Parking brake engaged. PTO/blades disengaged.
Key off. If your mower has a manual transmission, leave it in neutral. Hydrostatic units can stay in park.
Inspect and Clean the Terminals
Pop the mower battery cover. Look for white or bluish powder on the terminals. If you see it, disconnect the negative cable first, then the positive, and scrub with a wire brush and a baking soda paste (1 tablespoon baking soda to 1 tablespoon water).
Rinse with plain water, dry, and reconnect positive first, then negative.
Proceed to the Connection Steps
Once terminals are clean and the parking brake is set, you're ready to connect the cables. We cover that in detail in the next section.
Jump-Starting From a Portable Jump Box
If you don't want to drag the car into the yard, a portable jump box is cleaner and faster. The steps are nearly identical, but you skip the donor vehicle entirely.
Charge the Box the Night Before
Lithium jump boxes self-discharge at 1, 3% per month, so a charged box on the shelf is usually ready. Still, check the indicator lights before you walk out to the mower. A dead jump box in the middle of a Saturday morning is a special kind of frustrating.
Connect Directly to the Battery Terminals
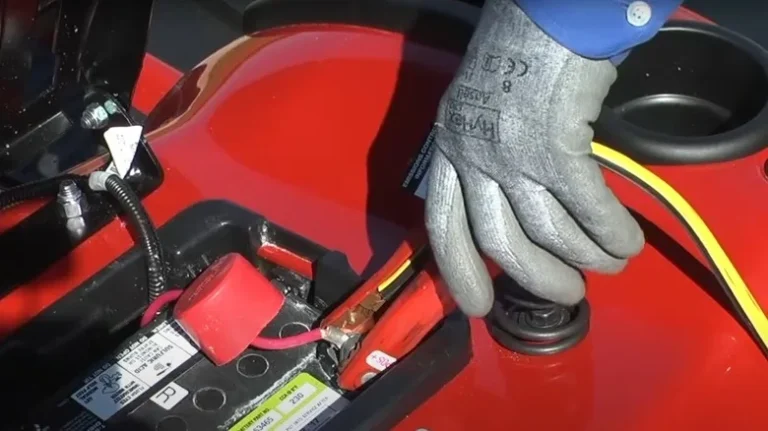
Set the jump box on a dry spot near the mower, away from the belts and pulleys. Connect red to positive, black to negative (or to a chassis ground bolt if your mower has one). Set the box to "12V" or "start" mode if it has a selector switch.
Crank and Pack Up
Turn the key, and the engine should fire within 1, 2 seconds. If it doesn't, wait 30 seconds and try again. Disconnect the box once the engine is running smoothly.
Pack the box away before you start mowing, because vibration from the seat can walk it off the frame.
Jump-Starting From Another Riding Mower
If a neighbor is willing to drive their mower over, this works well. The voltages and battery sizes are identical, so the connection is the safest option of all three.
Match the Sizes
Both batteries are roughly 12V and 230, 350 CCA, so there's no voltage mismatch risk. Position the two mowers nose-to-nose or side-by-side, close enough for a 10-foot cable to reach.
Use a Standard 12V Procedure
Connect positive to positive, negative to negative (or chassis ground). The same order, the same waiting period, the same crank. The smaller capacity just means the donor battery will be more drained after the jump, so let it idle for 20+ minutes afterward to recover.
The Right Connection Order (And Why It Matters)
Order matters because the last connection often sparks. If that spark happens at the dead battery, hydrogen gas can ignite. Doing it in the right sequence puts the spark at a safe ground point instead.
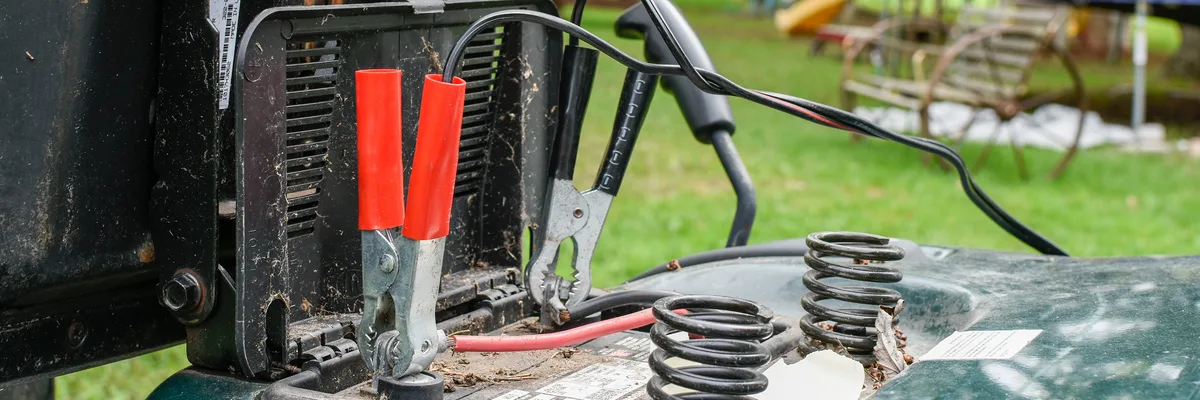
The Four-Step Sequence
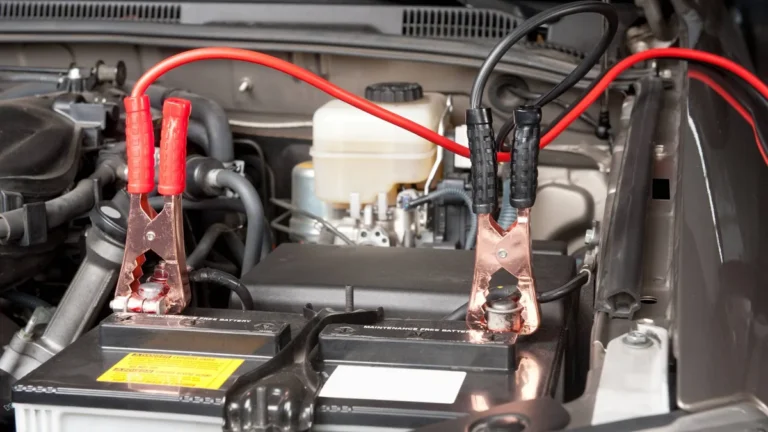
- Red clamp to the DEAD battery's positive (+) terminal.
- Red clamp to the DONOR battery's positive (+) terminal.
- Black clamp to the DONOR battery's negative (−) terminal.
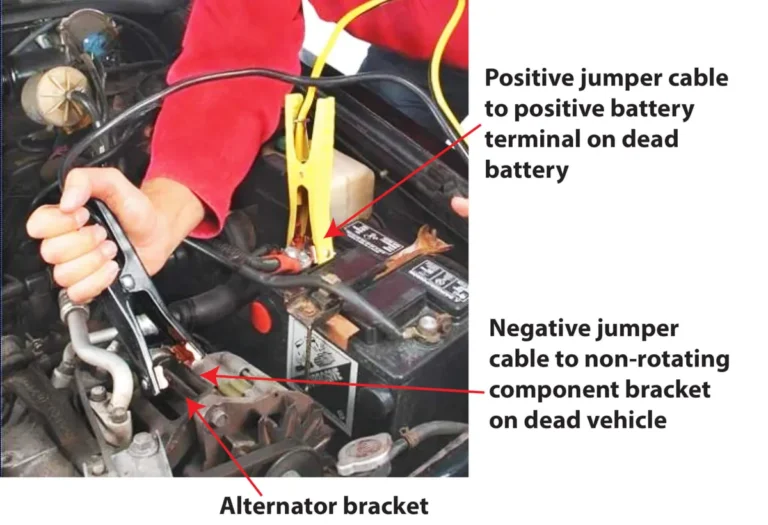
- Black clamp to an unpainted metal surface on the DEAD mower's frame or engine block, at least 12 inches from the battery.
That last clamp is the one that usually sparks when the circuit closes. Putting it on the frame keeps the spark away from any hydrogen gas venting off the dead battery.
Why "Negative to the Dead Battery" Is a Common Mistake
Plenty of guides say to clamp the last black lead directly to the negative terminal of the dead battery. We've seen it cause issues. A weak or cracked battery can vent hydrogen at that exact moment.
Grounding to the chassis eliminates the risk and still completes the circuit just fine.
Reference Diagram
This labeled diagram shows the four-step jumper cable connection order. Note the final black clamp landing on the engine block, not the dead battery's negative post.
Cranking the Mower and Bringing It Back
You're connected, the cables are secure, now the easy part.
Wait 60–120 Seconds Before Cranking
The wait lets a small surface charge build on the dead battery. Manufacturer specs confirm most U1 batteries need 30, 90 seconds of connection time before the donor's voltage helps overcome the dead cell's internal resistance.
Crank in Short Bursts
Turn the key to "start" for 5 seconds maximum. If nothing happens, release, wait 30 seconds, and try again. Three cranking attempts of 5 seconds each is plenty.
Anything longer overheats the donor battery and the cables.
If It Starts, Leave It Running
Once the engine fires, leave it idling for 5, 10 minutes before you disconnect anything. That gives the alternator a chance to put a partial charge back into the battery. Don't shut it off and immediately try to restart, because the battery is still nearly empty.
If It Doesn't Start, Stop and Re-Diagnose
Three failed attempts means something else is wrong. Possible culprits include a bad ground cable on the mower, a failed solenoid, a broken safety switch, or a battery so dead it won't take a surface charge. Disconnect the cables in reverse order and move to the troubleshooting section below.
Disconnecting Safely
Reverse the connection order exactly. Start with the black clamp on the mower's chassis ground, then black on the donor, then red on the donor, and finally red on the mower battery. This sequence keeps the same "spark-at-chassis" principle in reverse.
Don't let the clamps dangle or touch each other while the other ends are still live. We've seen sparks fly when someone removes the last clamp and the free end swings into the still-connected terminal. Tuck each clamp onto the cable or rest it on a clean shop rag as you pull it off.
Charging System Check After the Jump
A jump gets you mowing, but it doesn't tell you why the battery died. A 60-second charging system check prevents the same surprise next Saturday.
Test Voltage With the Engine Off
Set your multimeter to DC volts. Touch the red lead to the positive terminal, the black lead to the negative. A healthy, fully charged 12V battery reads 12.6V or higher.
Anything below 12.4V means partial charge. Below 12.0V means the battery is dead or deeply discharged.
Test Voltage With the Engine Running
Leave the meter connected, and start the mower. Voltage at the battery should jump to 13.5, 14.5V. That confirms the alternator (or stator, on most riding mowers) is charging.
If the voltage stays at battery level or drops while running, the charging system has failed. Per OSHA small-engine safety guidance, running a mower with a bad charging system will eventually strand you again, and the stator is usually the culprit on Briggs, Kohler, and Kawasaki engines.
Look for AC Ripple
Switch the meter to AC volts if it supports it. With the engine running, you should see under 0.5V AC at the battery. Higher readings mean a failing rectifier/regulator.
That's a separate repair and usually a $30, $60 part.
Mistakes That Fry Solenoids and Starters
Small-engine electrical systems are less forgiving than car systems. A few wrong moves can turn a simple jump into a $150 parts bill.
Jumping From a Running Car Engine
Don't leave the car running during the jump. A running car's alternator can push 14.5, 15V, and a riding mower's small voltage regulator isn't built to sink that extra current. We see fried regulators every season from this exact mistake.
Reversing Polarity
Red on negative and black on positive can fry the mower's entire wiring harness in seconds. Always double-check the + and − symbols before you connect. If you see a spark the size of a firecracker and smell burnt plastic, disconnect immediately and check for damage.
Skipping the Chassis Ground
Clamping the last black lead directly to the dead battery's negative post is the most common forum-level advice. It usually works, but it sparks right at the battery. Move that final clamp to the engine block or frame, and you get the same current path without the gas-ignition risk.
Cranking Too Long
Holding the key past 10 seconds overheats the starter windings. Three 5-second attempts with 30-second rests is the safe pattern. If it hasn't started by then, the issue is bigger than a dead battery.
Forgetting the Safety Switches
Seat switch, brake switch, and PTO switch must all be in the "ready" position. If the mower clicks but won't crank and the battery is good, one of those switches is probably open.
Safety Rules Around Battery Gas and Sparks
Lead-acid batteries vent hydrogen gas during charging and heavy use. Hydrogen ignites at concentrations as low as 4% in air, and a single spark is enough to set it off.
No Flames or Sparks Near the Battery
That includes cigarettes, grinders, and the spark you get when you complete the circuit. Keep the final negative clamp on the chassis for that exact reason.
Wear Eye Protection
Battery acid is dilute sulfuric acid, and a face full of it ruins a weekend. Standard safety glasses are enough. Nitrile gloves keep acid off your hands during the cleaning step.
Don't Jump a Cracked or Frozen Battery
A frozen battery looks normal but has ice crystals inside the case. Charging or jumping it can crack the case or explode it. If the battery was stored below 0°F overnight and won't take a charge, bring it inside to thaw before jumping, or replace it.
Keep Vent Caps Sealed
Modern AGM batteries are sealed, and there's nothing to service. Older flooded-cell batteries have removable vent caps. Make sure all caps are seated before you connect any cables.
How to Tell If You Need a New Battery Instead
A jump buys you a day or two. A bad battery leaves you stranded again. Here's how to tell which one you have.
Voltage Won't Hold Above 12.4V After an Hour of Charging
Drive the mower for 30, 60 minutes or put it on a 2, 10 amp charger for an hour. Measure the voltage after the mower sits off for an hour. Below 12.4V means a weak cell.
Replace it.
Battery Is More Than 4 Years Old
Average U1 battery life is 3, 5 years in a riding mower that runs weekly. If yours is at the upper end of that window and the voltage drops overnight, you're on borrowed time.
Visible Damage, Sulfation, or Swelling
Bulging sides, a cracked case, or heavy white sulfation on the plates (visible through the vent caps on flooded batteries) all mean replace, don't jump. These are signs of internal failure.
The Click Test
Charge the battery fully. Let it sit disconnected for 24 hours. Measure the voltage.
A healthy battery loses under 0.1V in that window. Losing 0.3V or more means a parasitic drain or a dying cell. A standard load test at any auto parts store is free and gives a definitive answer.
Caring for the Battery So You Don't Jump Again
A few habits add years to a riding mower battery. None of them take more than 10 minutes per month.
Use a Battery Tender During Storage
A Battery Tender Junior or any 1.25-amp smart charger keeps the battery at full charge without overcooking it. Plug it in when the mower goes into winter hibernation, and you'll skip the jump-start dance next spring.
Disconnect the Negative Cable for Long Storage
If you don't have a tender, pull the negative cable off the battery before storage. Most mowers have a small parasitic draw from the clock, the key switch, or safety circuits. That draw can kill a battery in 2, 3 months.
Keep Terminals Clean
Once a season, scrub the terminals with a wire brush and baking soda paste. Corrosion adds resistance, and resistance makes weak batteries look dead.
Run the Mower Weekly in the Growing Season
A weekly 30-minute mow keeps the battery topped off and the engine internals lubricated. Letting it sit for a month between uses is the fastest path to a dead battery.
Check Electrolyte Levels (Flooded Batteries Only)
If your battery has removable vent caps, check the fluid level every 6 months. Top off with distilled water only, never tap water. Minerals in tap water shorten plate life.
Frequently Asked Questions
Can You Jump a Riding Mower With a Car?
Yes, as long as the car is OFF during the jump. A running car alternator can push too much voltage through the mower's small voltage regulator. Connect cables with the car off, crank the mower, then disconnect.
The whole process should take under 5 minutes.
How Long Should You Let a Mower Run After a Jump?
At least 30 minutes of operation, ideally 45, 60 minutes. A riding mower's charging system typically puts out 15, 20 amps, and a deeply discharged U1 battery needs that long to climb back above 12.4V. A short 5-minute idle isn't enough.
Where Is the Battery on a Riding Mower?
On most riding mowers, the battery is under the seat. Lift the seat pan and you'll see a rectangular box with two terminals. A few brands, like some John Deere and Cub Cadet models, mount the battery under the front hood or behind the dashboard panel instead.
Check your operator's manual if it's not under the seat.
Will Jump-Starting a Lawn Mower Damage It?
Done correctly, no. The risks come from reversing polarity, jumping from a running car engine, or skipping the safety switches. Follow the four-step connection order, keep the car off, and you're using the same current path the manufacturer expects.
How Do You Jump a Riding Mower Without Another Vehicle?
Use a portable 12V lithium jump box rated at least 1000 peak amps. Connect red to positive, black to negative (or chassis), wait 60 seconds, and crank. These boxes are safer than a car because there's no second running engine to overcharge the system, and they double as a phone charger in a pinch.
What Causes a Riding Mower Battery to Keep Dying?
The three most common causes are a bad charging system (stator or regulator), a parasitic load like a stuck relay or aftermarket accessory, and an old battery that won't hold a charge. Test the charging system output at 13.5, 14.5V with the engine running. If that's healthy, load-test the battery.
If both check out, install an inline fuse holder and look for the parasitic draw.
How Long Do Riding Mower Batteries Last?
Most U1 batteries last 3, 5 years with weekly use and proper storage. Batteries that sit for months at a time, run in extreme heat, or see heavy vibration from rough terrain usually die closer to the 2, 3 year mark. A $30 battery tender adds 1, 2 years to that average.