What is ag sensor on a dash cam: Complete Guide
If you've ever wondered what is ag sensor on a dash cam, it's the tiny chip that tells your camera when something unusual happens to your car. Short for accelerometer (sometimes called a G-sensor), it measures forces in three directions and locks the footage when a bump, brake, or crash exceeds a set threshold.
That small MEMS chip usually samples motion at 100 to 400 Hz and trips at thresholds between roughly 0.1G and 1.5G. Once triggered, it freezes the current video clip so it can't be overwritten by loop recording, giving you a protected record of the event. Below, we'll walk through exactly how it works, where it lives, and how to tune it so it does its job without filling your card with false alarms.
Quick Answer
An AG sensor on a dash cam is a built-in accelerometer that detects sudden changes in motion. It measures G-force in three directions. It auto-saves footage when an impact or hard maneuver crosses a set threshold.
This protects important clips from being overwritten.
What an AG Sensor on a Dash Cam Actually Does
Think of the AG sensor as your dash cam's reflex system. It constantly watches the forces acting on the vehicle and reacts the instant something abnormal happens. You don't press a button.
The camera decides on its own, then locks the clip so you have it later.
Manufacturer documentation from MEMS chip makers like STMicroelectronics and Analog Devices confirms that modern dash cam accelerometers sample movement in real time across three axes. Per those datasheets, typical thresholds fall between 0.1G and 1.5G, depending on the setting you choose.
When the threshold is crossed, the camera triggers an "event" in three steps:
- The current recording segment is saved and locked.
- A short pre-buffer (usually 5 to 15 seconds before the trigger) is included.
- The locked file is moved to a protected folder on the SD card.
That whole sequence happens in under a second. You get home, scroll through your files, and the clip is right there, untouched by the normal loop recording that's been overwriting older footage all day.
Why the Sensor Looks the Way It Does: Visual Anatomy
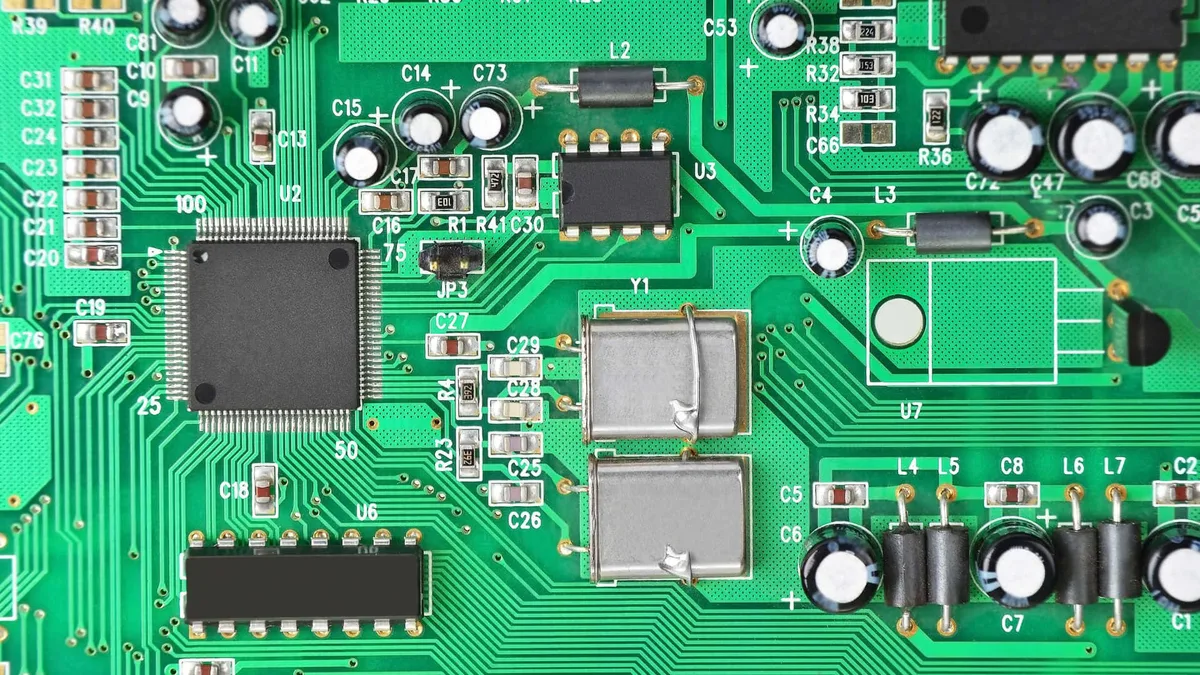
Most people never see the AG sensor because it's hidden inside the camera body. If you cracked open a dash cam, you'd spot a small square chip, usually 2 by 2 mm or 3 by 3 mm, soldered onto the main circuit board. It looks like any other microchip, but the package label usually hints at its purpose (LIS3DH, ADXL345, or similar part numbers).
The chip itself is a MEMS device, which stands for micro-electromechanical systems. Inside that tiny package sits a microscopic mass suspended on springs. When the car moves, the mass shifts a fraction of a micron, and that movement gets converted into an electrical signal the camera's processor can read.
In the image below, you can see exactly what we're describing: the small accelerometer chip mounted right on the dash cam's mainboard, sitting next to the image processor and memory slots.
Because the sensor measures mechanical motion directly, it's incredibly fast and reliable. There's no lag from software interpretation. The mass moves, the signal fires, and the camera reacts.
That's also why these chips are so small and cheap. Billions of them ship every year for phones, game controllers, and wearables.
How a MEMS Accelerometer Detects Movement
The physics behind a MEMS accelerometer is surprisingly simple once you strip away the engineering jargon. Inside the chip, a tiny proof mass is held in place by flexible suspension beams. Around it, fixed plates form a tiny capacitor.
When the car accelerates, brakes, or turns, inertia makes the mass shift slightly relative to the chip's frame.
That shift changes the gap between the mass and the fixed plates, which changes the capacitance. The chip's onboard circuitry measures that capacitance change, converts it to a digital value, and spits out a number representing the current G-force along each axis. This happens hundreds of times per second, giving the dash cam a near-continuous picture of how the vehicle is moving.
The key spec to understand here is sample rate. Most dash cam accelerometers run at 100 to 400 Hz, meaning they take 100 to 400 readings every second. That's fast enough to catch a hard brake that lasts only a fraction of a second, and quick enough to trigger before the impact has even finished unfolding.
There's also a concept called dynamic range, usually 2G to 16G. A higher range lets the sensor handle severe crashes without clipping the signal. A lower range gives better resolution for gentler events like parking lot taps.
Most consumer dash cams stick with a 4G or 8G range because it strikes a good balance for everyday driving.
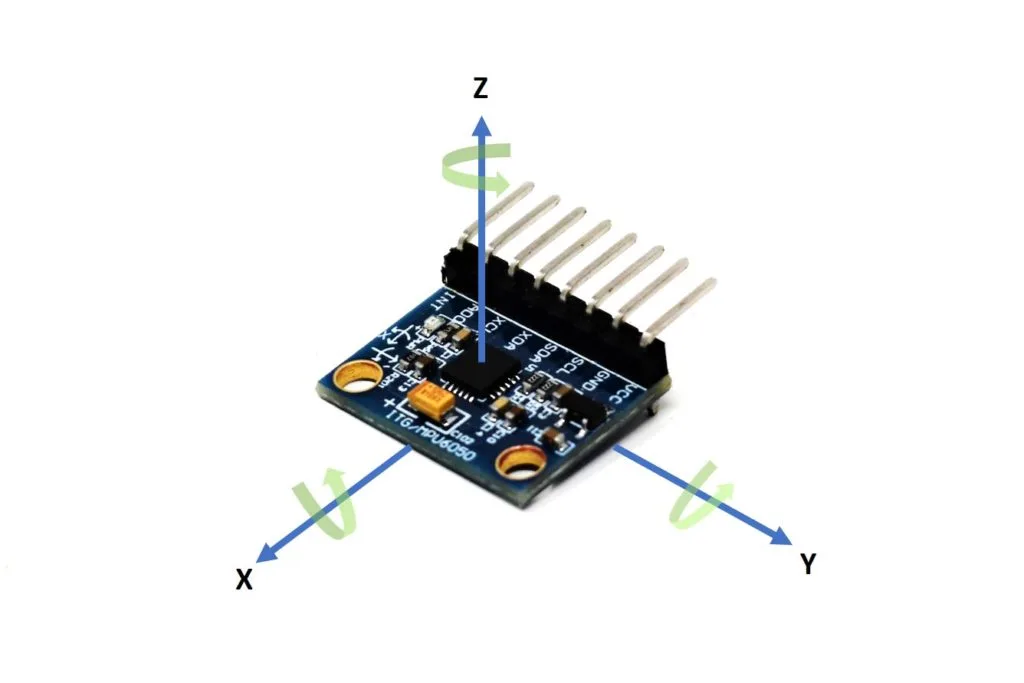
3-Axis Detection: What X, Y, and Z Really Mean
Every AG sensor in a modern dash cam measures force along three perpendicular axes. Understanding what each one captures helps you diagnose why the camera locks certain clips and ignores others.
Here's what each axis represents in a typical dash cam mounting orientation:
- X-axis (longitudinal): Runs front-to-back through the car. Captures acceleration when you speed up and deceleration when you brake.
- Y-axis (lateral): Runs left-to-right across the car. Captures the force of turns, lane changes, and side impacts.
- Z-axis (vertical): Runs up and down through the car. Captures bumps, potholes, speed humps, and the jolt from a rear-end collision.
The diagram below shows these three axes relative to a typical sensor package. The arrows indicate the directions of positive G-force the chip measures.
Here's a real-world example to tie it together. You're cruising on the highway and someone rear-ends you. The X-axis spikes as your car lurches forward.
The Z-axis spikes as the impact compresses the suspension. The Y-axis barely moves because the force came from straight behind you.
Now imagine a side-swipe in a parking lot. The Y-axis jumps hard as your car is shoved sideways. The X and Z stay quiet.
The camera locks the file either way, but knowing which axis triggered can help if you ever need to explain the physics of the crash to an insurance adjuster.
This three-axis setup is also why mount orientation matters more than most people think. If you rotate the dash cam 90 degrees in its mount, the sensor's X and Y axes no longer line up with the car's direction of travel. The camera still works, but it'll trigger on the wrong kinds of motion.
Where the AG Sensor Sits on the Dash Cam
The AG sensor lives on the mainboard, right behind the lens assembly. It's positioned near the center of the camera body so it can read motion in all three axes without being skewed by the weight of the lens or the battery.
If you tilt a typical wedge-style dash cam in its mount, you'll notice the lens points forward while the body sits mostly flat against the glass. That flat orientation is intentional. The chip's Z-axis (vertical) aligns with gravity when the camera is level, and the X-axis lines up with the car's direction of travel.
This way, hard braking reads as a clean X-axis spike rather than a confusing mix of X and Y.
A few practical notes about placement:
- Avoid mounting near vibrating trim panels, which can inject false signals into the accelerometer.
- Don't stick the camera over a heated windshield element, because thermal expansion can subtly shift the sensor's baseline.
- Keep it close to eye level so the X-axis matches the car's forward vector as closely as possible.
If you ever remount the camera, you may need to reset the orientation in the settings menu. Some cameras detect the change automatically, but most budget models assume a fixed orientation.
G-Sensor vs Motion Detection: What's the Difference
This is the single most common point of confusion, so let's clear it up. The G-sensor and motion detection are two completely separate systems that often work together.
| Feature | G-Sensor (AG Sensor) | Motion Detection |
|---|---|---|
| What it measures | Sudden change in G-force | Change in pixels in the video frame |
| Best for | Hits, hard braking, swerves | Movement near a parked car |
| Active when | Always on while driving | Usually only in parking mode |
| Trigger speed | Milliseconds (hardware-level) | 0.5 to 2 seconds (software-level) |
| False alarm risk | Potholes, speed bumps | Shadows, rain, passing headlights |
The G-sensor is a hardware trigger. It fires the instant a force crosses the threshold. Motion detection is a software trigger.
The camera's image processor compares consecutive frames and looks for differences. That's why motion detection works while parked (no movement of the car itself), while the G-sensor mostly waits for impact.
Many modern dash cams use both. The G-sensor catches the crash itself. Motion detection wakes the camera up from low-power parking mode so it can start recording before the impact even happens.
Sensitivity Settings Explained (Low, Medium, High)
Every dash cam with an AG sensor exposes three sensitivity tiers in its settings menu. Picking the right one is the difference between capturing every genuine event and filling your card with junk.
Here's how the tiers typically map to real driving:
- Low sensitivity: Triggers only on severe impacts, roughly above 1.0G. Best for rough roads, cobblestones, or drivers who get a lot of false triggers.
- Medium sensitivity: Triggers on moderate events, roughly 0.5G to 1.0G. This is the default for most users and the best starting point.
- High sensitivity: Triggers on lighter taps, roughly 0.1G to 0.5G. Best for city driving at low speeds where parking lot dings are a concern.
The image below shows what the sensitivity menu typically looks like on a mid-range dash cam. You'll see the three tiers plus, on some models, a numeric value in G-force.
A quick rule of thumb: if you're constantly seeing locked files from speed bumps, drop a tier. If you're missing low-speed parking lot incidents, raise a tier. After any change, give the camera a week of normal driving before judging the result.
What Happens When the Sensor Triggers
The trigger sequence happens so fast that most drivers never notice it. Here's the breakdown, frame by frame.
First, the accelerometer's output crosses the configured threshold. The camera's main processor sees the spike and flags the current recording as an event. The file is closed and renamed with an event tag, often something like "EVENT_20260315_143027.mp4" or moved into a separate "RO" (read-only) folder on the SD card.
Second, the pre-buffer is included. Most cameras constantly buffer the last 5 to 15 seconds of video in volatile memory. When the trigger fires, that buffer is written to the start of the locked file.
This is why event clips often show the seconds right before the impact, not just the moment of contact.
Third, the locked file is protected from loop recording. Even after the SD card fills up, the loop skips over protected files. They'll stay on the card until you manually delete them or the card is reformatted.
Here's a sample timeline for a rear-end collision at 30 mph:
- T minus 10 seconds: Pre-buffer recording normally.
- T minus 0.2 seconds: Following car fails to brake.
- T zero: Impact. G-sensor reads roughly 4G to 8G on the X-axis.
- T plus 0.1 seconds: Event flag set. Pre-buffer frozen.
- T plus 0.5 seconds: Locked file written to SD card.
- T plus 1 second: Camera returns to normal loop recording.
That whole cascade takes about one second. By the time you've reacted to the crash, the camera's already preserved everything you need.
Locked Files and Event Recording: How Footage Is Protected
The locked file is the whole reason the AG sensor exists. Without it, a critical clip could vanish in the next loop cycle, often within minutes.
Locked files are protected in three ways, depending on the camera brand:
- File system flag: The file is marked read-only at the OS level, so loop recording ignores it.
- Separate folder: Some cameras move locked files into an "EVENT" or "RO" folder that loop recording never touches.
- Partition separation: Higher-end cameras create a dedicated partition on the SD card for events.
If you want to keep an event permanently, copy it to your computer or phone right away. SD cards fail over time, and locked files don't get backed up automatically. As of 2026, most major dash cam brands still rely on the user to offload important clips manually.
One common gotcha: filling your card with locked files leaves no room for normal recording. The loop has nothing to overwrite, so the camera stops recording. Review your event folder weekly and clear out anything you don't need to keep.
Adjusting Your AG Sensor the Right Way
Start by parking on level ground and mounting the camera squarely behind the rearview mirror. A crooked mount skews the X and Y axes, which means the sensor reads turns as braking and braking as turns. Recheck the bubble level (many mounts have one) after the adhesive has cured for 24 hours.
Open the settings menu and find the G-sensor section. Most cameras label it "G-Sensor," "Collision Sensitivity," or "Impact Detection." Set it to Medium first, drive for a week, and check how often event files appear. If you see locked clips from every speed bump, drop to Low.
If parking lot dings go unnoticed, bump to High.
When to Recalibrate After a Windshield Change
Recalibrate any time you remove and remount the camera, swap vehicles, or replace the windshield. Even a small shift in angle changes how gravity loads the Z-axis, and the camera's baseline reading drifts. A fresh mount gives the sensor a clean reference point to work from.
Testing the Sensor After Installation
You don't need a real crash to verify the sensor works. A controlled test is safer and faster.
Do this in an empty parking lot, engine off:
- Firmly slam the driver's door shut. This produces a quick spike on the X-axis.
- Push the bumper forward with your hand, then release. A small bounce registers on the Z-axis.
- Walk around the car and gently rock it side to side. A clear Y-axis trigger should appear.
After each test, pull the SD card and check the locked folder. You should see a new event file for each action. If only some tests register, the sensitivity is probably set too low or the camera is misaligned.
Common G-Sensor Problems and How to Fix Them
Most AG sensor headaches fall into four buckets. Here's how to diagnose each one quickly.
Locked Files Everywhere
Your sensitivity is too high for the road conditions. Lower it one tier and monitor for a week. If the camera still over-triggers, check the mount for vibration from a loose dash panel.
No Locked Files After Real Impacts
Sensitivity is too low, or the mount is skewed. Raise the tier, then re-test with the parking lot method above. If files still won't lock, the SD card may be worn out and unable to write protected files fast enough.
Locked File Is Corrupted
This usually means a counterfeit or slow SD card. Use a name-brand card rated U3 or V30 and format it monthly. For more on card specs, see the SD Association's speed class guide.
Sensitivity Changed After Firmware Update
Some updates reset the G-sensor settings to factory defaults. Re-enter your preferred tier after any firmware flash. Always test the sensor again before trusting the camera in daily driving.
Best Sensitivity Settings for Different Driving Styles
Match the setting to how and where you drive, not to a one-size-fits-all default.
| Driving Style | Recommended Sensitivity | Why |
|---|---|---|
| Smooth highway commuter | Low | Few abrupt events, want to avoid false triggers from expansion joints |
| Urban stop-and-go | Medium | Captures typical fender benders without spam |
| Ride-share or delivery driver | High | Lots of low-speed incidents and curbside taps |
| Rough road or unpaved | Low | Bumps and ruts will overwhelm a higher setting |
| Parked vehicle surveillance | High or motion-only | Catches door dings and light taps while stationary |
Switch tiers whenever your driving pattern changes. A commuter who starts a delivery route should bump up the sensitivity within the first few shifts.
Parking Mode and the AG Sensor: What You Need to Know
Parking mode is where the AG sensor does some of its most important work, but only if the camera has constant power. The internal battery in most dash cams is too small to run the sensor for more than a few hours, so a hardwire kit is essential. Without one, the G-sensor goes dark the moment you turn off the ignition.
In parking mode, the camera usually sits in a low-power standby state. The AG sensor stays awake but samples at a reduced rate to save energy. When a bump or tilt crosses the threshold, the camera wakes fully and writes an event clip.
There are three parking mode behaviors you'll see across brands:
- Buffered parking mode: The camera continuously buffers a few seconds of video. When the G-sensor fires, the pre-event footage is included in the locked clip.
- Time-lapse parking mode: The camera records at a low frame rate continuously. The G-sensor still flags events, but full video is always saved.
- Motion-only parking mode: The camera sleeps until pixel-based motion detection triggers it. The G-sensor acts as a backup in case the impact is too fast for motion to catch.
For most drivers, buffered mode offers the best balance. It catches genuine hits while ignoring gentle nudges from wind or passing trucks.
Hardwiring Tips for Reliable Parking Mode
Tap into a constant 12V fuse (always-on) for power and an accessory fuse (switched) for ignition sensing. Use an add-a-fuse kit and a hardwire cable with built-in voltage cutoff to protect your battery. Most kits cut power around 11.8V to 12.0V, which is low enough to start the car but high enough to preserve battery life.
G-Sensor Footage in Insurance and Legal Situations
Locked event clips carry real weight with insurers and in court, but only if the footage is authentic and properly preserved. Most insurers will accept dash cam video as supporting evidence, but they may ask for the original SD card or an unedited file copy. Metadata matters here, so don't trim the start or end of the clip before handing it over.
In legal settings, dash cam footage is generally admissible in the US, UK, Canada, and Australia, though rules vary by state and jurisdiction. The footage must be time-stamped, untampered, and relevant to the case. Some jurisdictions require both parties' consent for audio recording, so check local rules before sharing clips with sound.
A few practical rules:
- Keep the original file intact. Work from a copy.
- Note the date, time, location, and weather conditions when you save the clip.
- If the footage is part of a claim, send the full clip, not a screenshot.
When Footage May Be Rejected
Courts and insurers may discount or exclude footage that's been edited, lacks a visible timestamp, or was captured in a way that violates privacy laws. For example, filming on private property without consent can be a problem in some regions. Always check your local recording laws before relying on footage for a claim.
Frequently Asked Questions
Should the G-Sensor Be On or Off?
Keep it on. The only reason to disable it is to prevent false triggers on a track day or off-road event where impacts are expected and not relevant.
How Long Do Locked Files Stay on the Card?
Indefinitely, until you delete them or format the card. Loop recording skips over them, but they still take up space and can eventually fill the card if you never clean it out.
Does the G-Sensor Drain the Car Battery?
Not by itself. The sensor draws only a few milliamps. The bigger drain is the camera itself in parking mode, which is why a hardwire kit with voltage cutoff is essential.
Can I Turn Off the G-Sensor but Keep Parking Mode?
Yes. Most cameras let you disable G-sensor triggers while keeping motion detection active. You'll lose impact-based events but still capture footage of anyone walking up to the car.
Why Does My Camera Lock Files Even When Parked and Unmoved?
Usually a false trigger from vibration, wind, or a passing truck. Lower the sensitivity, check the mount for looseness, and confirm the camera isn't sitting on a vibrating surface.
Does Higher Bitrate Recording Affect the G-Sensor?
No. Bitrate affects video file size and write speed, not the sensor itself. A slow SD card, though, can cause event files to corrupt even when the sensor triggers correctly.
What Is an AG Sensor on a Dash Cam in Simple Terms?
It's a motion-detecting chip that locks footage when your car experiences a sudden force, like a crash or hard brake. You don't press anything. The camera reacts on its own.
Is an AG Sensor the Same as a Gyroscope?
No. A gyroscope measures rotation (how the car is turning). An AG sensor measures linear acceleration (how the car is speeding up, slowing down, or being pushed).
Most dash cams use an accelerometer, not a gyroscope.
Can a Dash Cam Work Without an AG Sensor?
Yes, but you'll lose automatic event detection. You'll have to manually save clips, which defeats the purpose of having a dash cam in the first place.
How Often Should I Check Locked Files?
Once a week is enough for most drivers. Clear out anything you don't need, back up what you do, and format the SD card monthly to keep writes fast.
Does Cold Weather Affect AG Sensor Performance?
Cold can slightly shift the sensor's baseline reading, but it won't stop the chip from working. If you notice unusual triggers in winter, check the mount for thermal contraction gaps rather than blaming the sensor itself.