How to install dash cam
If you've bought a dash cam and the included manual reads like it was written for an electrician, you're in the right place. Learning how to install a dash cam is one of those weekend jobs that looks intimidating for about ten minutes, then turns into a satisfying half-hour project once you know the few decisions that actually matter.
The good news: manufacturer specifications and aggregate installer experience both confirm that most people finish a basic install in 20 to 45 minutes. Hardwiring to the fuse box, which is what gives you parking mode without leaving a cable dangling, typically takes 45 to 90 minutes the first time you do it. Stick with us and we'll walk through both paths, plus the small handful of mistakes that fry dash cams (tapping the wrong fuse, hiding cable through an airbag panel, draining your battery overnight).
Let's start with the question that decides everything else.
Quick Answer
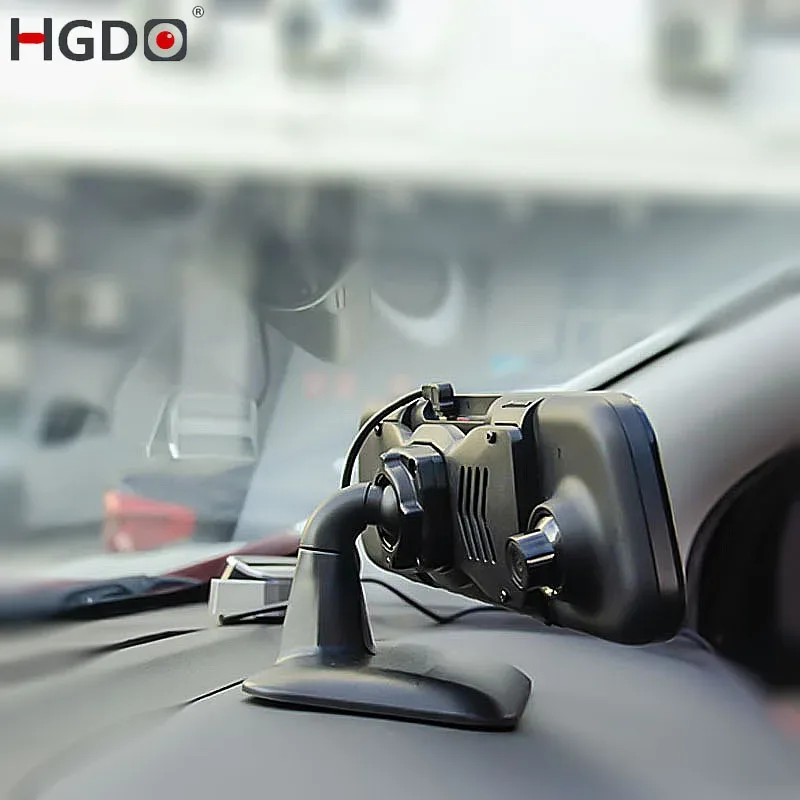
Installing a dash cam takes 20 to 90 minutes depending on the power method. The simplest install uses the 12V cigarette lighter socket and a suction or adhesive mount. For a clean, always-on setup with parking mode, hardwire the dash cam to the fuse box using an Add-A-Circuit fuse tap, route the cable behind the headliner and A-pillar trim, and set the low-voltage cutoff to protect your battery.
What Kind of Dash Cam Install Are You Doing? (Pick Your Path)
Before you touch the windshield, decide which of these three installs matches your goal. Each one branches into different tools, time, and skill. Pick the path that fits, then jump to the matching steps further down.
| Install type | Power source | Time needed | Best for | Skill level |
|---|---|---|---|---|
| Plug-and-go | Cigarette lighter / 12V socket | 20–30 min | Renters, temporary installs, first-timers | Beginner |
| Hardwired (switched) | Fuse box, ignition-only | 45–75 min | Always-clean look, no socket used | Intermediate |
| Hardwired (switched + constant) | Fuse box, with parking mode | 60–90 min | 24/7 parking surveillance | Intermediate to advanced |
If you just want footage while driving, the plug-and-go path is genuinely fine. If you want the camera to wake up and record when someone bumps your parked car, you need the hardwired path with a constant fuse and parking mode enabled.
Quick Answer: What You Actually Need Before You Start
Here's the short list, then we'll expand each item.
- Dash cam with mount (adhesive or suction)
- MicroSD card, endurance-rated, 64GB or larger
- Power cable (cigarette lighter plug or hardwire kit)
- Fuse tap (Add-A-Circuit) for hardwiring
- Trim removal tool or plastic pry tool
- Isopropyl alcohol and a microfiber cloth
A few decisions before you climb into the car. The MicroSD card matters more than most people realize. Endurance cards like the SanDisk High Endurance or Samsung PRO Endurance lines are built for the constant overwrite cycle a dash cam runs, which a regular card cannot survive for long.
Format the card in the camera itself before the first use, not in your computer, so the file system matches the firmware.
The mount choice also sets you on a path. Adhesive mounts (typically 3M VHB tape) hold better and sit lower on the glass, but they are one-shot. Once stuck, you peel them off with heat and patience.
Suction cups are reusable, but they fail more often in heat and leave a small ring on the glass. For a permanent install, adhesive wins. For a leased car or a camera you move between vehicles, suction is the safer call.
Tools, Gear, and Parts for Installing a Dash Cam
This is the expanded shopping and parts list. You can install a basic dash cam with almost nothing, but a few items turn a frustrating job into a clean one.
| Item | What to look for | When you actually need it |
|---|---|---|
| Dash cam | 1080p minimum, capacitor-based for heat | Always |
| MicroSD card | 64–256GB, endurance-rated | Always |
| Mount | 3M VHB adhesive or suction cup | Always |
| Cigarette lighter cable | Right-angle plug preferred | Plug-and-go install |
| Hardwire kit | Includes fuse tap and voltage cutoff | Hardwired install |
| Add-A-Circuit / fuse tap | Match your fuse box type (mini, micro2, ATO) | Hardwired install |
| Trim removal tool | Plastic, not metal | Routing cable cleanly |
| Isopropyl alcohol (70%+) | Cleans glass before mount | Adhesive mount |
| Multimeter or test light | Confirms switched vs. constant fuse | Hardwired install |
| Zip ties or cable clips | Secures slack near the fuse box | Hardwired install |
One tool people skip and later regret: a plastic trim removal tool. Metal screwdrivers crack A-pillar clips and scratch interior panels. A $5 nylon pry kit saves a $200 repair.
For hardwiring, confirm your hardwire kit has a built-in low-voltage cutoff. Manufacturer specifications indicate a cutoff threshold of 11.8V for standard 12V lead-acid batteries, which protects the battery while leaving enough reserve to start the car. Without that cutoff, a parked dash cam can drain a battery flat in 24 to 72 hours.
Where to Mount the Dash Cam (Front, Rear, and Interior)
Mounting location is the single biggest factor in footage quality. Get this wrong and no amount of resolution saves you from a plate you can't read.
Front camera placement
The sweet spot is just behind the rearview mirror, on the passenger side of the mirror housing. That position keeps the camera out of the driver's line of sight, which matters because most US states restrict windshield-mounted devices from sitting in the primary viewing area. A camera tucked behind the mirror is usually invisible to the driver and invisible to a passing police officer.
Keep the camera high enough that the lens clears the windshield wiper's arc on the driver's side. If half your footage shows a streak across the plate, the lens is sitting in the wiper's blind zone. Move it up an inch or shift toward the passenger side.
Rear camera placement
For a rear cam on a sedan, mount it high on the rear window, centered, just below the defroster line if your car has one. On SUVs and hatchbacks, mount it as high as possible on the liftgate glass so the wiper clears it. On vans with rear barn doors, the top center of each door window works.
Interior / cabin camera placement
If your dash cam has a third interior lens (common in rideshare setups), it usually mounts on the windshield next to the front lens, angled to cover the cabin. Avoid mounting it where it blocks the rearview mirror sensor or the lane-departure camera if your car has one.
The cleaner the glass at the mount point, the better the adhesive holds. Wipe the spot with isopropyl alcohol, let it dry for 60 seconds, then stick. Mounting on a dusty or oily windshield is the number-one reason dash cams fall off mid-drive.
How to Power a Dash Cam: Cigarette Lighter vs. Hardwire vs. OBD-II
Power is where most beginners stall, so let's clear it up before the step-by-step.
| Power method | Pros | Cons | Best for |
|---|---|---|---|
| Cigarette lighter | No tools, reversible, fastest | Blocks the socket, no parking mode in most cars | Temporary or simple installs |
| Hardwire to fuse box | Clean look, enables parking mode, frees the socket | Requires fuse tap and basic electrical comfort | Permanent installs |
| OBD-II adapter | Plug-and-play, always-on | Visible cable, may stay powered when you don't want it | Renters who want parking mode without splicing |
Cigarette lighter power is what the box recommends. The camera turns on and off with the ignition, and you can move it between cars in seconds. The downside: most 12V sockets lose power when the car is off, so parking mode does not work without a special always-on socket (rare in modern cars).
Hardwiring solves that by tapping into two fuses. One switched fuse (powered only when the key is on) handles normal driving. One constant fuse (always powered) handles parking mode, with a voltage cutoff protecting the battery.
OBD-II power sits in the middle. A plug-in adapter draws power from the diagnostic port, which is usually always-on. It is fast and reversible, but the cable runs across the footwell unless you tuck it carefully.
For most people, the right answer is hardwiring if you own the car, cigarette lighter if you don't.
How to Install a Dash Cam Using the Cigarette Lighter (Easiest Method)
This is the install path for anyone who wants footage today and does not care about a dangling cable. The cigarette lighter socket is the friendliest 12V source in any car, and most dash cams ship with a right-angle plug that fits even in tight center consoles.
Mount the camera behind the rearview mirror
Clean the glass with isopropyl alcohol where the mount will sit. Wait 60 seconds for the alcohol to flash off. Press the adhesive pad (or suction cup) firmly for 10 seconds.
Give adhesive mounts a full 24 hours before driving if you can, so the bond cures.
Plug into the 12V socket and route the cable
Run the power cable up from the socket, tuck it into the headliner with your fingers, and feed it across to the camera. Most cables disappear with zero tools if you press them into the headliner gasket and the A-pillar trim.
If you want parking mode from a cigarette lighter install, check whether your 12V socket stays powered when the car is off. Some cars cut it, others do not. A quick test: turn off the ignition, lock the car, and see if the dash cam is still recording.
Test before you button it up
Start the car. The camera should power on within a few seconds and start recording. Turn the car off and confirm the camera shuts down cleanly (or stays on, depending on your socket).
Adjust the lens angle so the horizon sits at the lower third of the frame. Done.
How to Hardwire a Dash Cam to the Fuse Box (Clean, Always-On Option)
Hardwiring is the install that makes the dash cam feel like it came from the factory. No cable hanging off the dash, the socket stays free, and the camera wakes up automatically when you start the car. The trade-off is that you are working with your car's electrical system, so the steps matter.
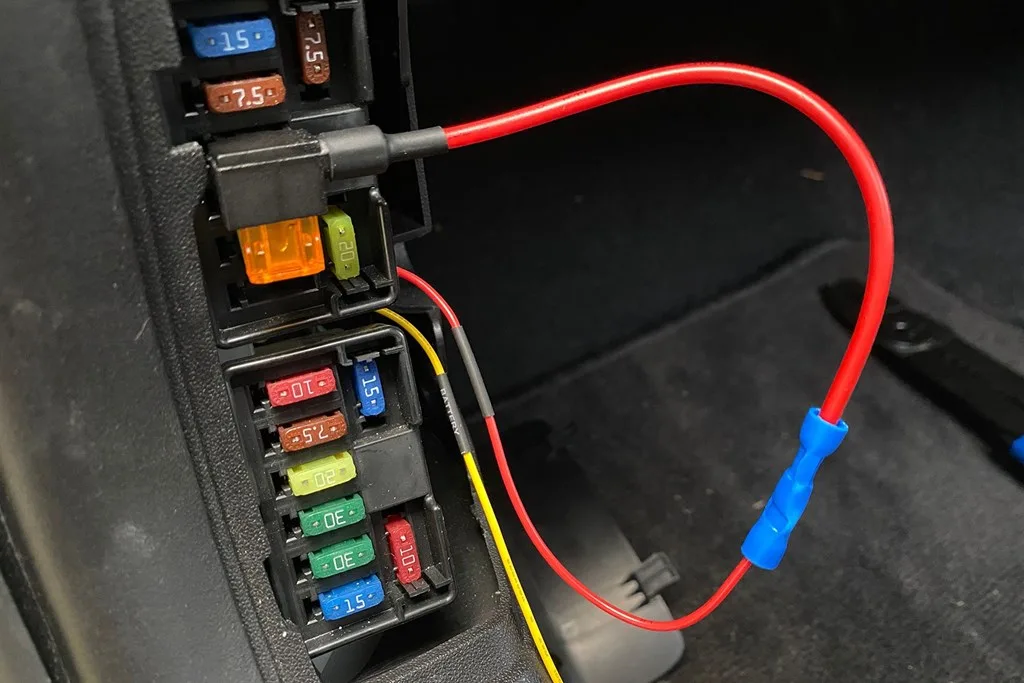
Finding Your Car's Fuse Box and Identifying Switched vs. Constant Fuses
Most cars have two fuse boxes. One sits in the cabin (often under the dash on the driver's side, behind a panel, or in the glove box). The other sits under the hood near the battery.
For a dash cam, the cabin fuse box is almost always the right choice because the cable run is shorter.
The owner's manual will list every fuse and tell you whether it is switched (only powered with the ignition on) or constant (always powered). Common switched circuits you can safely tap include the radio, the cigarette lighter, and the accessory socket. Common constant circuits include the interior lights, the horn, and some diagnostic ports.
Test before you tap. A test light or multimeter confirms which fuse is which. With the car off, probe both sides of the fuse.
If one side is hot and the other is dead, the fuse is constant. If both sides are dead with the car off and hot with the ignition on, it is switched.
Using a Fuse Tap (Add-A-Circuit) the Right Way
A fuse tap (also called an Add-A-Circuit) is a small adapter that slots into an existing fuse slot and gives you a second fused output. It is the safest way to add a new circuit without cutting any factory wiring.
Match the fuse tap to your car's fuse type. Modern cars use mini, micro2, or ATO/ATC blade fuses, and the tap must match exactly. Force the wrong type and it will not seat properly, which causes intermittent power or arcing.
Install the fuse tap in this order:
- Pull the original fuse from the fuse box.
- Insert the original fuse into the lower slot of the fuse tap (this protects the original circuit).
- Insert a second fuse of the same rating into the upper slot of the fuse tap (this protects the dash cam circuit, typically 2A or 3A).
- Crimp or solder the dash cam's red wire to the fuse tap's lead.
- Plug the fuse tap into the original fuse slot.
Most hardwire kits also include a yellow wire for constant power (if you are running parking mode) and a black ground wire. The ground wire must attach to a bare metal bolt on the car's chassis, not a painted surface. A seat bolt or a kick panel bolt works in most cars.
Setting the Low-Voltage Cutoff So You Don't Kill Your Battery
The hardwire kit's voltage cutoff is what keeps the dash cam from draining your battery flat during a long park. Manufacturer specs confirm a 12V cutoff of 11.8V is the safe threshold for standard lead-acid batteries. Below that voltage, the engine may struggle to crank, especially in winter.
If your hardwire kit has adjustable thresholds (many Viofo, Thinkware, and BlackVue kits do), set it based on your climate. In cold climates, leave the cutoff higher, around 12.0V, so the battery always has enough cold-cranking amps. In hot climates, 11.8V is fine because battery drain accelerates in heat anyway.
How to Hide the Cable Along the Headliner, A-Pillar, and Door Seal
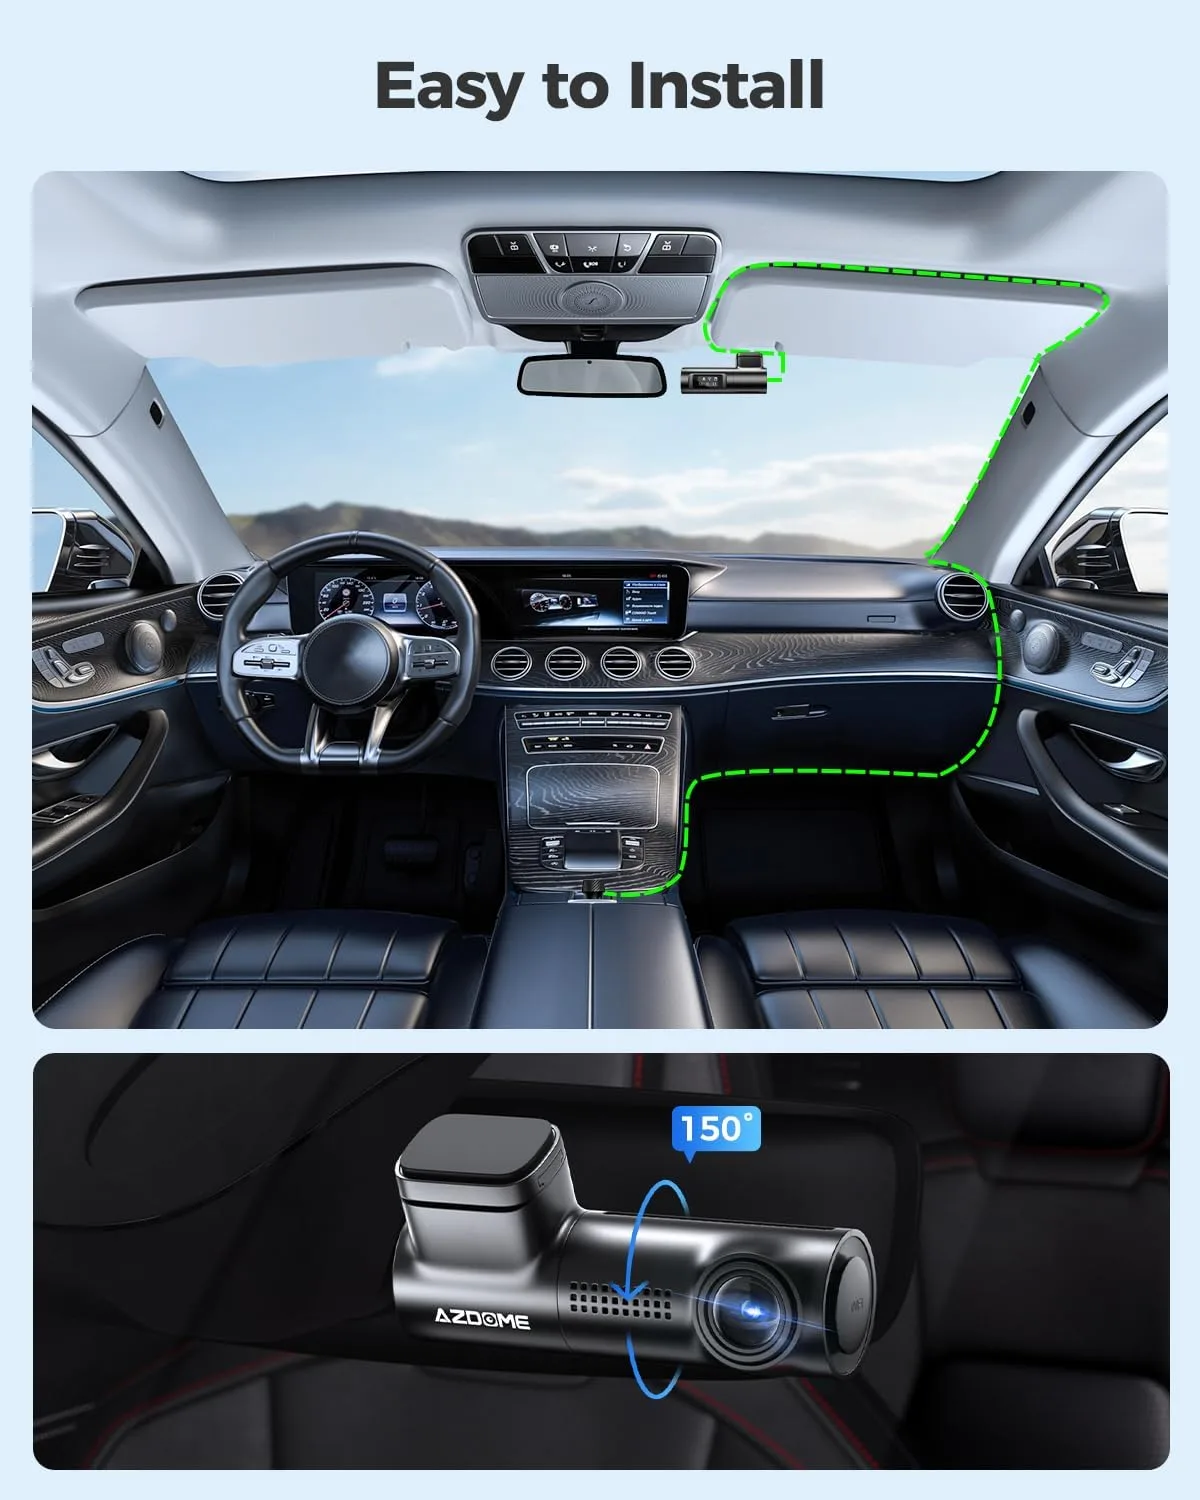
A clean cable run is the difference between an install that looks professional and one that looks like an afterthought. The good news is that almost every car is designed to hide wiring in exactly the spots you need.
Start at the camera. Tuck the cable into the gap between the headliner and the windshield using your fingers or a trim tool. Work across the roof toward the A-pillar on the passenger side.
The passenger side is almost always the safer route because the airbag and curtain airbag deployment zones run up the driver's A-pillar, and routing cable there risks interfering with the airbag's inflation path.
A-Pillar Trim Removal Without Breaking Clips or Hitting the Airbag
Most A-pillar trim panels are held in by a handful of plastic clips and pull straight off with steady pressure. Use a plastic trim tool, not a screwdriver, and start at the top near the headliner. Work down the pillar, releasing each clip as you go.
Once the panel is off, route the cable behind it, away from the airbag module. The airbag inflator sits inside the pillar, and any cable pressed against it can snag or burn when the airbag fires. Tuck the cable into the factory wiring channel that already runs down the pillar, then snap the panel back on.
At the bottom of the A-pillar, the cable needs to cross over to the fuse box. Run it along the door seal gasket by gently lifting the rubber with your fingers and pressing the cable underneath. The cable should disappear into the carpet near the driver's footwell, then pop up at the fuse box.
If the fuse box is under the dash on the driver's side, the cable run is short. If it is behind the glove box or in the center console, route the cable across the kick panel under the steering column, where it sits out of sight.
Installing a Rear Dash Cam (Cable Routing for Sedans, SUVs, and Vans)
A rear dash cam adds a second layer of evidence, and it catches the most common type of accident, the rear-end tap. Installation is similar to the front, but the cable run is longer and the path depends heavily on body style.
Sedans
Mount the rear camera high on the rear window, centered. Run the cable along the headliner all the way to the C-pillar on the side the front camera is mounted on. Tuck the cable into the C-pillar trim and down to the rear deck, then forward under the door sills to the front fuse box.
The total run is usually 12 to 16 feet, which fits inside the cable length that most dual-channel dash cams include.
SUVs and hatchbacks
Mount the rear camera on the liftgate glass as high as possible. Run the cable into the liftgate's headliner, down the rubber boot that carries the wiring for the license plate light or rear wiper, and into the body of the car. This boot is the cleanest path and avoids drilling any new holes.
Most SUV rubber boots have enough slack to accept an extra cable without binding.
Vans and trucks
Rear doors complicate the routing. Mount the camera on the top center of the door window and run the cable into the door's headliner, down the hinge side, and into the body via the existing wiring boot. Plan on more cable than the box includes; buy a 16 to 20 foot extension if your run is long.
Whichever body style you have, avoid running the rear camera cable near any factory wiring that carries high current (heated rear window, trailer wiring). The dash cam cable is low voltage and unshielded, and proximity to noisy circuits can introduce interference on the footage.
Setting Up Parking Mode, G-Sensor, and Loop Recording
Once the camera is physically mounted and powered, the next decision is how it behaves when you are not driving. Three settings do most of the work, and getting them right is the difference between useful evidence and a card full of nothing.
Parking mode
Parking mode is what wakes the camera when the car is parked and someone bumps it. There are three common flavors: motion-only, impact-only, and time-lapse. Motion-only records when something moves in the frame, which fills the card quickly in busy lots.
Impact-only records a short clip when the G-sensor detects a bump, which is the most storage-efficient. Time-lapse records continuously at a low frame rate, which gives you a full replay of what happened but uses more battery.
For street parking, impact-only is usually the smartest default. For a quiet driveway, motion-only or time-lapse both work well. Most cameras let you combine modes, so impact plus a short motion buffer covers most situations.
G-sensor sensitivity
The G-sensor triggers an event recording when the car decelerates sharply or gets bumped. Set it too sensitive and every speed bump or pothole locks a "critical" file you cannot delete. Set it too low and you miss the bump that dings your door in a parking lot.
Medium is the right starting point. Drive for a week, then check how many false events you have. If the card is full of speed bumps, dial it down.
If the camera missed a real bump, dial it up.
Loop recording
Loop recording is what keeps the camera running without you ever touching the card. It splits footage into short clips (3 minutes is the sweet spot) and overwrites the oldest clip when the card fills. The only files that do not get overwritten are the ones the G-sensor flags as events.
Format the MicroSD card in the camera once a month. Dash cam cards take a beating from constant overwrite cycles, and a fresh format clears out fragmented files that can corrupt over time. Replace the card every 12 to 24 months, sooner if you drive a lot or live in a hot climate.
Formatting the MicroSD Card and Getting the Settings Dialed In
The MicroSD card is the most failure-prone part of any dash cam, and most "the camera won't record" problems trace back to it. A few habits eliminate 90% of those failures.
Format the card before first use, and only in the camera. Computer formatting works, but the camera creates a file structure tuned to its firmware. If you format in Windows or macOS, the camera may not recognize the card on the next boot.
Set the loop length to 3 minutes. Shorter clips (1 minute) save faster after an event but fragment the card faster. Longer clips (5 or 10 minutes) are easier to review but harder to share.
Three minutes hits the middle.
Set the resolution and frame rate to whatever your card can sustain. Aggregate reviews of 4K dash cams show that a 256GB card fills in roughly 8 to 12 hours of continuous recording at the highest bitrate. If you drive a lot, lower the resolution or the bitrate so the card keeps two or three days of footage in reserve.
Set the date, time, and time zone manually if the camera does not have GPS. A dash cam with the wrong timestamp is half-useless in a court or insurance claim. Cameras with GPS set themselves automatically within a few seconds of the first satellite lock.
Turn off any screensaver or screen-dim feature if the camera has one. A bright screen in the cabin at night is distracting and, in some jurisdictions, technically a windshield-mounted obstruction.
Common Dash Cam Installation Mistakes (and How to Avoid Them)
Most dash cam problems are not hardware failures. They are install errors that show up the first time the camera is actually needed.
Mounting in the wiper's blind zone
If the lens sits below the wiper's arc, half your footage has a permanent smear across it. Move the camera up an inch or shift toward the passenger side until the entire frame is clear.
Tapping the wrong fuse
Tapping a constant fuse when you meant switched means the camera never turns off (battery drain). Tapping a switched fuse when you meant constant means parking mode never works. Test before you tap, every time.
Routing cable through the airbag path
The driver's A-pillar contains a curtain airbag that inflates upward and forward in a crash. A cable pressed into the deployment path can snag the airbag and either block it or get ripped out at high force. Always route on the passenger side, or stay inside the factory wiring channel on the driver's side.
Skipping the ground wire
A hardwire kit that grounds to a painted bolt or a loose dashboard bracket will give you flickering power, weird resets, and ghost recordings. Find a bare metal bolt on the chassis and tighten the ground ring terminal down so it bites into clean metal.
Forgetting to format the card
A new card straight out of the box may use a file system the camera does not recognize. The result is "card error" on the screen, or worse, the camera recording nothing while pretending to record. Format in-camera before first use, then format monthly after that.
Using the wrong fuse tap size
A micro2 fuse tap in a mini fuse slot will not seat. The connection will be loose, the camera will cut out over bumps, and eventually the tap will overheat. Match the tap to the fuse type exactly, and confirm by checking the original fuse's color and shape against the tap's slot.
Dash Cam Install by Vehicle Type: Sedan, SUV, Truck, EV, and Classic Car
The core steps are the same across vehicles, but a few body types have their own quirks.
Sedan
The cleanest install. Headliner hides easily, A-pillar pops off with one trim tool, and the rear camera runs through the trunk gasket. Plan on 45 minutes for a hardwired front-only install.
SUV
Tall glass means a slightly higher mount to keep the horizon centered. The rear camera cable usually runs through the liftgate's existing rubber boot, which is generous with room. Watch out for tailgates with motorized openings; pinching the cable in the boot can break it over time.
Truck
Single-cab trucks have short cabins, so the cable run to the fuse box is short. Crew-cab trucks are basically sedans. Mount the rear camera on the rear window of the cab if the bed is open, or on a topper window if you have one.
EV
Most EVs have their fuse box in unconventional spots. Teslas put cabin fuses behind a panel in the driver's footwell. Rivians put them in the center armrest.
Check the manual before you start, and expect to spend an extra 15 minutes finding the right panel.
Classic car
Older cars often have glass fuses, not blade fuses. Fuse taps for glass fuses exist but are rare. Consider an OBD-II power adapter or a switched accessory line tapped into the ignition switch instead.
Dash Cam Installation Safety, Legal, and Windshield Rules to Know
A dash cam install that breaks the law is worse than no install at all. Most jurisdictions are permissive, but a few rules trip people up.
Windshield obstruction laws
Most US states follow the NHTSA general guideline that windshield-mounted devices should sit outside the primary viewing area, which is roughly the center 6 inches at the top and the area swept by the wipers. Mounting behind the rearview mirror keeps you compliant in nearly every state. A few states (California, for example) have stricter rules about what counts as an obstruction, so check your state's vehicle code if you are unsure.
Audio recording laws
Eleven US states require two-party consent for audio: California, Connecticut, Florida, Illinois, Maryland, Massachusetts, Montana, New Hampshire, Pennsylvania, and Washington. If your camera records audio and you drive in one of those states, either turn audio recording off or post a small notice in the cabin. Rideshare drivers in particular should pay attention here.
Airbag zones
We covered this in the routing section, but it is worth repeating. The passenger-side A-pillar has a curtain airbag in most modern cars. Stay inside the factory wiring channel and never staple or screw the cable into the pillar.
Federal Motor Vehicle Safety Standards
In the US, dash cam mounts are not regulated the same way radar detectors were decades ago. As long as the mount does not project more than a few millimeters off the glass and does not sit in the driver's line of sight, you are fine. Manufacturer documentation from major dash cam brands confirms compliance with general FMVSS windshield requirements.
Troubleshooting: Dash Cam Won't Turn On, Keeps Falling Off, or Footage Is Corrupt
Even a clean install hits a snag sometimes. Here is how to diagnose the common ones.
Camera won't power on
Check the cable first. Unplug it from the camera and plug it into a phone or another USB source to confirm the cable works. Then check the power source.
For cigarette lighter installs, confirm the socket has power (plug in a phone charger). For hardwired installs, check the fuse tap fuse. If both pass, the camera itself may be dead, and it is warranty time.
Camera keeps falling off the windshield
The adhesive did not bond. Either the glass was not clean enough, the alcohol did not fully evaporate, or the temperature was too cold for the adhesive to cure. Remove the old adhesive with Goo Gone or heat (hair dryer), clean the spot again with isopropyl alcohol, and reapply a new 3M VHB pad.
Suction cups that fall off usually need a small dab of cooking oil on the rubber to refresh the seal, then a wipe down with alcohol.
Footage is corrupt or choppy
Almost always a card issue. Format the card in-camera. If the problem persists, replace the card.
Cheap or non-endurance cards fail under the constant overwrite cycle. If a brand-new endurance card still produces choppy footage, lower the resolution or bitrate in the camera settings.
Parking mode not working
Confirm you have tapped a constant fuse (powered with the car off) and that the hardwire kit's yellow wire is connected to it. Confirm the hardwire kit's voltage cutoff is set to a level above your resting battery voltage (11.8V or 12.0V, not lower). Confirm parking mode is enabled in the camera's settings, not just on the app.
Time and date reset every trip
The camera is not holding its internal clock battery. Most cameras with a small internal battery lose the clock after a few days of being unpowered. If you drive daily, the camera should hold the clock.
If it resets every morning, the internal battery is dead and the camera needs service or replacement.
How Long Does a Dash Cam Install Take and What Does It Cost?
Time depends on the path you picked back in the first section. Here is the realistic range.
| Install type | Time | Tools you need | Out-of-pocket cost beyond the camera |
|---|---|---|---|
| Cigarette lighter | 20–30 min | None | $0 |
| Hardwired, switched only | 45–75 min | Trim tool, fuse tap, multimeter | $15–$25 |
| Hardwired, switched + constant | 60–90 min | Trim tool, fuse tap, multimeter, zip ties | $20–$35 |
The dash cam itself runs anywhere from $50 for a basic 1080p unit to $400+ for a dual-channel 4K setup with parking mode. A good hardwire kit adds $15 to $30, and an endurance-rated 128GB MicroSD card runs another $20 to $30.
For most people, the realistic budget for a clean, hardwired, dual-channel setup is $150 to $250 in gear plus 90 minutes on a Saturday morning. That is the cost of a tank of gas for evidence that can save a $1,000 insurance deductible after one fender-bender.
Expert Tips for a Cleaner, More Reliable Dash Cam Install
A few habits separate the installs that look like they came from the dealership and the ones that look like a high school shop project.
Buy a second fuse tap kit. They are cheap, and having a spare means you are not stuck if you miswire the first one or want to add a second accessory later (a radar detector, for example).
Label your fuse taps. A small piece of tape on each tap with the circuit name (radio, cigarette lighter, interior light) saves you an hour the next time you need to trace a wire.
Run a slow first week. After the install, drive carefully for a week. Watch the footage.
Note any time the camera misses an event or catches a false one, then adjust the G-sensor and parking mode sensitivity accordingly.
Keep a spare MicroSD card in the glove box. If your card fails mid-trip, a spare keeps the camera recording. Endurance cards are cheap insurance against lost footage.
Update the firmware. Manufacturer firmware updates often fix bugs that affect loop recording, parking mode behavior, and MicroSD card compatibility. Check the manufacturer's app or website once a quarter.
Park in the shade when you can. Capacitor-based dash cams handle heat better than battery-based ones, but even capacitors wear out faster at 140°F+ dashboard temperatures. A sunshade or a garaged parking spot extends the camera's life by years.
Dash Cam Installation Checklist: Before You Hit Record
Run through this list once the install is done. It takes two minutes and catches 95% of the problems that show up later.
- Glass is clean under the mount, and the mount has cured for at least an hour
- Cable is fully tucked into the headliner, A-pillar, and door seal
- A-pillar trim panel is snapped back with all clips intact
- Fuse tap is fully seated, and both fuses are the correct rating
- Ground wire is attached to bare metal, not paint
- Camera powers on with ignition, shuts off when expected
- Parking mode triggers when you tap the bumper (test it)
- Footage plays back on the camera and on your phone via Wi-Fi
- Date, time, and time zone are correct
- MicroSD card is formatted in-camera
- Loop recording is set to 3-minute clips
- G-sensor sensitivity is set to medium
- Spare fuse taps and a spare MicroSD card are in the glove box
If every box is checked, you are done. Drive safe, and let the camera do its job.
Frequently Asked Questions
How long does it take to install a dash cam?
A cigarette lighter install runs 20 to 30 minutes for most people. A hardwired install to the fuse box takes 45 to 90 minutes the first time you do it. Plan on an hour if you are also routing a rear camera cable.
Do I need to hardwire a dash cam for parking mode?
Yes. Parking mode requires constant power, which the cigarette lighter socket usually does not provide when the car is off. The cleanest way to get constant power is a hardwire kit tapped into a constant fuse, with a low-voltage cutoff to protect the battery.
Where should I mount a dash cam on the windshield?
Mount it behind the rearview mirror on the passenger side, as high as possible without entering the wiper's blind zone. That position keeps the lens clear of the wiper sweep, the camera out of your line of sight, and the install compliant with most state windshield obstruction rules.
Will installing a dash cam void my car's warranty?
Generally, no. A plug-and-go install touches nothing electrical and is fully reversible. A hardwired install taps into existing fuse slots using an Add-A-Circuit, which is non-invasive and reversible.
The Magnuson-Moss Warranty Act in the US also prevents dealers from voiding a warranty over an aftermarket accessory unless they can prove the accessory caused the failure.
What MicroSD card should I use in a dash cam?
Use an endurance-rated card from a known brand (SanDisk High Endurance or Samsung PRO Endurance). Standard cards fail quickly under the constant overwrite cycle. A 64GB card is the practical minimum, and 128GB or 256GB gives you more days of footage in reserve.
Can I install a dash cam myself, or do I need a professional?
Most people can install a dash cam themselves with the steps above. If you are not comfortable identifying fuses, using a multimeter, or removing A-pillar trim, a professional installer at a car audio shop can do a hardwired install for $80 to $150. The cigarette lighter path is always a safe DIY project.
Final Recommendation: Your Decision Guide at a Glance
If you rent or plan to move the camera between cars, run it off the cigarette lighter and skip the fuse box. If you own the car and want parking mode, hardwire it with a fuse tap on a switched and a constant circuit, then set the cutoff to 11.8V. Mount behind the rearview mirror on the passenger side, route along the headliner and A-pillar (never through the airbag path), and format an endurance MicroSD card in-camera before you drive.
That decision tree covers roughly 95% of installs cleanly.
For 2026, the practical standard most installers agree on is a capacitor-based camera with at least 1080p, an endurance MicroSD card, and a hardwire kit with a built-in low-voltage cutoff. Anything more is bonus, anything less is a compromise you'll notice the first time you actually need the footage.
If a step in the guide felt over your head, the cigarette lighter path is always a clean fallback. Drive it for a month, get comfortable with how the camera behaves, and upgrade to a hardwired install when you're ready.