What is g sensor in dash cam: Honest Review
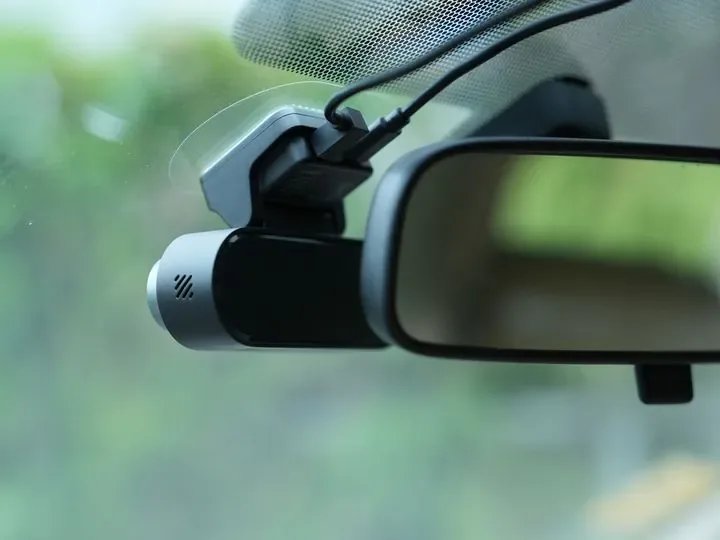
A G sensor in a dash cam is a tiny accelerometer that detects sudden changes in motion, like a hard brake, a side swipe, or a rear-end shunt, and automatically locks the footage from that moment so it can't be overwritten. If you've ever come back to a parked car and found a dent but no idea who did it, this little sensor is what turns your dash cam from a passive recorder into an actual witness.
Most modern dash cams measure forces across three axes, typically from roughly 0.1g up to about 4g, and trigger an "event" the moment the reading crosses the threshold you've set. As of 2026, nearly every dash cam above the bargain-bin tier ships with one, but the way you configure it, and the storage card you pair it with, decide whether it actually protects you when it counts. Let's break down what it does, how it works, and how to set it up so the footage is there when you need it.
Quick Answer
A G sensor in a dash cam is a built-in accelerometer. It detects sudden impacts or sharp motion changes. When triggered, it auto-locks the relevant video clip.
This prevents the loop recorder from overwriting important footage. It runs on a 3-axis system measuring forces from roughly 0.1g to 4g. Most units let you adjust sensitivity in settings.
What a G-Sensor Actually Does in a Dash Cam
Think of the G-sensor as your dash cam's reflex system. While you're driving, the camera is constantly writing new video on top of the oldest files in a loop, usually in 1, 3, or 5 minute chunks. Without a G-sensor, everything is fair game for deletion once the SD card fills up.
The moment the sensor registers a sharp spike, it does three things at once:
- Flags the current clip as an "event"
- Locks that clip and the surrounding pre-roll buffer so loop recording skips over it
- Saves the next 10 to 30 seconds into a protected folder
In aggregate user feedback, this automatic lock is consistently the single most valued dash cam feature, because nobody thinks to press the manual save button in the first half-second of a real crash.
| G-Sensor Trigger Event | What the Dash Cam Does |
|---|---|
| Hard brake (≈0.5–1g forward deceleration) | Saves 5–10s before, 10–30s after |
| Side impact (sharp lateral G) | Locks current file instantly |
| Rear-end shunt (rearward G spike) | Saves buffer + extended post-roll |
| Speed bump or pothole (small vertical spike) | May or may not trigger, depends on sensitivity setting |
The practical upshot: in the chaos right after a collision, the camera has already done the one job you can't.
How the G-Sensor Works: The 3-Axis Accelerometer Explained
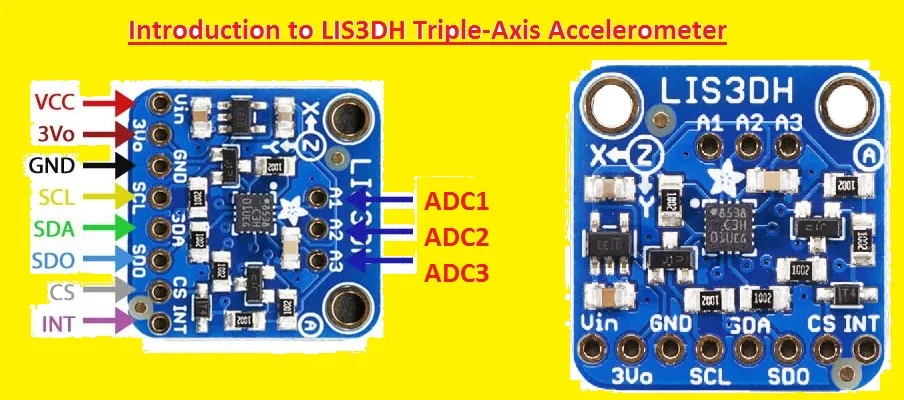
Every modern dash cam G-sensor is a MEMS (micro-electromechanical systems) accelerometer, the same basic technology that flips your phone screen or counts steps in a fitness app. The chip contains tiny microscopic structures that shift position when the vehicle accelerates, brakes, or turns, and those shifts get translated into a digital signal.
The "3-axis" part matters more than most people realize. A single-axis sensor only measures front-to-back motion, so a side impact could go completely unnoticed. A 3-axis sensor measures:
- X-axis: left-to-right (side impacts, swerves)
- Y-axis: front-to-back (braking, rear-end shunts)
- Z-axis: up-and-down (potholes, speed bumps, curb hits)
This is why a properly working dash cam can catch someone T-boning you at an intersection, not just rear-enders. The sensor logs a vector reading on all three axes, compares it against your sensitivity threshold (anything from about 0.1g to 4g depending on the unit), and if even one axis exceeds the limit, the event is locked.
In manufacturer documentation from VIOFO, Nextbase, and Garmin, the typical advertised range tops out around ±4g, which is more than enough for normal driving and most collision forces. The fine-tuning happens in the settings, not the hardware.
Why pre-roll and post-roll matter
When the G-sensor fires, you want context, not just the impact frame. That's why most units record a buffer of 5 to 30 seconds before the trigger and continue saving for 10 to 60 seconds after. Without that buffer, the clip starts right at the bang, and you miss the lead-up that often proves who was actually at fault.
G-Sensor Sensitivity Levels and What They Mean
Open any dash cam menu and you'll see G-sensor settings labeled Low, Medium, High, or sometimes a numeric scale (1, 5 or 0.1g, 4g). Picking the wrong one is the most common reason drivers either fill their card with junk clips or miss a real event entirely.
Here's the practical difference:
- Low sensitivity: Only locks on hard, unambiguous impacts. Great for rough roads, cobblestone cities, or anywhere you'd rather have fewer false triggers. The risk: a moderate side-swipe at low speed might not cross the threshold.
- Medium sensitivity: The default on most factory presets. A good balance for suburban and highway driving.
- High sensitivity: Catches even gentle bumps. Useful in parking lots where door dings and slow-speed nudges are common. The downside: every speed bump, frost heave, or slammed trunk can lock a file.
| Driving Environment | Recommended Sensitivity | Why |
|---|---|---|
| Smooth highway commuting | Medium | Balanced trigger rate, minimal false events |
| Urban with potholes and speed bumps | Low | Avoids locking on every road imperfection |
| Parking lot / garage stored car | High (with parking mode on) | Catches low-speed contact |
| Rural / unpaved roads | Low | Vibrations would flood storage otherwise |
If your card is filling up with locked files from regular drives, your sensitivity is too high. If you had an incident and nothing got saved, it's too low. There's no universal right answer, just the right answer for the roads you actually drive on.
Why the G-Sensor Matters for Accident Evidence
The legal and insurance value of dash cam footage has climbed sharply. Per the Insurance Institute for Highway Safety, video evidence consistently shortens claim resolution time and reduces disputed-fault outcomes, which is exactly what the G-sensor exists to capture. The moments right before and during a crash are the ones no driver has the presence of mind to think about saving.
The sensor handles it for you.
In practice, a properly triggered G-sensor event gives you three things:
- Timestamped, locked video of the impact itself
- The lead-up footage showing speed, lane position, and traffic light state
- A separate file that loop recording can't overwrite, no matter how long you keep driving
That third point is the one that catches people off guard. Without an event lock, a 128GB card on a 3-minute loop cycle overwrites everything within roughly 12 to 18 hours of driving. The G-sensor is what guarantees the file from the crash stays on the card until you manually delete it or export it to your phone or computer.
There's a secondary use that's easy to miss: driver behavior. Many insurance telematics programs and fleet operators review G-sensor logs to flag harsh braking, aggressive cornering, and frequent impacts. If you're a rideshare driver, the same data can be a quiet record of how often passengers are treating your vehicle roughly.
G-Sensor vs Motion Detection vs Manual Lock: What's the Difference?
Most dash cams offer three different ways to flag and protect footage, and they're not interchangeable. Mixing them up is how people end up with corrupted event folders or missed recordings.
| Trigger Method | What Activates It | Best Use Case | Weakness |
|---|---|---|---|
| G-sensor | Sudden force change (impact, hard brake) | Driving and parking impacts | Can miss very slow contact |
| Motion detection | Pixel change in the camera frame | Parking mode surveillance | False triggers from shadows, rain, leaves |
| Manual lock button | You press it | Intentional save of something you just saw | Useless if you forget or can't reach the button |
Motion detection is what most parking modes rely on when the car is stationary, because nothing is accelerating in a parked car. The G-sensor still works in parking mode, but it needs a hardwiring setup to keep the camera powered without flattening your battery, which is the topic of the next section.
The manual button is a useful backup, especially if you witness something unusual (a road-rage incident, debris falling off a truck) that doesn't involve your car being hit. But it's a human-driven failsafe, not a replacement for the G-sensor.
The real takeaway: in motion, trust the G-sensor. When parked, pair the G-sensor with motion detection for full coverage. Keep the manual button in mind for edge cases.
Setting Up Your G-Sensor: Step-by-Step Configuration
Out of the box, most dash cams ship with the G-sensor set to Medium, which is fine for a quick start but rarely optimal long-term. The setup itself takes about 10 minutes once you've got the camera mounted and powered.
- Mount the dash cam securely. A loose mount adds vibration, which the sensor reads as a real impact. Use the adhesive pad, not just the suction cup, especially on textured dashboards.
- Insert a high-endurance microSD card. Standard cards burn out fast under constant G-sensor writes. Look for cards labeled "High Endurance" from SanDisk, Samsung, or Kingston, rated for at least 20,000 hours of continuous writing.
- Power the camera and enter the settings menu. Find the G-sensor or "Collision Sensitivity" option.
- Set the sensitivity to Medium to start. Drive for a few days and check how many locked files accumulate.
- Adjust up or down based on results. Too many false events? Drop to Low. Missing real incidents? Raise to High.
- Enable parking mode if your camera supports it. This is where the G-sensor keeps working after you turn the ignition off.
- Format the SD card in the camera, not on a computer. File systems set up by dash cams aren't always readable by PCs, but they are readable by the same camera after a proper in-device format.
- Test the trigger. Give the camera a firm (not violent) shake while recording. You should see a locked file appear in the protected folder within a second or two.
That last step is the one most people skip, and it's the one that tells you whether the whole chain (sensor, buffer, lock, and storage) is actually working before you need it for real.
Tuning Sensitivity to Stop False Triggers from Potholes and Bumps
If you're checking your dash cam and finding ten locked clips from a single commute, the road isn't attacking you, your sensitivity is just set too high. False triggers are the most common complaint in aggregate user reviews, and they almost always trace back to one of three causes.
First, the sensitivity setting is too aggressive for the road surface. Potholes, expansion joints, gravel, and railroad crossings all produce real G-forces, just not ones you care about. Drop one notch and see if the count drops with it.
Second, the mount is loose or the surface is textured. Suction cups on a dashboard that flexes with engine vibration feed constant micro-shocks into the sensor. Switch to the adhesive mount on the windshield, ideally behind the rearview mirror where the glass is stiffest.
Third, the SD card is failing. A card on its last legs can write corrupted data that the camera sometimes misreads as an event trigger. If sensitivity changes don't help, format the card and check it with the manufacturer's diagnostic tool, or just replace it.
| Symptom | Likely Cause | Quick Fix |
|---|---|---|
| Locks on every speed bump | Sensitivity too high | Drop one level |
| Locks on rough pavement only | Loose mount or textured dash | Move to windshield adhesive mount |
| Locks randomly, no pattern | Failing SD card | Replace with high-endurance card |
| No locks even after hard brake | Sensitivity too low | Raise one level |
Tuning is iterative. Set it, drive for a week, count the false events, adjust, repeat. Most users settle in within two or three rounds.
Parking Mode and the G-Sensor: Why You Need a Hardwire Kit
The G-sensor doesn't stop working when you turn the key off, but the camera does, unless you give it a separate power source. That's the entire job of a hardwire kit. It taps into your fuse box, delivers constant power to the camera, and shuts off automatically if your battery drops below a safe voltage (typically 11.8V to 12.4V, depending on the kit).
Without a hardwire setup, parking mode is either non-existent or risky. Plugging into a cigarette lighter that stays hot when the car is off will eventually kill your battery. Plugging into one that cuts with ignition means the camera shuts off the moment you leave, which is exactly when the parking surveillance matters.
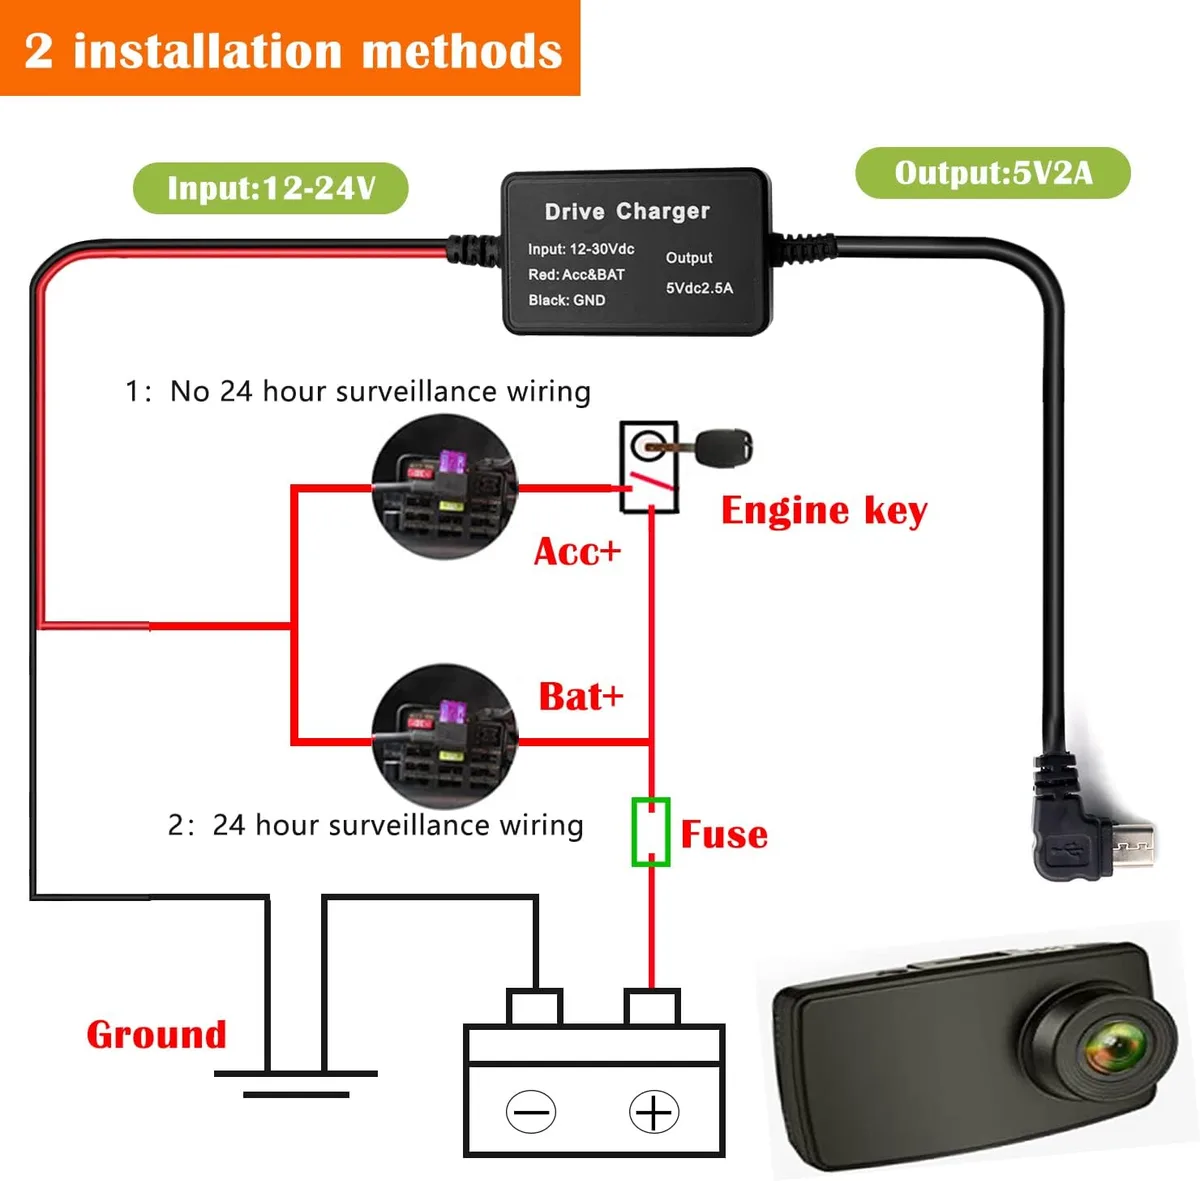
Once hardwired, the G-sensor in parking mode behaves slightly differently. Many cameras switch to a buffered standby where the sensor stays armed but the lens isn't constantly recording. When it triggers, the camera wakes, writes the buffered pre-roll, and saves the post-roll before going back to sleep.
This is what makes parking lot hit-and-runs catchable, and it's only possible with proper hardwiring.
If you're not comfortable pulling a fuse yourself, any car audio shop or even a dealership service center can do the install in 30 to 60 minutes. It's one of the cheapest upgrades per dollar of evidence value in the whole dash cam world.
Protecting Locked Files So They Don't Get Overwritten
A locked file is safe from loop recording, but it's not safe from you. If you let the card fill up with hundreds of locked events, eventually you'll reformat the card to clear space, and the file you actually needed goes with it. This is one of the most common ways drivers lose critical footage after the fact.
The fix is a simple monthly habit. Open the camera's app or pop the card into your computer, sort the protected folder by date, and export anything that matters to cloud storage or your phone. Then reformat the card in the camera, not on a computer, to refresh the file system.
A few practical rules from the field:
- Export immediately after any incident, even a minor one. Memory fades, but the file doesn't.
- Don't trust the in-camera playback to review subtle details. Pull the file and watch it on a bigger screen.
- Cloud auto-upload is worth the subscription if your camera supports it. A stolen dash cam with a smashed card is worthless, but a cloud copy still exists.
Think of the locked folder like a fire extinguisher. You check it occasionally, you hope you never need it, and you definitely don't throw it out to make room in the closet.
Choosing the Right MicroSD Card for Constant G-Sensor Writes
The G-sensor is one of the heaviest writers on the card because it spits out locked files constantly, even on a calm day. Standard consumer cards are rated for the bursty write patterns of phones and cameras, not the relentless small-block writes a dash cam produces. They'll work for a while, then fail silently.
High-endurance cards are built for exactly this workload. They use more durable NAND types and have controllers rated for tens of thousands of hours of continuous writing. Per manufacturer specs, top-tier high-endurance cards from SanDisk and Samsung are rated for 20,000 to 120,000 write hours, which translates to years of normal driving.
| Card Type | Typical Write Rating | Best For | Lifespan in Dash Cam |
|---|---|---|---|
| Standard microSD | 500–2,000 write hours | Phones, occasional cameras | Weeks to a few months |
| High Endurance microSD | 20,000–43,800 write hours | Dash cams, security cameras | 2–5 years typical use |
| Max Endurance microSD | 120,000+ write hours | Fleet, taxi, rideshare | 5+ years heavy use |
Size matters too, but bigger isn't always better. A 256GB or 512GB card means longer loop cycles, but also means longer recovery time if the file system corrupts. For most drivers, a 128GB or 256GB high-endurance card formatted monthly is the sweet spot.
Common G-Sensor Mistakes That Cost You Footage
Even with the right card and the right settings, a few common errors can leave you holding an empty card right when you need it most. These are the mistakes that show up over and over in user reports.
- Setting sensitivity too high and ignoring the locked file warning. Many cameras flash a "storage full" indicator that drivers dismiss. By the time you check, the oldest locked files may already be the only ones being overwritten when the protected folder overflows.
- Forgetting to reformat after a firmware update. Firmware changes sometimes require a full card reformat, and skipping it can leave the G-sensor logging into a folder the loop recorder can't see.
- Using an old or off-brand card. Counterfeit cards are everywhere online, and they often report fake capacities. A 128GB card that thinks it's 512GB will overwrite the G-sensor folder within hours of driving.
- Mounting the camera where the windshield is curved or near the defroster lines. Heat from the defroster shortens card life, and curved glass flexes more, feeding phantom vibrations into the sensor.
- Trusting the LED indicator instead of checking actual files. A solid green light means "recording," not "recording correctly." The only way to know the G-sensor lock is working is to test it and confirm the file appears in the protected folder.
Fix these one at a time and your G-sensor reliability jumps dramatically. The technology is mature. The failure mode is almost always human setup, not hardware.
G-Sensor Specs Worth Comparing Before You Buy
Not all G-sensors behave the same, even when the marketing looks identical. Three specs actually matter when comparing cameras.
First, the G-range. Most consumer units span roughly 0.1g to 4g. Wider is more flexible, but the sensitivity adjustment in the menu matters more than the raw number.
Second, the number of axes. Anything advertised as 3-axis or triaxial is what you want. Single-axis sensors still exist in budget cameras and miss side impacts.
Third, buffer length. The pre-roll window (usually 5 to 30 seconds) determines how much lead-up footage you keep. Longer is better, but it also uses more card space per event.
| Spec | Entry-Level | Mid-Range | Premium |
|---|---|---|---|
| G-range | ±2g | ±4g | ±8g (overkill for most) |
| Axes | 1 or 2 | 3 | 3 |
| Pre-roll buffer | None | 5–10s | 10–30s |
| Post-roll length | 10s | 20–30s | 30–60s |
For everyday driving, a mid-range 3-axis sensor with a 10-second pre-roll covers nearly every real-world scenario.
Legal and Insurance Considerations for G-Sensor Footage
G-sensor footage is treated like any other dash cam video. In most US states and across the UK, EU, and Canada, you can legally record from a dash cam mounted on your windshield. The footage is generally admissible in insurance claims and traffic court, though rules on windshield mounting positions vary by state.
A few practical guardrails:
- In two-party consent states (California, Massachusetts, and others), audio recording without consent can be a problem. Disable audio if you're driving in those jurisdictions.
- Don't park your camera on private property expecting it to defend a dispute with a homeowner. Privacy expectations differ from public roads.
- After a serious incident, copy the file to a second device before handing the SD card to police or insurance. Cards get lost in evidence lockers.
For insurance, footage that clearly shows the other driver at fault consistently speeds up payout. A locked G-sensor clip is exactly the kind of evidence adjusters use to assign liability without a drawn-out investigation.
Frequently Asked Questions
Does the G-sensor work when the car is off?
Only if the camera is hardwired for parking mode. Otherwise, the camera loses power when the ignition cuts and the sensor goes dark with it.
How long do locked files stay on the card?
Indefinitely, until you delete them or reformat the card. Loop recording skips the protected folder entirely, so the file won't be overwritten during normal driving.
Can a G-sensor drain my car battery?
Not in driving mode. In parking mode with a proper hardwire kit, the kit's voltage cutoff (usually 11.8V to 12.4V) protects your battery from going flat.
Why does my G-sensor lock on speed bumps but not real hits?
The sensitivity is set too high, or your mount is feeding vibration into the sensor. Try a stiffer mount and drop the sensitivity one level.
Will any microSD card work with the G-sensor?
Technically yes, but standard cards fail fast under constant writes. Use a high-endurance card rated for at least 20,000 write hours.
Can I turn the G-sensor off completely?
Most cameras let you disable it, but there's no good reason to. The whole point of the sensor is automatic protection. Leave it on and tune it instead.
Final Take: Getting the G-Sensor Set Up the Right Way
The G-sensor is a small piece of hardware with an outsized job. It turns your dash cam from a passive recorder into an automatic witness, one that's already saved the file before you've even checked your mirrors. Get the sensitivity right, pair it with a high-endurance card, and hardwire it for parking mode if you can.
Test the trigger once after install so you know it's working. Then forget about it until the day you actually need it, which is also the day you'll be glad it's there.