How to jump start an ac compressor: Easy guide
The outdoor unit hums, the fan spins, but no cool air comes out. You start Googling "how to jump start an ac compressor" because someone online said you can bring it back to life with a quick trick. Here's the real answer: a compressor that won't start almost never needs voltage "jumped" across its terminals.
Doing that destroys the windings in a single second. What it usually needs is a failing capacitor replaced, or a hard start kit installed to give it the torque boost it lost.
Roughly 60% of "dead compressor" calls HVAC techs run turn out to be a $25 capacitor or a $40 hard start kit, not a $2,500 compressor. That single fact is why this guide exists, so you can figure out which one you're dealing with before paying anyone anything.
Quick Answer
A compressor is "jump started" by replacing its failed run capacitor or installing a hard start kit. You never apply line voltage directly to the compressor terminals. Diagnose first.
Hum with no start means bad capacitor or weak start torque. No hum and no start means electrical or contactor issue. Test the capacitor, check the windings, then add a hard start kit if needed.
What "Jump Starting" an AC Compressor Actually Means
The phrase gets thrown around, but it has a specific meaning in HVAC talk. Jump starting a compressor means giving its single-phase motor the extra torque it needs to overcome locked rotor resistance on startup. It does not mean backfeeding voltage across the terminals.
Single-phase compressors don't start on their own the way three-phase motors do. They need a phase-shifting trick to create a rotating magnetic field in the start winding. That trick comes from one of three things:
- A run capacitor that stays in the circuit continuously (PSC motors).
- A start capacitor that drops out after the motor is up to speed (CSR motors, controlled by a potential relay).
- A hard start kit, which is a relay plus start capacitor combo bolted onto an older PSC compressor to give it CSR-style starting torque.
When people say the compressor "needs a jump," they almost always mean the start torque is gone. The motor hums because it has voltage, but it can't spin up because the phase shift collapsed. That collapse usually traces back to a failed capacitor, a weak capacitor, or a relay that isn't kicking in.
The 3 Symptoms That Tell You What Kind of Problem You Have
Before you touch a wire, listen. The sound the unit makes when the thermostat calls for cooling tells you almost everything.
Symptom 1: Dead silence at the outdoor unit. The fan doesn't spin, the compressor doesn't hum, nothing happens. This is usually not a compressor problem at all. It's a contactor issue, a blown fuse, a tripped breaker, a bad thermostat call, or a low-voltage wiring fault.
Check for 24V at the contactor coil first.
Symptom 2: A single loud click, then nothing. You hear the contactor pull in, you hear a brief thunk, and the unit goes quiet. The overload protector inside the compressor tripped on a locked rotor condition. Two things cause this: a bad capacitor that can't deliver starting torque, or a compressor with seized bearings.
You test to find out which.
Symptom 3: A continuous hum with no spin-up. The unit hums for 5, 10, sometimes 30 seconds. Then either it spins up and runs fine (this is borderline acceptable for older units in summer heat), or the overload trips and shuts it off. Continuous hum with no spin-up is the textbook bad capacitor symptom.
The windings have voltage but not enough phase shift to turn the rotor.
| Symptom | Most Likely Cause | First Test |
|---|---|---|
| Dead silence | Contactor, fuse, thermostat, low voltage | Check 24V at contactor coil |
| Click then off | Failed capacitor or seized compressor | Test capacitor MFD |
| Hum no spin | Bad or weak capacitor | Test capacitor MFD and check for swelling |
Why a Compressor Won't Start (And Why It's Almost Never the Compressor Itself)
Here's the part of the conversation nobody wants to hear: most failed compressors didn't fail on their own. They failed because a $25 part kept them from starting under high-load conditions, and the repeated locked-rotor events cooked the windings.
The locked rotor amps (LRA) on a residential compressor can run 5 to 8 times the rated load amps (RLA). A 3-ton unit might pull 15 RLA steady-state and 90+ LRA on startup. That surge is why a contactor chatters when voltage is weak, and it's why the overload protector exists.
It's also why a hard start kit is so effective: it dumps a giant capacitor-stored energy burst into the start winding for the first half-second, dropping LRA closer to normal range and getting the rotor moving before the overload can react.
Three things cause the no-start condition in roughly this order of frequency:
- Capacitor failure. Start or run capacitors lose capacitance over time. Heat kills them. A capacitor running 20°F above its rated ambient loses about half its rated life. Most residential AC capacitors live in 150°F+ condenser compartments, so a 10-year-old capacitor is living on borrowed time.
- Voltage sag. Long wire runs from a marginal transformer, an overloaded utility grid in summer peak, or undersized wiring at the disconnect. Anything that drops voltage below about 208V on a 240V circuit cuts start torque by the square of the voltage ratio.
- Mechanical seizure. Bearings fail, refrigerant contamination causes acid in the oil, or liquid refrigerant slugging bends a valve. This is the actual compressor failure, and it can't be fixed with a capacitor.
Test #1: Is the Capacitor Bad? (And How to Discharge It Safely First)
Before you grab a multimeter, discharge the capacitor. Even with the breaker off, a run capacitor can hold enough charge to give you a serious shock or weld a screwdriver to the terminals. A 45 MFD / 370V capacitor fully charged stores around 3 joules of energy.
That's not lethal at that voltage, but it's more than enough to make you drop off the unit and hurt yourself.
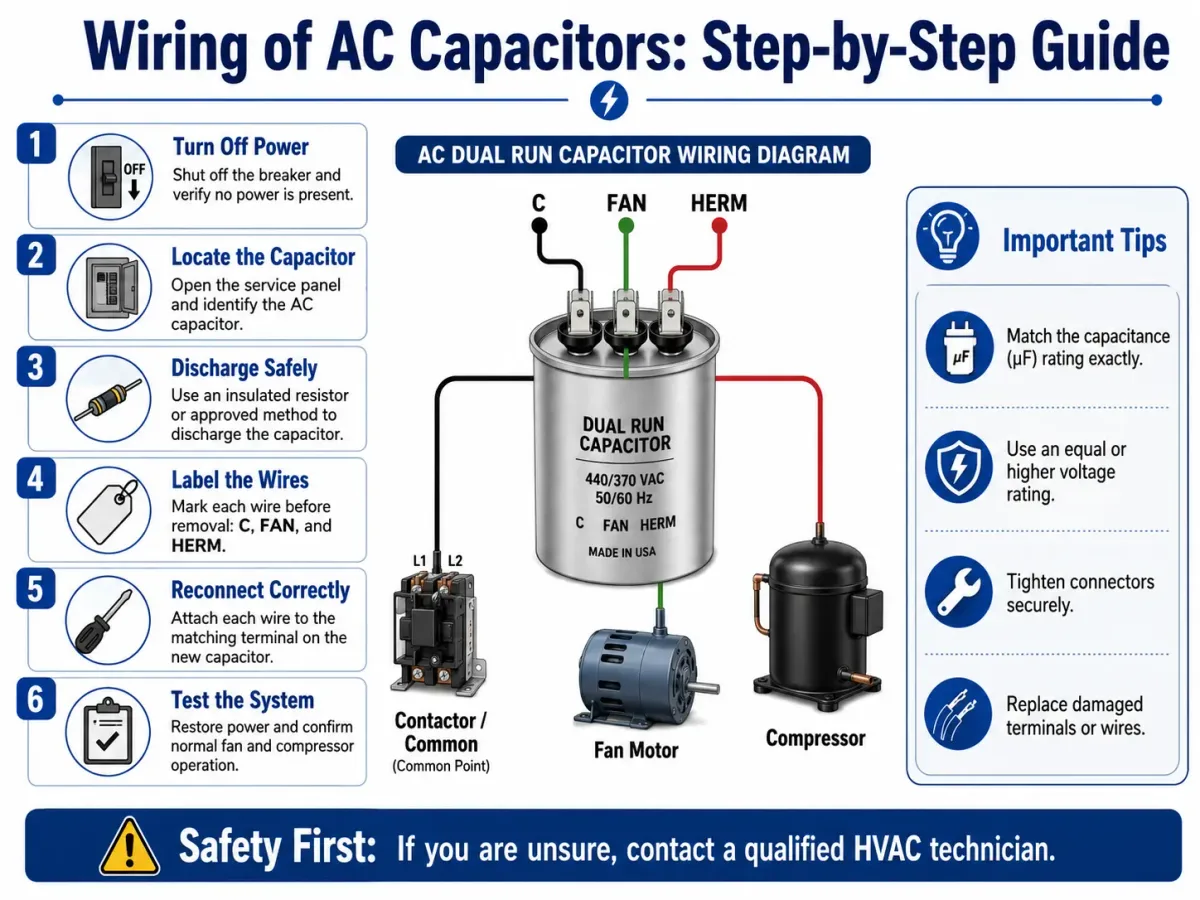
To discharge safely: Take an insulated-handle screwdriver, hold it by the plastic handle only, and short across the two terminals at the same time. You'll see a small spark and hear a pop. Do it twice to be sure.
Some techs also short from each terminal to ground.
Now look at it. A capacitor that's failed visually is obvious once you've seen one. The top is domed upward instead of flat. There's crusty brown residue leaking out the vent on top.
The terminals are corroded green or white. Any of those three means it's bad regardless of what your meter says later.
Now test it. Set your multimeter to capacitance (MFD or µF). Touch the probes to the corresponding terminals. A healthy capacitor reads within 6% of its rated MFD.
Manufacturer specs indicate +/- 5% tolerance, so anything outside 5 to 10% of the rated value is suspect.

If you don't have a multimeter with capacitance mode, a cheap $15 capacitor tester does the same thing and survives field abuse better. Don't trust a visual inspection alone: a capacitor can lose capacitance without showing any physical damage at all.
If the capacitor reads weak or zero, replace it before doing anything else. A 45/5 dual run capacitor runs about $25. Swapping it takes about 10 minutes with a nut driver and is the single highest-ROI repair in residential HVAC.
If the capacitor tests good but the compressor still won't spin up, the next test is the windings.
Test #2: Are the Compressor Windings Still Good?
With the breaker still off and the capacitor discharged, pull the wire leads off the compressor terminals. You're looking for three terminals on the terminal block inside the compressor: Common (C), Start (S), and Run (R). On most residential units they're marked HERM (for "hermetic" compressor) and follow this layout.
Set your multimeter to ohms. You're going to take three readings.
Common to Start should give you a low resistance value, typically 3 to 7 ohms on residential PSC compressors.
Common to Run should also be low, often 1 to 3 ohms, since the run winding uses heavier gauge wire.
Start to Run should equal the sum of the other two, because you're reading through both windings in series.
What you don't want to see: an open circuit (OL on the meter, no reading), or a short (reading under 0.5 ohms). Either is a dead winding.
The fourth test is the one most people skip, and it's the most important. Set the meter to megohms (or switch to a megger if you have one). Touch one probe to any of the three terminals and the other to a grounded metal part of the compressor shell.
You're reading the resistance through the insulation between the winding and the compressor housing.
Per industry standard and as confirmed in manufacturer service documentation from major compressor makers like Copeland Emerson, anything under 1 megohm to ground is failed. Anything under 5 megohms is suspect and should be watched. A healthy reading on a good compressor is 50 megohms or higher.
If your megohm test fails, no capacitor and no hard start kit will fix the unit. The winding insulation has broken down.
Here's the branch point. If winding resistance is normal AND the megohm test passes AND the capacitor is good, your compressor is mechanically sound and just needed a starting boost. That's the case for a hard start kit.
If winding resistance is off or the megohm test fails, stop. You're not jump-starting anything. You're dealing with a failed compressor that needs replacement or professional recovery.
The Branching Decision Tree: What to Do Based on What You Found
Now you can act based on real data instead of guessing. This is the workflow.
Branch A: Capacitor tests weak or failed.
Replace the capacitor with a new one of the exact same MFD rating and equal or higher voltage rating (370V or 440V). Power back up and test. If the compressor starts and runs, you're done.
Total cost runs about $25. Total time runs about 10 minutes. Most "jump start" situations end here.
Branch B: Capacitor tests good, windings test good, but unit still won't spin.
Install a hard start kit. The original capacitor isn't strong enough anymore (capacitance drifts down with age), or voltage conditions in your area are weak enough that the original design is now undersized. A hard start kit adds the missing torque.
Branch C: Capacitor tests good, windings test off (open or shorted).
Stop. The compressor is electrically failed. Hard start kits won't help.
You're looking at compressor replacement ($1,500 to $3,500 installed) or full system replacement if the unit is over 12 years old. This is when a professional opinion matters, and getting a second one from a tech who isn't also selling the replacement is worth the trip charge.
Branch D: Capacitor tests good, megohm test fails.
Same as C. Ground fault means the windings have absorbed moisture, the refrigerant is contaminated, or the motor has overheated to the point of insulation breakdown. A hard start kit will dump more current into a dying motor and kill it faster.
Don't do it.
| Test Result | Decision | DIY-Friendly? |
|---|---|---|
| Weak/failed capacitor | Replace capacitor | Yes |
| Good cap, good windings, no start | Install hard start kit | Yes |
| Open or shorted windings | Replace compressor | No, call a pro |
| Failed megohm test | Replace compressor | No, call a pro |
| No 24V at contactor | Trace low-voltage fault | Possible, depends on cause |
As of 2026, the popular hard start kit brands (Supco, Mars, Packard, Rectorseal) sell versions rated for residential PSC compressors up to 5 tons. The most common go-to is the 5-2-1 Compressor Saver (Supco SSP10 or SPP6 series), which includes the start capacitor and the potential relay in one unit.
How to Install a Hard Start Kit (The Real "Jump Start" Fix)
Breaker off. Capacitor discharged. Verify with your meter.
Mount the hard start kit inside the condenser compartment, usually on the inside of the service panel or the cabinet wall. Most kits come with a self-tapping screw and a bracket. Get it somewhere it won't vibrate against the copper lines.
The wiring is the part you can't get wrong. A hard start kit has four wires (in most 3-wire designs): two go to the compressor HERM terminals, and two go inline with the start winding path. The manufacturer wiring diagram is the source of truth here.
Generic guidance doesn't replace it.
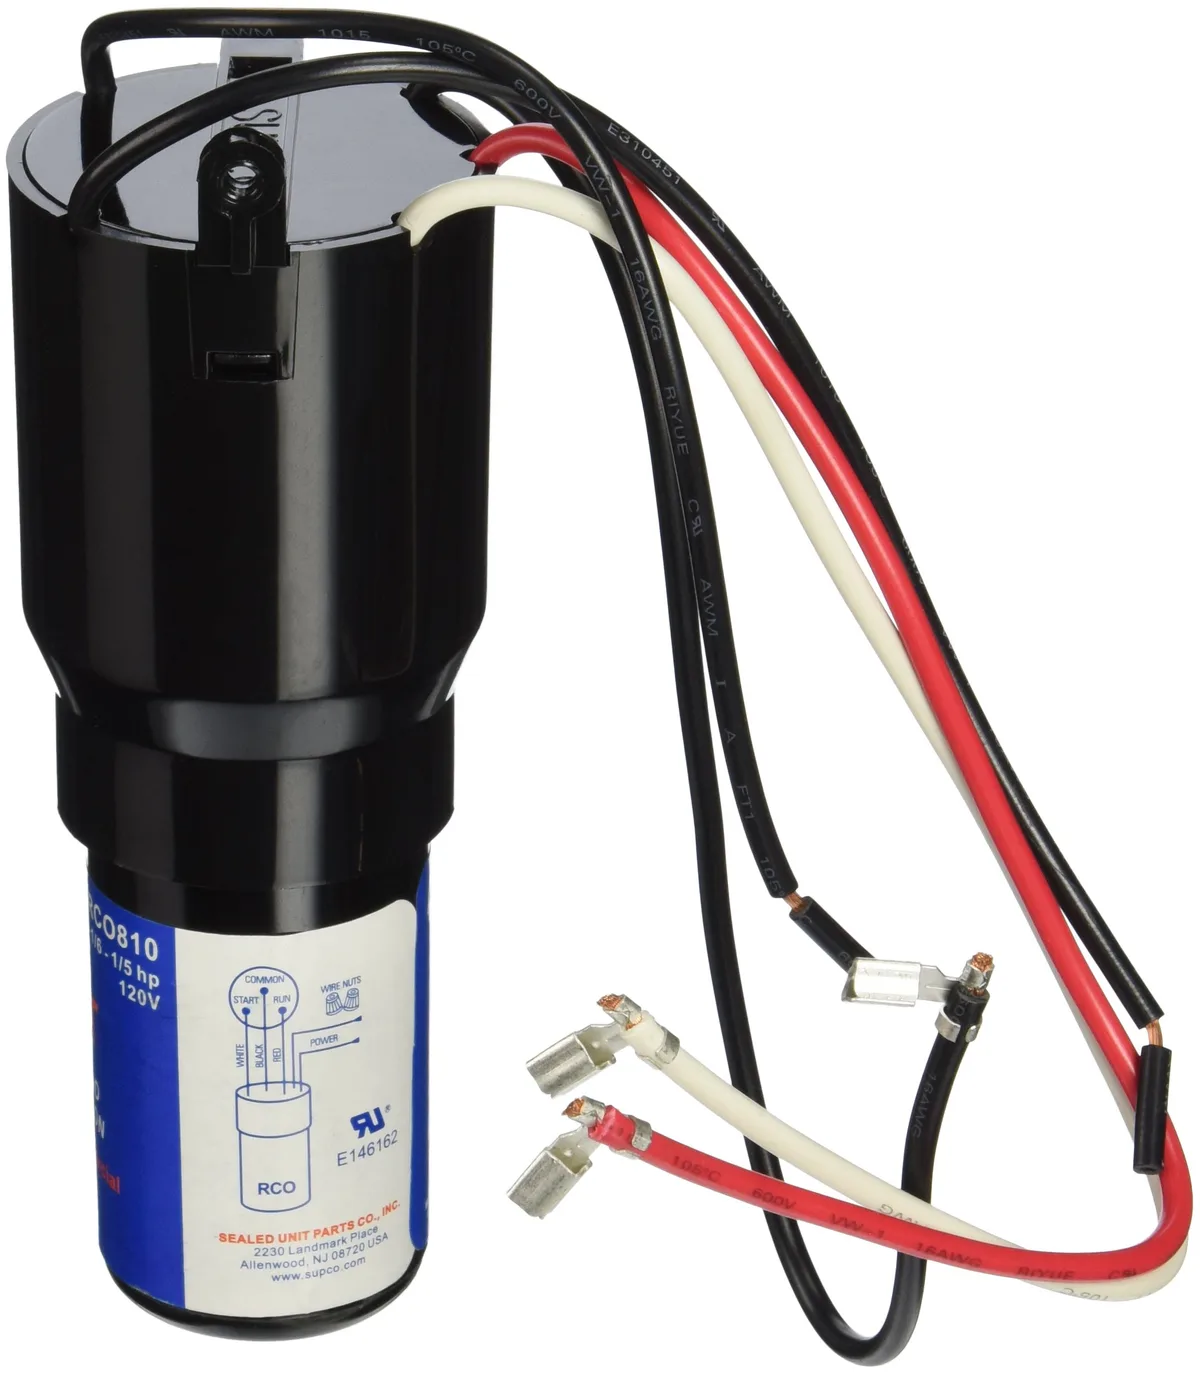
Here's the standard wiring pattern for a 3-wire hard start kit on a residential PSC compressor:
- The black compressor wire (common, from contactor L2) lands on the Common terminal.
- The start winding wire lands on the Start terminal.
- The run winding wire lands on the Run terminal.
- The hard start kit's two black leads wire in parallel across the HERM (start and run) terminals, with the kit's potential relay interrupting the start capacitor path.
Wire it backward and the kit won't fire. The potential relay is what disconnects the start capacitor from the circuit once the motor is up to speed, just like a CSR compressor does from the factory. If it never disconnects, the start capacitor overheats and pops.
If it never engages, nothing changes.
Once wired, restore power. Listen for the spin-up. The compressor should start within 1 to 2 seconds with a clear surge, then run steady.
If it chatters or clicks, the kit is miswired or the wrong MFD rating for your compressor. If it hums for 3+ seconds before spinning, the kit's MFD is too low and you need a higher-rated unit.
Verify amp draw with a clamp meter on the common wire. Compare it to the compressor's RLA rating on the nameplate. A reading within 10% of RLA under steady-state conditions means the motor is healthy.
A reading under 70% of RLA often means the motor is partially shorted. A reading 20%+ over RLA means the compressor is mechanically overloaded (low refrigerant, bad bearings, or high head pressure), and the hard start kit isn't going to fix that.
Hard Start Kit vs New Capacitor vs New Compressor
Pick the swap based on what your tests actually showed.
If the capacitor tested bad, replace the capacitor. Hard start kit alone won't help, and the cost difference is significant. A new run capacitor runs $15 to $50 retail.
A hard start kit runs $25 to $60. A new compressor runs $1,500 to $3,500 installed. Don't add a kit when the capacitor is the failed part.
If the capacitor tests good and the windings test good, install a hard start kit. This is the case where people get told they need a compressor replacement but actually just need $40 of parts. It's the most cost-effective "jump start" in residential HVAC, and the install is well within DIY reach.
If the windings test bad or the megohm test fails, replace the compressor or the whole system. No accessory will bring it back, and trying will just make things worse. A dying compressor pulled into hard start torque repeatedly trips its overload, overheats the windings further, and can rupture the suction line.
That turns a $2,500 compressor job into a full refrigerant recovery and replacement.
| Fix | Cost (parts only) | Skill Needed |
|---|---|---|
| Run capacitor | $15 to $50 | Beginner |
| Hard start kit | $25 to $60 | Beginner to intermediate |
| Start capacitor only | $10 to $25 | Beginner |
| Compressor replacement | $1,500 to $3,500 | Professional only |
| Full system replacement | $4,000 to $8,000 | Professional only |
When in doubt, replace the capacitor first. It's the cheapest, the easiest, and it's the most common fix. Hard start kits are step two.
Compressor replacement is step three, and only after the first two have been ruled out.
Costs, MFD Ratings, and Specs You Need Before Touching Anything
Run capacitors come stamped with two numbers that have to match: the MFD (microfarad) rating and the voltage class. Voltage class is 370V or 440V for residential. Going higher than the original is fine.
Going lower is not. The MFD has to be within 5 to 10% of the nameplate rating on the compressor, or the motor runs inefficiently and overheats.
Common residential ratings:
- 2.5 ton unit: 35/5 dual run, 370V
- 3 ton unit: 45/5 dual run, 370V
- 3.5 to 4 ton unit: 45/7.5 dual run, 370V or 440V
- 5 ton unit: 55/10 or 60/15 dual run, 440V
The fan MFD and the compressor MFD live on the same dual capacitor in most residential condensers. They're two separate capacitance ratings on one can. When you replace the capacitor, replace both at once even if the fan rating tests good, since the failure mode (heat aging) hits both simultaneously.
Pricing as of 2026:
- OEM Carrier, Lennox, Trane capacitors run $40 to $80
- Aftermarket (GE, Packard, Genteq) run $15 to $40
- Hard start kits run $25 to $60
- OEM compressor replacement parts cost more than aftermarket equivalents, but warranty terms are stronger
Mistakes That Kill Compressors (And How to Avoid Them)
The most expensive mistake is the one people make trying to save money. Here's what kills compressors on the way to "jump starting" them.
Applying line voltage directly to the compressor terminals is the dangerous "trick" some old forums still recommend. You backfeed 240V across the HERM terminals to force the motor to spin. It works for about 0.3 seconds before the windings burn open.
On the way it can arc-weld the terminals, blow the contactor, and trip the main breaker. Never do this.
Bypassing the overload protector is another fast path to a melted winding. The overload exists to save the motor. Pulling it out means the windings can overheat indefinitely.
The compressor might start, then it might also die 10 minutes later.
Adding a hard start kit to a motor with already-failed windings accelerates the failure. The kit dumps more current into the start winding for a fraction of a second. If insulation is compromised, that extra current finds ground and the motor burns out within days.
Replacing a capacitor with the wrong MFD rating runs the start winding hotter than designed and shortens compressor life. Match the MFD exactly. Match or exceed the voltage rating.
Forgetting to discharge the capacitor before swapping it can ring your bell hard enough to drop you off the unit. Always short the terminals first with an insulated screwdriver.
Not labeling the wires before pulling them off the compressor is how you swap start and run. The compressor will start once, run hot for 20 minutes, and never start again.
Continuing to restart a compressor that hums and won't spin cooks the windings. Limit locked rotor attempts to about three in any 10-minute window.
Safety Rules That Aren't Optional
Working on an AC compressor means two different voltage systems at once. There's the 240V line voltage powering the compressor and fan, and the 24V control voltage running the contactor coil. Both can hurt you.
Line voltage can kill you.
Lock out the breaker at the panel, not just the disconnect at the unit. The disconnect can fail in the closed position.
Test for voltage before touching anything. Use a non-contact voltage tester first, then a multimeter to confirm. Trust nothing.
Discharge the capacitor before swapping it, even with the breaker off.
Don't work alone on the roof or ladder. If you get shocked and fall, you want someone there.
Refrigerant handling requires EPA 608 certification if you're recovering or opening the system. Capacitor and hard start kit work doesn't break the refrigerant circuit. Compressor replacement does.
The EPA's Section 608 program covers the rules for techs and homeowners handling refrigerant.
Capacitors and refrigerant aren't the same disposal. Capacitors go to e-waste. Refrigerant goes to a certified reclaimer.
When a Hard Start Kit Won't Save Your Compressor
The unit needs more than starting torque if any of these are true.
The compressor short cycles. It starts, runs 2 to 5 minutes, kicks off on overload, then tries again. That's a refrigerant, airflow, or mechanical problem, not a starting problem.
The suction line is frosted or iced up. That's low refrigerant charge or a metering device failure. A hard start kit can't fix low charge.
The compressor draws locked rotor amps and never spins down. The bearings are seized or the motor is mechanically locked. Adding more starting torque just produces more heat in a motor that can't physically turn.
The amp draw at the common wire is way off from nameplate RLA. Either the motor is shorted or the compressor is unloaded from a broken valve. Neither is a hard start kit fix.
In any of these cases, the right next move is a professional service call with a manifold gauge set and a recovery machine.
Quick Decision Guide: DIY, Call a Tech, or Replace the Whole System
Here's how to choose in under a minute.
Do it yourself if the capacitor is bulging, the test reads weak, the windings pass, and you're comfortable with a multimeter and a disconnect. Total parts cost runs $25 to $60. Total time runs 30 to 60 minutes.
Call a tech if the windings test off, the megohm test fails, you smell burnt insulation, or the compressor short cycles after a capacitor swap. You're now in territory where refrigerant gauges and EPA 608 procedures come into play.
Replace the whole system if the compressor is over 12 years old, the SEER rating is below 14, the refrigerant is R-22, and you've already spent $500+ on repairs in the past two years. New compressor plus refrigerant plus labor approaches the cost of a new entry-level unit. Federal tax credits for high-efficiency systems as of 2026 can offset the upgrade.
Walk away from the repair if a tech quotes you a compressor replacement without ever testing the capacitor or the windings. That quote is at best uninformed and at worst a scam. Insist on the tests shown earlier in this article before authorizing the work.
Frequently Asked Questions
Can you jump start an AC compressor with a battery?
No. A 12V battery cannot spin a 240V compressor motor. People who say otherwise are describing the dangerous backfeed-voltage-across-the-terminals trick, which destroys the windings and can cause a fire.
The only correct way to give a compressor more starting torque is with a properly rated start capacitor or a hard start kit wired per manufacturer specifications.
How long does a hard start kit last?
Manufacturer specifications for major brands indicate a service life of roughly 5 to 10 years under normal residential operating conditions. The start capacitor inside the kit is the limiting component. Replace the kit if you're replacing the compressor as a matter of routine.
Will a hard start kit fix a compressor that hums but won't start?
Yes, in most cases, provided the run capacitor tests good, the windings test good, and the megohm test passes. A humming compressor with healthy windings is exactly the failure mode a hard start kit is designed for. If the windings or capacitor test bad, fix those first or replace the unit.
Is it safe to keep resetting a tripped AC breaker?
No. Each reset is another locked rotor event with another high-current surge through the windings. Per manufacturer service documentation, three failed starts in a 10-minute window is the practical limit before you start damaging the motor.
Find and fix the cause before resetting the breaker.
How much does an HVAC tech charge to diagnose a no-start compressor?
Service call rates in 2026 typically run $75 to $150 for the visit plus diagnosis, applied toward the repair if you proceed. A capacitor swap usually lands $200 to $400 total. A hard start kit install runs $250 to $450.
A compressor replacement runs $1,500 to $3,500.