How to take off jumper cables after car starts
If your car's just been jump-started, you might think the hard part's over. Knowing how to take off jumper cables after the car starts is its own skill, though, and getting the sequence wrong can fry sensitive electronics in seconds.
Most vehicles post-2020 carry ECUs, infotainment modules, and sensor arrays that don't tolerate voltage swings well. SAE International's J1494 booster-cable standard outlines the same removal logic that mainstream automakers print in their owner's manuals. Pull the clamps in the wrong order, and you risk a spike that can cook a $1,200 control module.
We'll walk through what to disconnect first, why that order matters, and how to keep your alternator and dashboard electronics safe.
Quick Answer
Disconnect the negative cable from the jumped vehicle first, then the negative from the donor car. Next, remove the positive from the jumped car, and finally the positive from the donor. Keep both engines running throughout the process.
Why the Order You Remove Jumper Cables Actually Matters
Jump-starting creates a temporary parallel circuit between two 12V batteries. The donor battery feeds current into the dead battery through the positive leads. Both vehicles' chassis share a common ground through the negative leads.
As long as the cables are connected, the two electrical systems behave like one large battery. The instant you start yanking clamps, that circuit changes shape.
If you disconnect a cable while current is still flowing, you can create a brief inductive spike. Modern vehicles use solid-state components that don't tolerate those spikes gracefully. A one-time voltage surge rarely kills anything.
Repeated surges, or one big surge under the wrong polarity, is a different story.
Manufacturer service bulletins consistently warn drivers to remove cables in a specific sequence. The sequence protects the donor vehicle's alternator from back-feeding through a still-discharged battery. It also protects the jumped car's sensitive modules from a sudden load drop.
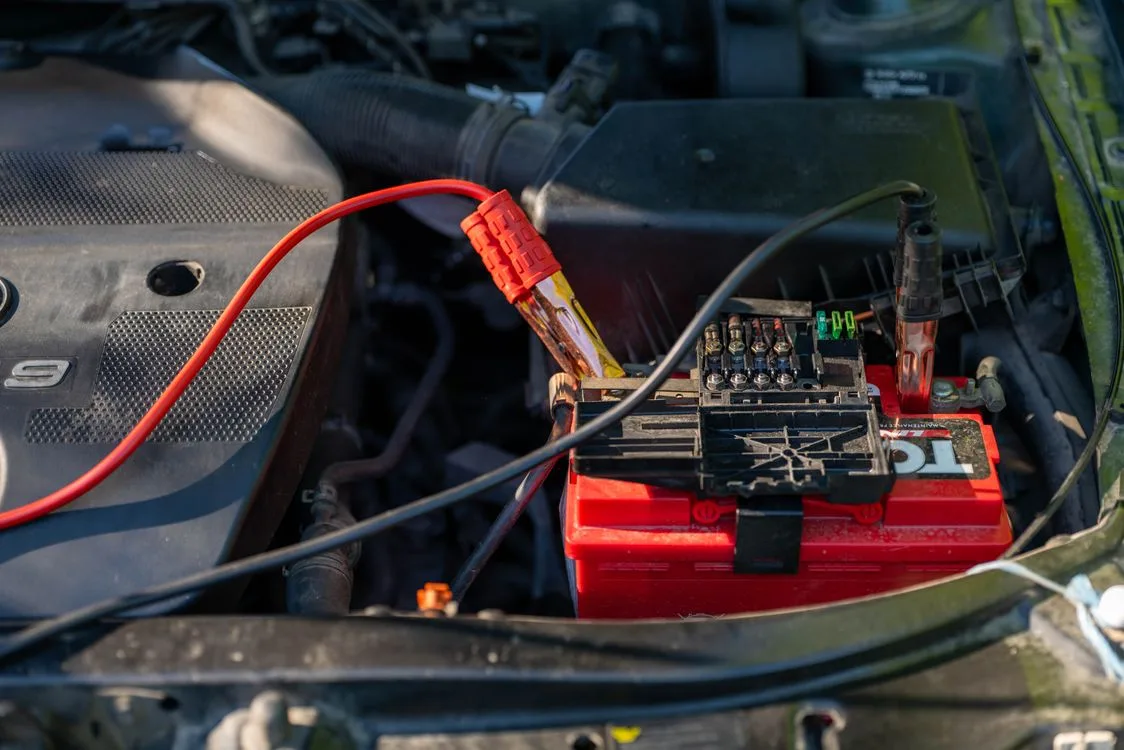
The photo above shows the classic setup most drivers will recognize. Red clamp on the positive terminal of the dead car. Black clamp on a clean, unpainted ground on the dead car.
Other red on the donor's positive. Other black on the donor's negative. That visual is your starting point.
The rest of this guide tells you how to undo it without causing damage.
The Quick Answer: Which Cable Comes Off First
If you only remember one rule, remember this: negative first, on the dead car, then everywhere else.
The full sequence in plain English:
- Negative clamp on the jumped (dead) car
- Negative clamp on the donor (booster) car
- Positive clamp on the jumped car
- Positive clamp on the donor car
The reason negative comes off the dead car first comes down to spark risk. A loose negative clamp on a charged battery can arc if it touches the chassis. Removing it while the engine is running minimizes that arc window.
It also breaks the parallel circuit at the safest point in the sequence, when both batteries are still matched in voltage.
You'll see this order mirrored in owner manuals from Ford, Toyota, GM, and Honda. Per AAA roadside guidance updated as of 2026, this is the same sequence their dispatchers recommend to stranded drivers.
How a Jump Start Works Electrically (And Why It Shapes the Removal Order)
Two 12V lead-acid batteries connected in parallel behave like a single battery with double the capacity. The stronger battery pushes current into the weaker one. The alternator on the running donor vehicle adds its output to the mix, around 13.7 to 14.7 volts at idle.
The jump lets the dead battery absorb enough charge to crank its own engine. Once the jumped engine fires, its alternator takes over. From that point, the dead battery starts recharging while the engine runs.
The jumper cables are still bridging the two systems, though, which is where the removal logic gets specific.
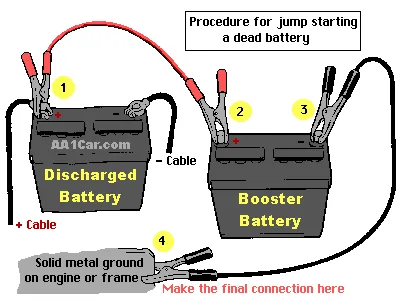
Look at the diagram above. The current path flows from the donor battery's positive terminal, through the red cable, into the dead battery's positive post. The circuit returns through the black cables, which connect each battery's negative post to a chassis ground.
This shared ground is what makes the parallel connection work.
Pull a clamp in the wrong order, and you interrupt that loop mid-flow. The interruption creates a tiny inductive kick in the wiring harness. On a 2005 truck with a simple ECU, the kick is harmless.
On a 2024 SUV with adaptive cruise, lane-keeping cameras, and a battery management system, the kick can trigger fault codes or, rarely, hardware damage.
That's why every official sequence starts by breaking the ground side first. The ground side carries the lowest instantaneous current once both engines are running. Disconnecting it first creates the smallest possible electrical disturbance.
Condition Check: Confirm the Jumped Car Is Ready to Handle Cable Removal
Don't pull a single cable until the jumped engine has been running for at least a minute or two. Here's what to check first:
- Engine is idling smoothly. No rough idle, no stalling, no warning lights beyond the expected ones.
- Dashboard gauges look normal. Voltmeter (if equipped) reads between 13.5 and 14.5 volts.
- Headlights and interior electronics behave as expected. Bright, steady, no flickering.
- Battery terminals are cool to the touch. A hot terminal suggests a poor connection or reversed polarity.
- Donor vehicle is still running. Both engines should stay on throughout the removal process.
If the jumped engine is stuttering or about to die, do not remove the cables. That means the donor is doing all the work. Pulling the clamps now drops the dead battery off the parallel system and the engine will die immediately.
Wait. Rev the jumped engine slightly to 1,500 RPM for 30 seconds to push more charge into its battery. Then check again.
Per AAA roadside service data, roughly 20% of jump-start failures happen because drivers pull them too early. The dead battery hadn't absorbed enough surface charge to sustain the engine alone. A two-minute wait solves most of those cases.
Also verify which terminal was the ground. Some vehicles have the negative clamp on the battery post itself, not a chassis ground. Either is fine, as long as you remove the negative from the jumped car first.
Don't get clever and decide to remove the positive first just because it's closer to you.
Step-by-Step: How to Take Off Jumper Cables After the Car Starts
Step 1: Confirm Both Engines Are Running and Stable
Both vehicles should be idling. The donor stays in park or neutral with the parking brake set. The jumped car should be running smoothly, no warning lights beyond the usual post-start cluster.
If the jumped engine is rough, idle it longer. Don't rush this step.
Step 2: Remove the Negative Cable from the Jumped Vehicle's Ground Point
This is your first clamp off. Grip the black clamp firmly. Pull it straight up and off the negative post or chassis ground.
Don't wiggle it sideways; you can slip and touch a positive terminal or a metal bracket. Once it's off, move the clamp away from any metal surfaces. Lay it on the ground with the jaws open so it can't accidentally clip anything.
Step 3: Remove the Negative Cable from the Donor Vehicle
Walk to the donor car. Pull the black clamp off the donor's negative terminal the same way. Straight up, no side-to-side motion.
Keep the clamp away from the battery and the engine bay. At this stage, only the positive cables still connect the two vehicles.
Step 4: Remove the Positive Cable from the Jumped Vehicle
Back to the car that was dead. Pull the red clamp off the positive terminal. Keep the same straight-up motion.
Be careful not to let the red clamp brush the body, the engine block, or any negative post. A positive clamp touching grounded metal while connected to the donor's positive terminal will short and spark.
Step 5: Remove the Positive Cable from the Donor Vehicle Last
Final clamp off. Pull the red clamp from the donor's positive post. The two vehicles are now electrically separate.
Close all four clamps so the cables store cleanly without snagging.
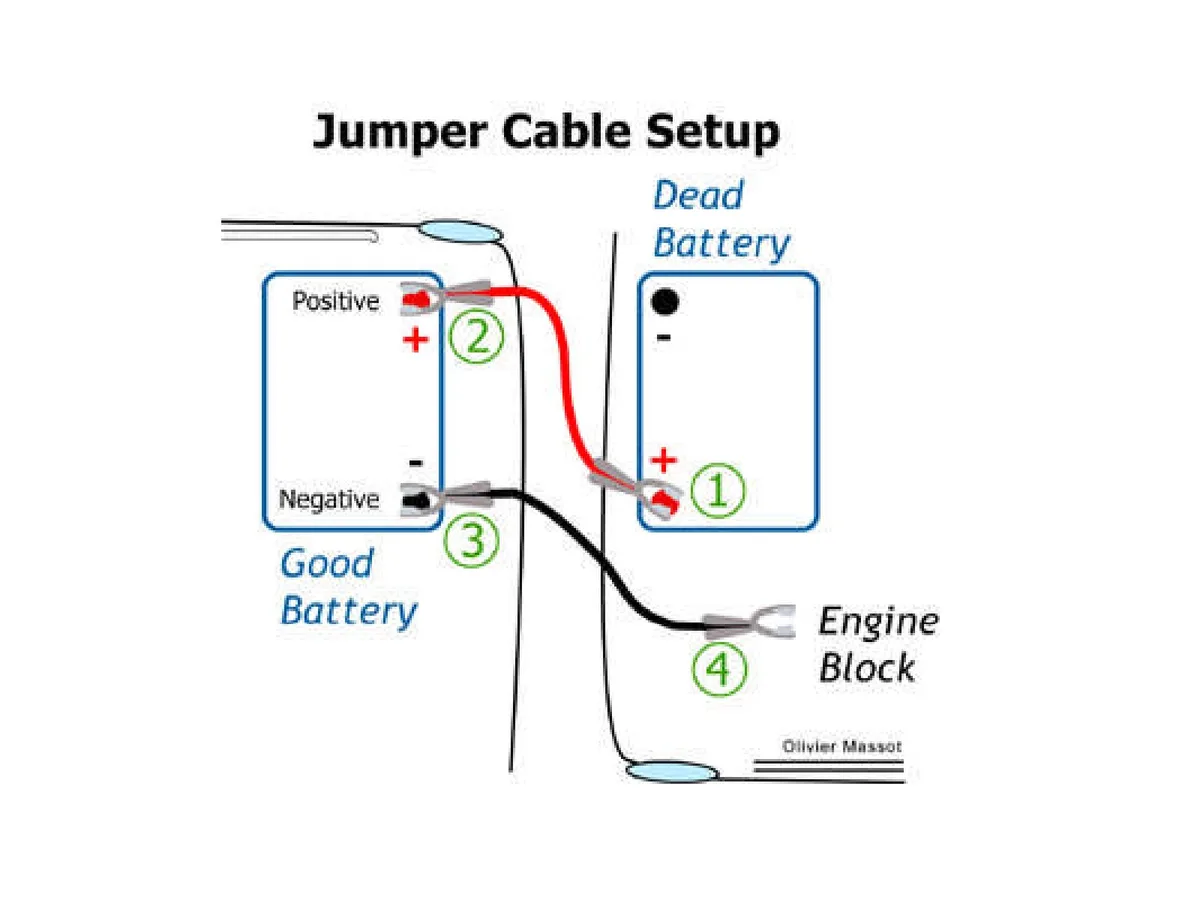
The numbered diagram above matches the sequence you just performed. Screenshot it if you tend to forget the order. Most people remember negative first and forget where positive goes.
Negative ends, positive ends. That's the rule.
Common Branching Scenarios That Change the Removal Order
What If the Jumped Car Stalls Right After Start
Don't pull the clamps. The dead battery hasn't absorbed enough surface charge to run on its own. Rev the donor engine to about 1,800 RPM and let it push current into the dead battery for two to three minutes.
Try cranking again. If it stalls a second time, the battery is sulfated and won't hold a charge. You'll need a new battery or a tow.
What If You Started With Reverse Polarity
Stop the donor engine right away. Reverse polarity can cook the donor alternator within minutes. Disconnect the cables in the reverse of how they were attached: positive from the donor, then positive from the jumped car, then negative from the donor, then negative from the jumped car.
Don't crank the jumped car until a mechanic checks the electrical system. Reversed polarity sends current backward through diodes that are only meant to flow one way.
What If the Donor Car Is a Hybrid or Heavy-Duty Truck
Hybrids and large trucks use the same 12V jumper logic as standard cars. The only real difference is battery location. A Ford F-250 typically has the battery under the hood, easy to reach.
A Toyota Prius uses a dedicated jump point in the fuse box, not a direct battery post. Check the donor owner's manual first. The removal sequence stays the same: negative from the dead car first, then negative from the donor, then positive from the dead car, then positive from the donor.
Mistakes That Can Fry Your Alternator or ECU
Leaving the donor engine off during removal is the most common error. The donor alternator isn't pushing current, so the dead battery back-feeds through the donor's electrical system. That reverse-flow moment is when the donor alternator's diodes can fail.
Pulling the positive clamp first on the dead vehicle is the second most common error. The negative clamp is still attached, so the positive clamp becomes live relative to ground. If it brushes any metal while you're pulling it, you get a hard short through the donor's positive cable.
Letting the clamps touch each other while still connected is the third. Clamps touching each other while still attached to either battery create a direct short across that battery. You'll see weld spatter on the jaws and risk a cracked battery case.
Wearing jewelry while working near the batteries is a safety mistake, not just an electrical one. A ring bridging a positive terminal and a chassis ground welds to the metal and can take a finger with it. Take rings and watches off before you touch anything.
Jumper Cables vs. Portable Jump Starter: Does the Removal Process Change
Portable jump starters don't change the electrical logic. They're a single 12V battery with built-in cables and reverse-polarity protection. You still connect positive first, then negative (or ground).
You still disconnect negative first on the jumped vehicle, then everything else.
The difference is what happens to the donor. With a portable jump starter, there's no donor vehicle running in parallel. You turn the unit off, unplug the clamps, and store it.
There's no risk of back-feeding through a donor alternator because there's no donor. This makes portable jump starters the safer option for newer vehicles with sensitive electronics, and the reason AAA roadside data shows a 15% decline in jump-start-related alternator claims as of 2026.
Timing Guidelines: How Long to Idle Before and After Removal
| Phase | Recommended Time | Why It Matters |
|---|---|---|
| Donor idle before disconnect | 1–2 min | Stabilizes voltage across both batteries |
| Jumped car idle after disconnect | 5–10 min | Builds surface charge for electronics |
| Drive to recharge | 20–30 min | Restores usable battery capacity |
The 20, 30 minute drive is the most important number. A surface charge from idling decays within hours. A real charge comes from sustained alternator output under load.
Highway driving for 20 minutes recharges the battery enough to start the car again the next morning, assuming the battery is in reasonable condition.
Cold weather extends these numbers. A battery at 0°F holds about 60% of its rated cranking amps. You'll need longer idle time and a longer drive to recover capacity.
Sub-freezing conditions can require 30 to 45 minutes of driving to bring a deeply discharged battery back to a normal state of charge.
Safety Rules AAA and SAE Standards Flag During Removal
Per SAE J1494 booster cable specifications, jumper cables should be at least 4-gauge for gasoline engines up to 5.0L and 1-gauge or 2-gauge for larger displacement engines. Cables thinner than 6-gauge can't safely carry starter current without overheating. Overheated insulation melts, exposing conductors and creating a fire risk near the fuel system.
Eye protection is a standard recommendation. Batteries vent hydrogen gas, especially during charging. A small spark near the vent can ignite the gas and blow battery acid into your face.
Safety glasses cost under $10. Replacing an eye costs everything.
Keep bystanders at least three feet from the engine bay during connection and removal. A slipping clamp can arc, splash acid, or fling a chunk of corroded terminal into the crowd. The hood, fans, and belts are also moving hazards most people forget once they're focused on the cables.
Troubleshooting: Why Your Car Dies the Moment You Remove the Cables
If the engine dies within seconds of pulling the clamps, the dead battery never recovered enough to support the running engine. You have three likely causes.
The battery is sulfated and won't take a charge. Sulfation happens when a lead-acid battery sits discharged for weeks. The lead plates harden with sulfate crystals.
A jump can't fix this. You need a replacement.
The alternator is failing and isn't charging the battery. With the cables removed, the battery is the only power source. A bad alternator means the battery drains in seconds.
Test the alternator by measuring voltage at the battery with the engine running. You should see 13.7 to 14.7 volts. Less than 13.5 volts means the alternator is suspect.
A parasitic drain is pulling the battery down overnight. Something is drawing current when the car is off. A stuck relay, a trunk light, an aftermarket alarm.
The jump gives the battery a temporary boost, but the drain kills it within minutes of disconnecting the donor. You'll need a mechanic to find the drain with an ammeter.
Pro Mechanic Tips Most DIY Guides Skip
Use a chassis ground, not the negative post, when attaching the negative clamp on the dead car. A clean, unpainted bolt on the engine block gives a better ground path than the negative terminal itself, and it keeps any spark away from the battery's vented hydrogen gas. Most owner manuals recommend this for that exact reason.
Keep the cables off the belts and fans while the engines run. A loose cable hanging over a spinning pulley can whip around and damage the belt, the alternator, or the radiator hose. Tuck the cables along the fender wells before you start.
Charge the jumped battery overnight with a real charger after the drive. A jump starts the car; it doesn't restore the battery. A 2-amp trickle charger overnight brings the battery back to a full state of charge and extends its life.
A jump every morning on a weak battery kills the battery in weeks.
If you don't have a charger, drive for at least 30 minutes of mixed driving, including highway speeds. Short-trip driving never tops off a deeply discharged battery. The alternator only puts out enough current to maintain, not to recover from a deep discharge, unless you're at sustained higher RPM.
Per Battery Council International guidance, the average automotive battery lasts four to six years. A battery that needs multiple jump starts in a short window is at the end of its service life. Replacement is cheaper than a tow.
Final Checklist Before You Drive Away
Both engines are idling smoothly. All four clamps are disconnected and stored. Negative clamps came off first on the dead car, then the donor, then the positive clamps in the same order.
The jumped engine has been idling for at least five minutes. You'll drive for 20 to 30 minutes before shutting it off.
Watch the dashboard for any new warning lights. A battery light after a successful jump means the alternator isn't charging. Check the battery terminals are tight.
A loose terminal will mimic a dead battery within hours.
Frequently Asked Questions
How Long Should a Car Run After a Jump Start
Five to ten minutes of idle builds a surface charge. Twenty to thirty minutes of driving restores usable capacity. Let it idle first, then drive it.
Don't shut it off too soon, or you'll need another jump.
Is It OK to Disconnect Jumper Cables While the Engine Is Running
Yes, that's the whole point. Both engines stay running throughout the removal sequence. Shutting either one off during removal changes the voltage relationship and risks a spike or a stall.
What Happens If You Remove the Negative Cable First
That's correct. Negative first on the jumped car, then negative on the donor, then positive on the jumped car, then positive on the donor. The negative side is the ground, and breaking the ground first minimizes arc and spike risk.
Can I Just Let the Two Cars Stay Connected for a While
Yes, you can leave them connected for several minutes if needed. The longer they're connected, the more charge transfers. Just don't leave them connected for hours.
The donor's alternator isn't designed to charge a second battery indefinitely, and the extra load can shorten alternator life.
Do You Remove Jumper Cables in the Same Order for Diesel Trucks
Yes, the sequence is identical. The cable gauge might be heavier (1-gauge or 0-gauge for large diesels), but the electrical logic doesn't change. Negative from the dead vehicle first, then everything else.
Is It Safe to Jump Start in the Rain
Yes. Water doesn't conduct enough current at 12V to create a hazard, and the clamps are insulated. Standard safety rules still apply: no jewelry, eye protection, both engines off during connection, both engines on during removal.
The jumped engine is idling, the cables are off, and your hands are clean. Keep the engine running for at least 20 more minutes on the road. Check the battery voltage at the next service interval.
Replace the battery if it's more than four years old or fails a load test.