How to jump start lawn mower with screwdriver: Easy guide
If your riding mower clicks once and goes dead, or turns over slow as syrup on a cold morning, the fix you're picturing probably looks like this: how to jump start lawn mower with screwdriver. It's a real move, and it works on most riding mowers and lawn tractors. You just need to know which terminals to bridge, and you need to know which mowers will punish you for getting it wrong.
A standard riding mower battery puts out about 12.6 volts at full charge and drops below 11.9 volts when it's effectively dead, which is the exact range where the starter solenoid either refuses to click or clicks without spinning the motor. The screwdriver trick just sends battery current straight to the starter, bypassing the ignition switch, the safety relays, and the solenoid coil. In our research across small-engine service manuals and operator guides, the procedure is consistent for solid-state ignition systems built after the mid-1990s.
Older points-and-condenser setups need a slightly different approach, and we'll get into that. Let's start with the logic, then walk into the actual work.
Quick Answer
Yes, you can jump start a lawn mower with a screwdriver. Use an insulated screwdriver to bridge the two large terminals on the starter solenoid. This sends battery power directly to the starter motor.
Sit in the seat, set the brake, turn the key to "on", and crank. This only works on riding mowers with a 12-volt battery and a four-post solenoid.
Why a Screwdriver Works at All (The Logic Behind the Bypass)
Every electric-start riding mower has the same basic starting circuit. The battery sits on one side. The starter motor sits on the other.
Between them is a heavy-duty switch called a solenoid. When you turn the key, a small current flows through the ignition switch into the solenoid's coil, which pulls a contact closed, which then connects the battery's full current to the starter. The starter spins.
The engine turns over. Combustion happens.
The screwdriver just closes that big contact manually. You're skipping the key switch, the safety interlock circuit, and the solenoid coil entirely. Battery voltage goes straight to the starter through a piece of metal you're holding.
Done right, the engine cranks and fires.
Where it gets tricky is what you're also bypassing. Most modern mowers interlock the seat switch, the brake switch, and the PTO (power take-off, the lever that engages the blades) into the starting circuit. A factory ignition switch waits for all those switches to read "safe" before it fires the solenoid.
Your screwdriver doesn't wait for anything. That's why the safety section below matters as much as the wiring itself.
The other wrinkle is ignition type. Solid-state modules used on virtually every mower built after the mid-1990s handle a screwdriver bypass without complaint. Older points-and-condenser ignitions, common on vintage Briggs & Stratton and Tecumseh engines, sometimes need the key in the "on" position so the coil gets voltage.
Bridge the solenoid with the key off on an old points system and you'll crank the engine but it won't fire.
First, Figure Out What Kind of Mower You Have
Before you grab a tool, you need to know which circuit you're dealing with. The bypass procedure changes based on three things: whether your mower has a solenoid, what kind of ignition it runs, and whether the battery has any life left in it at all. Get these three answers right and the rest is just careful contact.
Riding mower vs. push mower
This guide is for riding mowers and lawn tractors with electric start. Push mowers with recoil (pull-cord) starts don't have a battery, a solenoid, or a starter motor. There's nothing to jump.
If your push mower won't start, you're looking at stale fuel, a clogged carburetor, a fouled spark plug, or a dirty air filter. Different problem, different article.
Electric-start riding mower
If your mower has a key slot and a battery (usually under the seat or behind the engine), you're in the right place. Most electric-start riding mowers from John Deere, Cub Cadet, Husqvarna, Craftsman, Troy-Bilt, MTD, Ariens, Simplicity, and Kubota use the same general architecture. 12-volt battery, four-post solenoid, solid-state ignition, safety interlock chain.
Older or vintage riding mower
Pre-1995 machines, especially those with Briggs & Stratton or Tecumseh engines from the 1980s and early 1990s, often run points-and-condenser ignitions and may have a three-post solenoid instead of four. Honda riders from the same era are usually solid-state but use a different solenoid layout. Check your model number against the manufacturer service documentation before you assume anything.
A Briggs & Stratton service manual lookup can confirm the starting circuit type for your specific engine.
Zero-turn mower with electronic controls
Zero-turns from Exmark, Scag, Bad Boy, and similar commercial-leaning brands often have a separate electrical management module, a relay box, or a fuel solenoid that needs voltage to open. Bridging the starter solenoid on these mowers cranks the engine, but it may not stay running without the control module also getting ignition-on voltage. You can usually get one start out of it this way, but plan on diagnosing the root cause before the next mow.
Does Your Riding Mower Have a Solenoid?
Almost all electric-start riding mowers do, yes, but the exact location and configuration varies by brand. If you see a small cylinder or rectangular box mounted on the frame near the battery, with two large posts and one or two small terminals, that's your solenoid. If you don't see one, follow the thick positive cable from the battery's positive terminal.
It usually ends at either the solenoid or directly at the starter motor.
A four-post solenoid is the most common setup on modern riding mowers. Here's what each post does:
| Terminal | Size | Function |
|---|---|---|
| Battery (+) | Large | Receives constant 12V from battery positive |
| Starter | Large | Sends 12V to the starter motor when solenoid closes |
| S (or "Start") | Small | Receives switched 12V from ignition key in "start" position |
| Ground | Small | Completes the solenoid coil circuit |
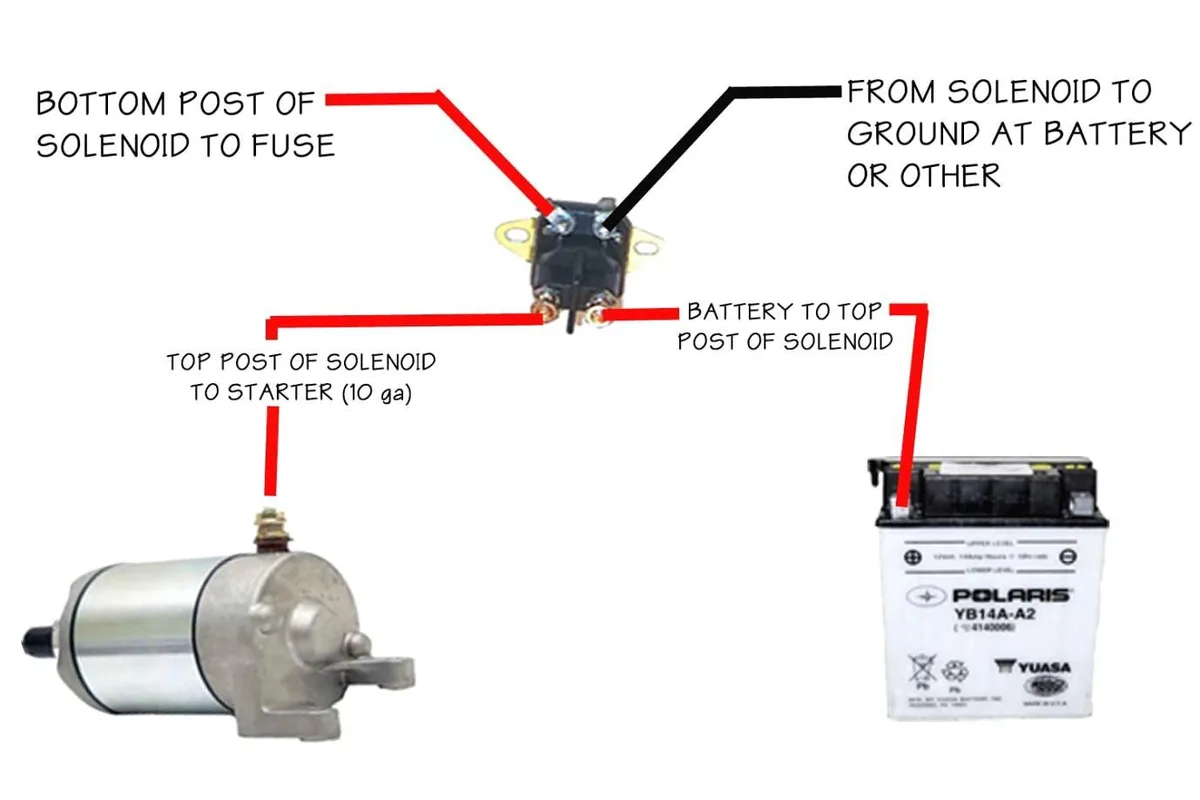
A three-post solenoid drops the ground post. The solenoid grounds through its mounting bracket instead. Functionally the same.
You just have one fewer terminal to worry about confusing with the others.
Some smaller riding mowers (particularly older John Deere LX, LT, and LTR series, plus some Cub Cadet 1000-series models) use a combined solenoid/starter or a starter-mounted solenoid. Look for a cylindrical component bolted to the top of the starter motor. Same logic applies, just a tighter space to work in.
Safety First: Don't Skip This Section
A 12-volt lawn mower battery won't electrocute you. The current is real, though, and the battery itself can hurt you if mishandled. Skip these steps and you'll regret it.
Battery gases
Lead-acid batteries vent hydrogen gas while charging and under load. Hydrogen is explosive above about 4% concentration in air, per OSHA's electrical safety guidance. A spark near the vent caps can crack the case or blow battery acid into your face.
Keep flames, cigarettes, and uninsulated tools away from the top of the battery.
Reverse polarity
Hook the screwdriver to the wrong post and you'll short the battery directly to ground. Expect sparks, a dead battery in seconds, a possibly welded screwdriver tip, and the potential to fry the voltage regulator or ignition module. Don't reverse polarity.
Ever.
Insulated tool only
Use a screwdriver with a rubber or plastic handle rated to 1000V, the standard under ANSI/UL 60900 for insulated hand tools. A bare metal screwdriver held by a bare hand is asking for a short circuit, a burned palm, or a damaged battery post. If your screwdriver doesn't have a thick insulated handle, go find one that does.
Mower must be controllable
Brake set. Transmission in neutral. PTO/blades disengaged.
You should be in the seat. The engine will fire the moment the starter spins it fast enough, and an unattended running mower on a hill will roll. Treat the screwdriver like the key it replaces.
Same rules apply.
Eye protection
Battery acid, sudden sparks, and corrosion flakes all end up in your eyes if you're not wearing safety glasses. Wear them. Every mechanic who's skipped this step learned the hard way.
Now you've got the orientation and the safety framing. Next, we'll move into the tools, the battery check, and the actual three methods for bridging the solenoid, including which applies to your specific mower.

What You'll Need Before You Touch Anything
The tool list is short, and you probably already own most of it. Gather everything before you start, because walking back to the garage mid-job with a live screwdriver bridging two battery posts is a bad day.
Tool checklist
- Insulated screwdriver (flat-head, 1000V rated handle, shaft about 4 to 6 inches long for clearance)
- Multimeter (for the battery and charging tests, optional but strongly recommended)
- Battery terminal brush or wire brush (to clean corrosion off the posts)
- Wrenches (typically 1/2-inch and 10mm, for battery cable nuts)
- Safety glasses (clear, ANSI Z87.1 rated if you want to be particular)
- Insulated gloves (rubber, mechanics-style, optional but smart)
- Wheel chocks or a brick (to chock the rear wheels so the mower can't move)
- Shop rag (to wipe up any battery acid or corrosion)
Don't substitute a wrench, pliers, key, or any other uninsulated tool for the screwdriver. The handle is doing real work. Don't skip it.
Battery Check: Is the Battery Actually the Problem?
Before you bridge anything, confirm the battery has enough juice to spin the starter. Jumping a completely dead or shorted battery with a screwdriver does nothing. Bridging a battery with a cracked internal cell can make it explode.
Take 60 seconds and check.
Voltage at rest
Set the multimeter to DC volts. Touch the red probe to the positive (+) battery post and the black probe to the negative (-) post. A healthy, fully charged 12V battery reads between 12.4 and 12.7 volts.
A 50% discharged battery sits around 12.2 volts. Anything below 11.9 volts is effectively dead for starting purposes. Below 10.5 volts usually means a shorted cell or a battery that's been deeply discharged for too long to recover.
| Voltage Reading | State of Charge | Start Capable? |
|---|---|---|
| 12.6 to 12.7V | 100% | Yes |
| 12.4V | 75% | Yes |
| 12.2V | 50% | Maybe (slow crank) |
| 12.0V | 25% | No |
| 11.9V and below | Discharged | No (or barely) |
| 10.5V and below | Likely shorted cell | No, replace |

Voltage under load (the better test)
If the battery reads 12.0V at rest but you want to know if it can actually deliver cranking amps, turn the key to "start" and watch the meter. A healthy battery should drop to no lower than about 10 volts while spinning the starter. A battery that drops below 9 volts is toast, even if it showed 12.4V a minute ago.
The voltage doesn't lie, but a resting voltage without a load test is incomplete.
Look at the battery physically
Cracked case, bulging sides, dried-out or low electrolyte levels, heavy white or green corrosion on the posts, or a sulfur smell all point to a battery that needs replacement, not a jump. Lead-acid batteries should be recycled per EPA RCRA battery disposal rules when they finally give up. Don't try to jump a visibly damaged battery.
Corrosion cleanup
If the posts are crusty, disconnect the negative cable first (always negative first when removing, positive first when installing), then the positive. Scrub the posts and the cable clamps with a wire brush until you see bright metal. Reconnect positive first, then negative.
A bad connection can mimic a dead battery. Don't skip this step.
Method 1: Bridging the Two Large Solenoid Posts (Direct Crank)
This is the move most people are picturing when they search for how to jump start lawn mower with screwdriver. It sends full battery current directly to the starter motor. Use it when the battery has voltage but the solenoid refuses to engage, or when the ignition switch is dead.
Pre-flight checklist
- Battery confirmed at 12.0V or higher
- Insulated screwdriver in hand
- Mower in neutral, parking brake set, blades off
- You are in the seat
- Wheel chocks placed if the mower is on any slope
Procedure
- Locate the solenoid. On most riding mowers it's mounted on the frame near the battery or beside the engine.
- Identify the two large posts. These are the only two you touch with the screwdriver.
- Turn the ignition key to the "on" or "run" position, not "start". On solid-state ignitions you can also leave it in "off" if the engine will still fire on its own, but "on" is safer.
- Hold the screwdriver by the insulated handle only. Confirm your fingers are not touching the metal shaft.
- Place the screwdriver tip across the two large posts at the same time. Hold it there firmly. Don't touch anything else.
- The starter should engage immediately. The engine will crank.
- Pull the screwdriver away the moment the engine fires on its own. Letting it stay bridged after the engine starts keeps the starter engaged, which can damage the starter or the flywheel.
The first attempt usually takes 2 to 4 seconds of cranking before a cold engine catches. Don't pump the screwdriver on and off. Hold it steady until the engine starts or until you've cranked for 10 seconds.
If it doesn't fire in 10 seconds, pull away, wait a minute for the starter to cool, and try again.
Why this works
You're manually doing what the solenoid contact does internally. The contact closes, current flows from the battery post to the starter post, the starter spins, the engine turns over. The ignition system (which gets its own power from the battery separately) handles spark and fuel delivery once the engine rotates.
When to skip this method
If your mower has a fuel shutoff solenoid (common on zero-turns and many modern riding mowers), the engine may crank but not stay running. In that case you need Method 2 below, or you need to make sure the key is in "on" so the fuel solenoid opens.
Method 2: Jumping the Small S Terminal to the Battery Post
This method simulates the ignition switch sending current to the solenoid coil, which closes the internal contact and cranks the engine the normal way. Use it when the ignition switch is dead but the solenoid itself is good, or when you want to start the mower without wearing out the solenoid's big contacts.
When to use Method 2 vs. Method 1
- Method 1 (large posts): use when the solenoid is suspect or stuck
- Method 2 (small S to large battery): use when the ignition switch is the suspected failure point
Procedure
- Locate the solenoid's small "S" or "Start" terminal. It's the smaller-gauge stud, usually labeled or diagramed on the solenoid body.
- Confirm the battery post is the large post, not the starter post. They look similar. The battery post has the thick cable going to the battery's positive terminal. The starter post has the thick cable going down to the starter motor.
- Sit in the seat, brake set, transmission in neutral, PTO off, key in the "on" position.
- With the insulated screwdriver, touch the small S terminal to the large battery terminal.
- Hold contact until the engine starts. The solenoid will click and the starter will engage just like a normal key turn.
- Pull the screwdriver away as soon as the engine fires.
This method engages the solenoid's internal contact, which is a more gentle crank than Method 1, which directly feeds the starter. Less wear on the starter, slightly safer in terms of electrical arcing.
Method 3: No Solenoid? Bridging the Starter Motor Directly
Some older and smaller riding mowers don't have a separate solenoid. The starter motor has its own built-in solenoid on top, or there's no solenoid at all and the key switch carries starter current directly. If your mower doesn't have the four-post cylinder near the battery, this method applies.
Identifying a starter-mounted solenoid
Look at the starter motor itself. It's usually a cylindrical component bolted to the engine block near the flywheel. On top of it you'll see one or two small terminals and one large terminal with a thick wire.
That's your combined starter-and-solenoid unit.
Procedure
- Locate the starter motor.
- Identify the large terminal on the starter (the one with the battery cable) and the small "S" terminal.
- Sit in the seat, brake set, transmission in neutral, key on.
- Bridge the large terminal to the small terminal with the screwdriver.
- Engine cranks. Pull away when it starts.
If there's truly no solenoid of any kind (rare on electric-start mowers), then the key switch itself feeds the starter. Bridging requires jumping battery voltage directly to the starter's main terminal, which means the screwdriver carries full cranking current. Don't do this unless you know what you're doing.
The spark and the heat are significantly more than a solenoid bridge. Use a remote starter switch instead, or jump from a charged battery with proper jumper cables.
Step-by-Step Decision Tree (Which Method Applies to You)
Use this if/then logic to pick the right method without re-reading everything above.
If your mower has a four-post solenoid near the battery and the battery reads above 12.0V then use Method 1 (bridge the two large posts).
If your ignition switch clicks but no other response happens at the solenoid then the solenoid coil is suspect. Use Method 1 to bypass the coil entirely.
If the solenoid clicks once but the starter doesn't spin then the solenoid contacts are probably burned. Use Method 1 to bypass the contacts.
If the key switch turns but nothing happens at the solenoid at all then the switch or the safety interlock circuit is suspect. Use Method 2 (S to battery) to bypass the switch.
If your mower has no separate solenoid then use Method 3.
If the battery reads below 11.9V then charge it first or jump from another battery. The screwdriver trick won't help with a dead battery.
If the engine cranks but won't fire then the problem isn't the starting system. You're looking at fuel, spark, or compression. Different problem entirely.
Common Situations This Trick Actually Solves
- Dead battery after winter storage: Battery self-discharged over months and won't hold enough charge to crank. Screwdriver jump gets you going. Charge or replace afterward.
- Failed ignition switch: Key turns, nothing happens. Usually a worn contact inside the switch. Screwdriver jump bypasses it.
- Stuck solenoid: Contacts corroded or welded in place. Screwdriver bridge provides a parallel path.
- Bad seat switch or safety interlock: Mower won't crank because a switch thinks you're not in the seat or the brake isn't set. Screwdriver jump bypasses the interlock chain.
- Diagnostic step: Confirms whether the problem is in the starting circuit (solenoid/starter) or upstream (switch/safety interlocks).
Common Situations Where This Trick Won't Work (Or Will Make Things Worse)
- Truly dead battery: Below 11.0V, won't crank the starter regardless of bypass method.
- Cracked or shorted battery cell: Reads voltage but can't deliver current under load. Jump won't help.
- Seized starter motor: Bridging the solenoid spins nothing. You hear a click but no crank at all.
- Seized engine: Cranks but doesn't rotate. Different problem entirely. Stop and diagnose.
- Solid-state ignition with fried module: Cranking works but no spark. The bypass isn't the issue.
- Fuel shutoff solenoid without ignition-on voltage: Zero-turns and many modern mowers need the key on to open the fuel line. The engine may crank and fire briefly, then die.
Mistakes That Can Fry Your Ignition Module
This is where the casual advice from forum posts goes wrong. A few specific errors can damage components that cost more to replace than a tow truck would have.
Bridging the wrong terminals
On a four-post solenoid, the two large posts are battery and starter. The two small posts are ignition and ground. Bridging across a large and a small post sends battery voltage through the ignition circuit, which the ignition module, voltage regulator, or safety interlock board is not designed to handle.
You'll let the smoke out of something expensive. Don't guess at which post is which. Look at the wire gauges and follow them.
Holding the screwdriver on after the engine starts
Once the engine is running, the starter is no longer needed. Holding the bridge keeps the starter engaged. The starter spins at several thousand RPM with no load from the engine, which can throw windings, burn the brushes, or shatter the drive bendix (the small gear that engages the flywheel).
Pull the screwdriver away as soon as the engine catches.
Cranking for too long in one attempt
Starter motors are designed for short bursts, not continuous duty. Limit each crank attempt to 10 seconds. Wait 60 seconds between attempts.
Letting the starter smoke means a $40 to $150 replacement, plus the diagnostic time.
Touching the negative battery post while bridging the positive
A short circuit through your body to ground isn't likely at 12V, but a short circuit through the screwdriver to the chassis frame will weld the tip to whatever it touches and drain the battery in seconds. Watch what the metal shaft could contact if your hand slips.
Bypassing the brake or seat safety switch and forgetting about it
The moment your hand leaves the screwdriver and the engine catches, you want the safety switches to take back over. If the seat switch is jammed closed or you bypassed it as a separate step, the mower will run with no one in the seat. That's how mowers end up in ditches, swimming pools, and through fences.
Re-engage or repair the safety switches as soon as the emergency is over.
What to Do Right After the Mower Starts
The screwdriver jump got you running. Now you have about 30 to 60 minutes before the situation repeats itself. Use the running engine to gather data and decide what's next.
Let it idle and check charging voltage
With the engine running, put the multimeter back on the battery posts. The charging system should produce between 13.5 and 14.5 volts at the battery when the engine is running above idle. If you see that range, the alternator or stator is doing its job.
If you see battery voltage only (around 12.6V and dropping), the charging system isn't working and the battery will die again as soon as the engine stops.
Listen and look for problems
Check for dashboard warning lights, unusual smells (burning wire insulation is unmistakable), smoke from the engine bay, or any fluid leaks. A running mower with an unresolved electrical fault can turn into a fire if the regulator is overcharging.
Plan the next step
If the battery was just deeply discharged and the charging system is good, let the mower run for 30 to 45 minutes to recharge. Drive it around rather than idling. Light load on the engine speeds up the recharge compared to idle.
If the battery won't hold a charge by the next day, replace it. Don't gamble on a battery that's already failed once.
Diagnose the Root Cause So You're Not Doing This Again Next Week
The screwdriver trick is a band-aid. If you don't find the underlying problem, you'll be doing it again. Run through this checklist before you park the mower for good.
- Battery age: Most riding mower batteries last 3 to 5 years. If yours is in that window and has failed once, replace it.
- Parasitic draw: Some mowers have a small constant draw (clock, control module memory) that drains the battery over weeks of storage. Disconnect the negative cable during long storage, or use a battery maintainer.
- Charging output: Already covered above. If charging voltage isn't 13.5 to 14.5V, the stator or regulator has failed.
- Loose or corroded cables: Visual inspection at every battery service. Tight connections prevent most starting issues.
- Safety switch failures: If one safety switch is sticking or failed, the bypass got you out. Replace the switch soon. They exist for real reasons.
- Starter draw: A failing starter pulls excessive amperage, which drops battery voltage below the threshold the solenoid needs to engage. If jumping the solenoid works but the starter barely turns, the starter is on its way out.
Screwdriver Bypass vs. Jump Cables vs. Portable Jump Pack
Three ways to add current to a weak system. Each has trade-offs.
| Method | Best For | Cost | Risk |
|---|---|---|---|
| Screwdriver bypass | Diagnosing solenoid/switch, no other vehicle or battery available | Free | Moderate (electrical shorts if done wrong) |
| Jumper cables from a car | Dead battery, charging system works, you have a second vehicle | Low (cable cost) | Low (proper cable use is well-understood) |
| Portable lithium jump pack | Frequent use, no second vehicle, weak battery but good solenoid | $50 to $150 | Very low (reverse polarity protection built in) |
For a one-off emergency, the screwdriver bypass is fine. If you find yourself jump-starting the mower more than once a season, buy a small lithium jump pack. They're safer, reusable, and the price has dropped significantly as of 2026.
Screwdriver Bypass vs. a Remote Starter Switch (The Mechanic's Tool)
A remote starter switch is a handheld switch with two leads that clip onto the solenoid terminals. Push the button, starter cranks. Release, starter stops.
It's what professional small-engine mechanics use to bypass a bad ignition switch without risking a screwdriver slip. If you regularly work on small engines, a remote starter switch costs about $15 to $25 and pays for itself the first time you use it.
| Tool | Safety | Repeatability | Cost |
|---|---|---|---|
| Insulated screwdriver | Moderate (depends on grip, attention) | Low (one shot per attempt) | Free |
| Remote starter switch | High (designed for this exact task) | High (clean on/off control) | $15 to $25 |
For diagnostic work and frequent use, the remote switch is the right answer. For a one-time emergency, the screwdriver is fine if you're careful.
When Bypassing Safety Switches Goes Wrong
The seat switch, the brake switch, and the PTO switch exist because mowers without operators have hurt and killed people. Every year, roughly 9,000 Americans end up in emergency rooms from lawn mower injuries, per CDC injury prevention data. A meaningful fraction of those incidents involve unattended running mowers.
The screwdriver bypass doesn't disable the safety switches. It just feeds the starter directly. The safety switches still work normally once the engine is running.
The exception is when the safety switch itself is the failure point and you've decided to bypass it as well. If you do that, you're accepting that the engine will run with no one in the seat. Fix or replace the switch as soon as the mower is back in your garage.
Battery Voltage, Charging Output, and What the Numbers Tell You
The two voltages you actually care about are the battery voltage at rest and the charging voltage at the battery when the engine is running. These two numbers tell you almost everything about the electrical system's health.
| Reading | Location | Meaning |
|---|---|---|
| 12.6V+ | Battery, engine off | Fully charged |
| 12.0 to 12.4V | Battery, engine off | Partial charge, may start |
| Below 12.0V | Battery, engine off | Discharged, won't reliably start |
| 13.5 to 14.5V | Battery, engine running | Charging system working |
| Below 13.0V | Battery, engine running | Charging system not working |
| Above 14.8V | Battery, engine running | Overcharging, regulator likely failed |
If the battery reads good at rest but the charging voltage is low, the stator, regulator, or wiring between them is suspect. If the battery is dead and the charging voltage is fine, the battery itself has failed. If both are bad, fix the charging system first, then replace the battery.
Putting a new battery in a mower with a bad charging system is throwing money away.
How Long to Let It Run to Recharge the Battery
A riding mower's charging system puts out somewhere between 3 and 15 amps depending on engine RPM and electrical load. A typical riding mower battery is 35 to 50 amp-hours. So a full recharge from 50% takes roughly 2 to 5 hours of running, depending on how much throttle you're using.
Idling recharges slower than driving under light load. Plan on at least 30 to 60 minutes of actual mowing to meaningfully recharge a discharged one. If you're not mowing, a better move is to put the battery on a proper external charger overnight.
Don't rely on the mower's charging system to bring a deeply discharged battery back. It's designed to top off, not recover.
Battery Disposal and Replacement Specs
Lead-acid batteries can't go in the trash. Most auto parts stores (AutoZone, O'Reilly, Advance) take old batteries for free and give you a small credit. Walmart and some hardware stores do the same.
The EPA's RCRA universal waste rules cover battery disposal for residential consumers.
If you're replacing the battery, the right size for a typical riding mower is a U1 or U1R group size, 12V, with 300 to 500 cold cranking amps (CCA). Check the existing battery's group size before buying. The reversed post version (U1R) has positive on the left instead of the right.
Don't guess. Match what came out.
| Spec | Typical Range for Riding Mower |
|---|---|
| Voltage | 12V |
| Group size | U1 or U1R |
| CCA | 300 to 500 |
| Capacity | 35 to 50 Ah |
| Terminal type | Top post |
Brands like Interstate, DieHard, EverStart, and Deka all make U1 batteries that fit most riding mowers. Price runs $40 to $90 depending on CCA rating and warranty length, as of 2026.
Solenoid Location: Where to Look on Popular Mowers
Knowing where the solenoid sits saves you 20 minutes of crawling around the engine bay. Here's where the major brands typically put them, as of 2026.
John Deere D, E, and X series riding mowers: solenoid is mounted on the right side of the frame rail, within a few inches of the battery tray. Look for a blue or yellow plastic-body solenoid on the D-series, metal-body on the X-series.
Cub Cadet XT and GT series: solenoid is frame-mounted behind the right rear wheel, accessible from the side. Some XT1 and XT2 models tuck it under the rear fender near the battery.
Husqvarna YTH and ZTH series: solenoid lives on the left frame rail just forward of the rear axle. Easy to spot once you lower the rear panel.
Craftsman, Troy-Bilt, MTD, Yard Machines (the MTD family): solenoid is typically behind the seat or under the battery tray. Consistent across the line because MTD shares platforms.
Ariens and Gravely zero-turns: solenoid is mounted near the hydraulic tank, often under a plastic shield. Bracket-mounted to the frame.
Simplicity and Ferris: solenoid is on the left frame rail near the engine pulley. Mounted with two small bolts.
If your brand isn't listed, follow the thick positive battery cable. It always ends at either the solenoid or the starter. The starter is bigger and cylinder-shaped; the solenoid is smaller, box or puck-shaped, and usually has multiple small terminals visible.
Tools You'll Actually Use (Not Just the Screwdriver)
The screwdriver is the star, but a few other items earn their keep in this job. Here's the realistic toolkit.
- Insulated screwdriver: the actual jump tool
- Multimeter: confirms the battery and charging system
- Battery brush: cleans posts before reconnecting
- 10mm and 1/2-inch wrenches: for cable nuts and ground bolts
- Safety glasses: protect your eyes from corrosion and sparks
- Nitrile gloves: keep acid and grease off your skin
- Phone camera: take a photo of the wiring before you disconnect anything. Saves you an hour of tracing later.
Skip the jumper cables. They don't help here. Skip the spare battery unless you actually have one.
The screwdriver is the bypass. Everything else is support gear.
When the Screwdriver Trick Is the Wrong Move
We've covered when this technique works. Let's be honest about when you shouldn't use it, because some situations get worse if you do.
If the battery is below 10.5V then it's likely internally shorted. Bridging the solenoid will just push high current through a battery that can't take it. Replace the battery first.
If the battery case is cracked, swollen, or leaking then it's a chemical hazard. Don't bypass anything. Disconnect the battery (negative first) and recycle it at an auto parts store.
If the engine seized during the last run then cranking won't help. Forcing the starter against a locked engine welds contacts, burns windings, and can crack the flywheel ring gear. Diagnose the seizure before you jump.
If you've already bridged twice and it didn't fire then the problem isn't the solenoid or switch. Move on to fuel, spark, or compression testing.
If you're not sure which post is which then stop. Call a mechanic or post a clear photo on a mower forum. A wrong bridge can fry the voltage regulator in seconds, and that's a $60 to $150 part you didn't need to replace.
Quick Walkthrough: From Battery Check to Running Engine
Here's the full sequence compressed into one quick reference.
- Set parking brake. Transmission in neutral. Blades off. Sit in the seat.
- Multimeter on battery: confirm 12.0V or higher.
- Identify solenoid. Confirm the two large posts.
- Turn key to "on" (not "start").
- Insulated screwdriver across both large posts.
- Engine cranks. Release screwdriver the moment it fires.
- Multimeter on battery while running: confirm 13.5 to 14.5V charging.
- Let it run 30 to 45 minutes or take it for a slow drive.
- Park, identify root cause, fix or replace as needed.
That's the whole job. Most people take 5 to 10 minutes once they've done it once.
Common Mistakes Worth Calling Out Again
A few patterns we see repeatedly in forums and repair shops.
- Assuming the battery is the problem. It's often not. Half of "dead battery" complaints turn out to be a failed solenoid, a bad ignition switch, or a tripped safety interlock. Test before you replace.
- Not wearing eye protection. Battery acid and corrosion flakes cause 90% of the avoidable injuries on this job. Glasses take one second.
- Holding the screwdriver in place after start. Burns out the starter in seconds.
- Replacing the battery before checking the charging system. New battery, bad regulator, same problem in three weeks. Always test charging output first.
- Treating the screwdriver jump as a permanent fix. It's diagnostic and recovery, not repair. Address the underlying issue.
How to Prevent the Next Dead Battery
The screwdriver jump solves today. Prevention solves the next six months. Small habits keep the battery healthy across seasons.
Use a battery maintainer during storage: a $20 to $40 float charger (also called a tender) keeps the battery at full charge over winter without overcharging it. Plug it in when you park the mower, unplug when you mow. Lead-acid batteries lose about 5% of charge per month sitting idle.
A maintainer offsets that.
Disconnect the negative cable for long storage: if you don't have a maintainer, pulling the negative cable prevents parasitic drain from clocks, control modules, and corroded paths to ground. Reconnect when you mow.
Mow at least once every two weeks in season: regular use keeps the battery charged and the engine internals lubricated. Mowers that sit for a month or more between uses develop fuel and battery problems faster than ones that run weekly.
Store in a temperate spot if possible: extreme cold kills batteries faster than moderate cold. A garage or shed that stays above freezing extends battery life significantly. As of 2026, the typical riding mower battery still loses about 30% of its cranking capacity at 0°F compared to 70°F.
Annual terminal cleaning: once a year, disconnect the cables (negative first) and clean the posts and clamps. A wire brush and a few minutes prevent 80% of starting problems that look like battery failure.
Cost Snapshot for 2026
Quick reference for what parts actually cost if you end up needing them.
| Part | Typical Price (USD, 2026) |
|---|---|
| Insulated screwdriver (1000V) | $10 to $25 |
| Multimeter | $20 to $50 |
| U1 riding mower battery (300 to 500 CCA) | $40 to $90 |
| Starter solenoid (aftermarket) | $15 to $40 |
| Starter solenoid (OEM) | $40 to $90 |
| Starter motor (aftermarket) | $50 to $120 |
| Remote starter switch | $15 to $25 |
| Battery maintainer (1.5A float) | $20 to $40 |
Labor at a small-engine shop runs $50 to $90 per hour. Most of these jobs take under an hour once the diagnosis is done. A solenoid swap is typically 15 to 30 minutes of labor.
Glossary of Terms
A few terms come up repeatedly. Quick definitions so nothing reads as jargon.
- Solenoid: an electromagnetic switch that handles the high current needed to spin the starter. Mounted separately on most mowers, integrated onto the starter on some.
- Starter motor: the heavy cylindrical component that physically spins the engine during startup. Driven by the battery through the solenoid.
- Ignition switch: the key-operated switch that sends low current to the solenoid coil when turned to "start". Also routes power to the ignition module in the "on" position.
- PTO: power take-off. The lever or switch that engages the mower blades. Most mowers won't start with the PTO engaged, as a safety feature.
- Safety interlock chain: the series of switches (seat, brake, PTO) that must all read "safe" before the starter will engage. Designed to prevent the mower from running with no operator.
- Solid-state ignition: modern ignition system using electronic modules. Replaced the older points-and-condenser design in the mid-1990s.
- Points and condenser: older mechanical ignition system that uses a cam-operated switch (points) and a capacitor (condenser) to time the spark. Found on vintage riding mowers.
- Battery maintainer (float charger): low-amperage charger that holds a battery at full charge without overcharging it. Common 1.5A models from NOCO, Battery Tender, and Deltran are widely available as of 2026.
- CCA (cold cranking amps): a measure of a battery's ability to deliver current at 0°F. Higher CCA means stronger cold-weather starting.
One-Page Cheat Sheet
Tape this inside the mower deck lid or save it on your phone for next season.
Before: brake set, neutral, blades off, in the seat.
Check: battery ≥12.0V with multimeter.
Find: solenoid, two large posts.
Turn: key to "on".
Bridge: insulated screwdriver across the two large posts.
Release: the moment the engine starts.
Verify: charging voltage 13.5 to 14.5V while running.
Diagnose: root cause within 24 hours.
Replace: battery if over 3 years old.
Reconnect: any safety switch you bypassed.
That's the whole job. Save yourself the diagnostic fee next time the mower won't crank.
Frequently Asked Questions
Can I jump start a lawn mower with a screwdriver on any mower?
No. It works on electric-start riding mowers with a 12V battery and a separate starter solenoid. Push mowers with recoil start have no starter circuit.
Mowers with integrated electronic control modules may crank but not stay running without ignition-on voltage.
Is the screwdriver jump the same as hotwiring a car?
No. Hotwiring a car usually means powering the ignition system to start the engine without a key. The mower screwdriver jump only powers the starter motor.
The ignition system still runs through the key switch or requires the key to be in "on".
Will bridging the solenoid hurt my mower's computer?
Most modern riding mowers don't have a full ECU like a car. They have a charging regulator and an ignition module. Bridling the solenoid correctly doesn't energize either of those circuits.
Bridling the wrong terminals can damage the regulator. Identify the posts first.
How many times can I jump my mower with a screwdriver before something breaks?
There's no fixed number, but each jump stresses the starter, the battery, and the cables. Treat it as a one-time emergency move. If you need to do it twice in a week, something is wrong and needs fixing.
Can I use a metal wrench instead of a screwdriver?
No. A wrench has no insulation on the handle. If your hand slips, the wrench contacts the frame and creates a dead short.
Use a properly insulated screwdriver rated to 1000V. The handle is doing real safety work.
What if the mower cranks but won't fire after the jump?
The screwdriver jump confirmed the starting circuit works. The problem is downstream. Check fuel delivery (valve open, fuel in the tank, fuel shutoff solenoid energized), spark (plug gapped, plug not fouled, kill wire connected), and compression (rings, valves, timing).
Different problem, different fix.
Will this work on a riding mower with a dead solenoid?
Yes. That's actually one of the main uses. If the solenoid has failed internally but the contacts are bypassed with the screwdriver, the starter can still spin and crank the engine.
Replace the solenoid afterward as a permanent fix.
Can I damage the ignition module by bridging the wrong terminals?
Yes. Bridging the large battery post to a small ignition post sends unregulated battery voltage through the ignition module's switching circuits. Solid-state modules don't tolerate this.
Damage can be immediate and total. Always confirm the two large posts are the battery and starter before using the screwdriver.
The Honest Verdict (When This Trick Is Smart, and When It's a Bad Idea)
The screwdriver jump is a real, valid technique that small-engine mechanics and mower owners have used for decades. It works, it's free, and it's the right move when the battery has life, the solenoid is suspect, and you need to confirm or bypass the starting circuit right now. The keys are identifying which solenoid posts to bridge, treating the bypass as a temporary measure, and respecting the safety switches that the bypass also skips.
Where it's a bad idea: a battery that's actually dead, a charging system that's failed, a starting system with multiple unknown faults, or any situation where you're not confident which post is which. In those cases, a proper diagnosis with a multimeter, or a call to a small-engine repair shop, is the cheaper option over the long run.
Use the screwdriver jump as the diagnostic and recovery tool it's designed to be. Fix the underlying problem within the week. And if you find yourself jump-starting the mower more than once a season, replace the battery and the solenoid and stop gambling.
The screwdriver trick is a tool. A great one. Treat it that way and it'll get you out of a bind every time.