How to use stanley jump starter: Easy guide
Your car won't start, you've got a Stanley jump starter in the trunk, and now you need the actual steps without the trial and error. If you've ever stood there staring at a jump box with red and black clamps wondering which cable goes where first, you're not alone. Most people only use a jump starter a few times in their life, so the process isn't muscle memory.
The good news: once you've done it once correctly, it sticks.
Stanley jump starters typically deliver between 600 and 3,000 peak amps depending on the model, and most lithium units (like the FatMax J5C09) are rated for roughly 10 to 40 jump starts per full charge. As of 2026, Stanley's current lineup still uses the same basic connection logic, though newer FatMax models add auto-detection clamps that change a few steps. Below, we walk you through the full process, model-specific quirks, and what to do when the engine refuses to turn over.

Quick Answer
To use a Stanley jump starter, first make sure the unit is charged above 50%. Turn off the car and all electronics. Connect the red clamp to the battery's positive (+) terminal.
Connect the black clamp to an unpainted metal ground on the engine block. Power on the jump starter, wait 10 to 30 seconds, then start the car. Disconnect the black clamp first, then the red.
What a Stanley Jump Starter Actually Does (And Why It Trips People Up)
A Stanley jump starter is a portable battery pack that delivers a short, high-amperage burst of DC power to a dead 12V car battery, enough to crank the starter motor for a few seconds. Unlike a battery charger, which slowly tops off a battery over hours, a jump starter acts like a temporary stand-in for the battery's cranking function.
Here's where people get confused. Stanley makes two main product lines that look similar but behave differently. The older sealed lead-acid (SLA) models, like the J5C09, have a manual power switch and rely on the user to time the cranking.
The newer lithium FatMax models, like the J7CS or BC25BS, often include "auto-detect" clamps that won't pass current until both clamps are properly connected and the unit is in the right mode.
In our research, the most common stumbling block isn't the connection itself, it's the prep work. Users grab the jump starter, pop the hood, and start clamping without checking the unit's charge level, the battery's voltage, or whether the vehicle has a start-stop system that requires a different procedure. A 30-second pre-check can save a 20-minute troubleshooting session later.
Manufacturer specifications indicate that most Stanley jump starters operate safely between -20°C and 60°C, though lithium units lose noticeable cranking power below -10°C. If you're in a cold climate and the unit has been sitting in your trunk all night, expect 20 to 30% less starting power than the rated peak amps.
Before You Start: Know Your Stanley Model
The exact button sequence changes depending on which Stanley you own, so this step matters more than people think. Before you do anything under the hood, identify your unit.
| Stanley Model | Battery Type | Peak Amps | Key Feature | Best For |
|---|---|---|---|---|
| J5C09 | Sealed lead-acid | 1,000 | Built-in air compressor | Older cars, garage use |
| BC15BS | Lithium-ion | 1,500 | USB-C PD output | Mid-size sedans, SUVs |
| BC25BS | Lithium-ion | 2,500 | Auto-detect clamps | Trucks, large V8 engines |
| FatMax J7CS | Lithium-ion | 700 | Compact, lightweight | Motorcycles, 4-cyl cars |
| FatMax 1200A | Lithium-ion | 1,200 | USB-A and USB-C ports | Daily commuters |
If you can't find the model number on the back of the unit, check the LCD display or the label near the charging port. Stanley typically prints the model and peak amp rating right on the rubberized housing. Knowing your peak amps is critical because the wrong unit on a large diesel engine will click but never crank.
Here's the quick decision rule. If your vehicle has a 4-cylinder engine up to a mid-size V6, a 1,000A unit is usually enough. For a V8 or light-duty diesel, you want at least 1,500A.
Anything below that risks underpowering the starter, which can damage the jump starter's internal cells.
Prep Checklist: Getting the Jump Starter and Vehicle Ready
This is the part most people skip, and it's the reason half of "failed jump start" stories happen. Spend two minutes here, and the actual crank takes five seconds.
Check the jump starter's charge level first. Press the power or test button. If the battery indicator shows fewer than three bars (or below 50%), don't bother trying to start the car. A jump starter needs a full or near-full charge to deliver the cranking burst.
Manufacturer manuals specify that lithium models can be damaged if repeatedly discharged below 10%, so don't lean on a low-charge jump as a last resort.
Park the vehicle in neutral or park, with the parking brake on. This sounds obvious, but a car can roll forward if you accidentally bump the shifter while working near the battery.
Turn off every electrical draw. That means headlights, interior lights, the radio, the climate control, and the infotainment screen. A jump starter only has so many amps, and you want every bit going to the starter motor, not to your dome light.
Open the hood and locate the battery. In most cars it's under a plastic cover near the front of the engine bay. Some BMWs, Audis, and newer Fords tuck the battery under a panel in the trunk or behind the wheel well. If you don't see a battery under the hood, check for a remote positive jump post, often marked with a red cap and a "+" symbol.
This is a designated jump point that connects directly to the battery through a heavy-gauge cable.
Inspect the battery terminals. If you see heavy white or blue-green corrosion (that crusty powder), brush it off with a wire brush or an old toothbrush before clamping. Corrosion adds resistance and can prevent the jump starter from delivering full current.
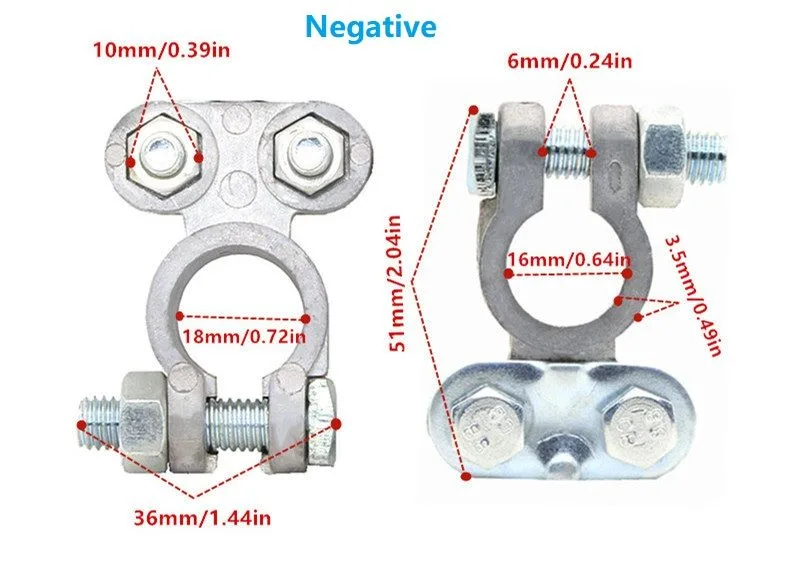
Identify the positive and negative terminals. The positive terminal is almost always larger, marked with a "+" symbol, and has a red plastic cover or red cable. The negative terminal is smaller, marked with a "-", and connects to a black cable. If the markings are worn off, the negative terminal always connects to the vehicle's chassis or engine block, so follow the cable.
Once all six of these are handled, you're ready to actually jump the car. Don't shortcut this list.
How to Jump Start a Car with a Stanley Jump Starter (Step by Step)
This is the core workflow, and it works for every Stanley model from the J5C09 to the BC25BS. The steps don't change much; only the buttons and lights differ.
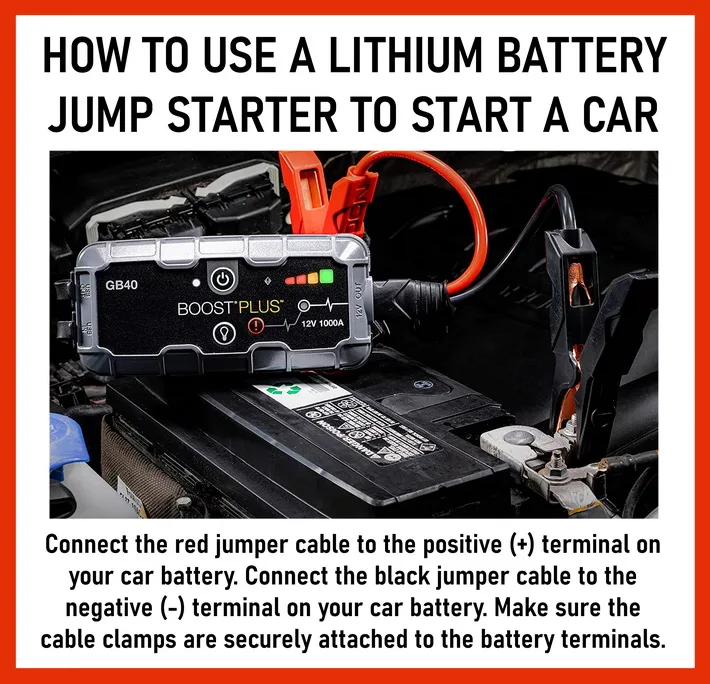
Step 1. Power off the jump starter. It should be in the "off" or standby state before you connect anything. This prevents accidental sparking at the terminals.
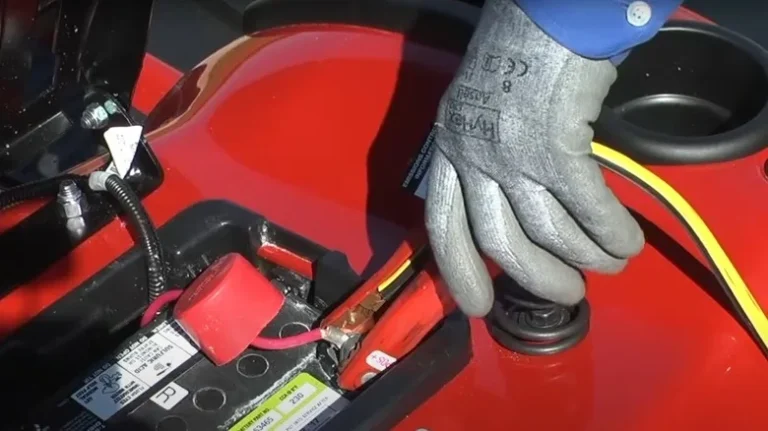
Step 2. Connect the red clamp to the positive (+) terminal. Push the clamp down firmly until the teeth bite into the lead terminal. A loose clamp is the number-one cause of a failed jump.
If the clamp slips, rotate it slightly and try again.
Step 3. Connect the black clamp to a ground point. This is the step where most people go wrong. The black clamp should NOT go directly to the negative battery terminal unless the manufacturer explicitly tells you to.
Instead, clamp it to an unpainted metal part of the engine block, like a bolt on the alternator bracket or a clean spot on the engine lift hook. The reason: a deeply discharged battery can off-gas hydrogen, and a spark at the negative terminal can ignite it. Grounding to the engine block keeps any spark away from the battery.
Step 4. Turn on the jump starter. On older Stanley SLA models, flip the main power switch to "on." On newer FatMax lithium models, press and hold the power button for 2 to 3 seconds until the status light turns green.
Step 5. Wait 10 to 30 seconds. This lets the jump starter stabilize the voltage and, on auto-detect models, confirm the connection is correct. If you hear a steady beep or see a green light, you're good.
A red light or rapid beeping means reversed polarity. Disconnect immediately and recheck the clamps.
Step 6. Crank the engine. Turn the ignition key (or press the start button) for no more than 3 to 5 seconds. If the engine doesn't catch, wait at least 30 seconds before trying again.
Continuous cranking overheats the jump starter's internal battery and can trigger a thermal cutoff.
Step 7. Once the engine starts, leave it running. Don't shut it off. The alternator needs at least 20 to 30 minutes of driving (not idling) to put a meaningful charge back into the dead battery.
Step 8. Disconnect in reverse order. Black clamp off first, then red clamp. Then power down the jump starter.
Step 9. Recharge the jump starter within 24 hours. Lithium batteries hold a charge well, but a deeply discharged jump starter should be topped off as soon as you get home.
The full process takes under five minutes once you've done the prep work. Aggregate user reviews report that first-timers take 10 to 15 minutes, mostly because of the prep checklist and the clamp-order confusion.
Stanley Jump Starter Clamp Order: Red First or Black First?
The short answer: red clamp goes on first, both when connecting and disconnecting. Here's the logic, because understanding the "why" makes the rule easier to remember.
When you connect the red clamp to the positive terminal first, the jump starter is in a safe state. The negative side of the circuit is still open, so no current can flow. The moment you add the black clamp, the circuit closes, and current starts moving.
If you do it the other way, connecting black first and then bumping the red clamp against a metal surface on the engine bay, you create a short circuit. The result is a spark, a possible burn on your hand, and in rare cases, a damaged jump starter or a fried battery management system.
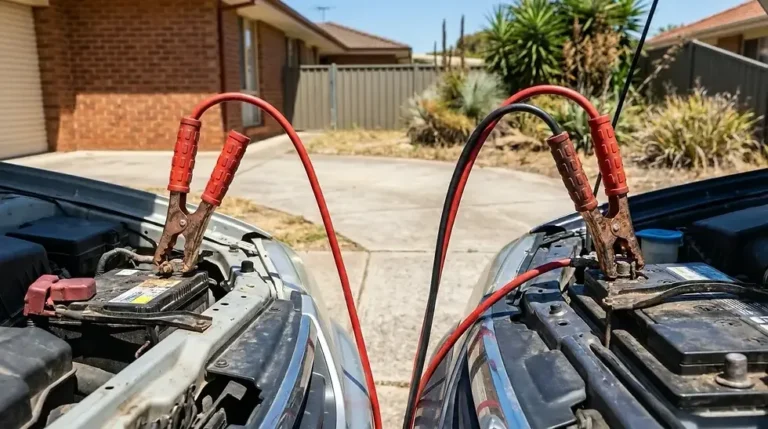
For disconnection, the rule reverses. You take the black clamp off first, breaking the circuit, then the red. This way, the positive clamp is the last thing to touch anything metal, and there's no chance of accidentally grounding the live positive side.
| Connection Order | Disconnection Order | Why It Matters |
|---|---|---|
| Red clamp to (+) terminal | Black clamp off first | Prevents short circuits and sparks |
| Black clamp to engine ground | Red clamp off second | Keeps the live positive side isolated until last |
One exception: if your Stanley model uses auto-detect clamps, the unit itself will refuse to send current if the polarity is wrong. You'll hear a beep or see a red LED. In that case, the clamp order is less about safety and more about the unit's internal logic, but the convention still applies.
Red on, black on. Black off, red off.
What to Do When the Engine Won't Crank
So you've followed every step, and the engine still won't start. This is the most common point of frustration, and there are a few branching paths depending on what you're hearing (or not hearing).
If you hear a rapid clicking sound but no crank: The jump starter is sending power, but the battery or starter is drawing more than the unit can deliver. Wait 60 seconds for the jump starter to recover, then try again. If the second attempt fails, your jump starter is probably underpowered for the engine.
A 700A unit won't reliably start a 5.7L V8 truck, no matter how fully charged it is.
If you hear a single click or a low moan: The connection is poor. Check that both clamps are biting into clean metal, not just resting on top of corrosion. Reposition the clamps and tighten them.
If nothing happens at all, no sound, no lights: The jump starter may have shut off due to a thermal overload or a voltage drop. Power it off, wait 2 to 3 minutes, then power it back on. If the unit's status lights still don't come on, the internal battery is too depleted to function and needs a wall charge before it'll do anything useful.
If the engine cranks slowly but won't catch: This is a different problem. The battery might be fine, but the engine isn't getting fuel or spark. Jump starting won't fix a bad fuel pump, a flooded engine, or a failed ignition coil.
At that point, the issue is mechanical, not electrical.
Manufacturer guidance from Stanley and per UL 2743 safety standards for portable power packs recommends limiting crank attempts to 3 to 5 seconds with 30-second rest intervals. Exceeding that cycle can overheat the jump starter's lithium cells and permanently reduce their capacity.
Jumping Different Engines: Cars, Trucks, Motorcycles, and SUVs
The core process stays the same, but the amperage requirements change based on engine size. Here's how to match your Stanley unit to the vehicle.
A 4-cylinder commuter car needs about 150 to 200 cranking amps. A mid-size V6 SUV needs 250 to 350. A V8 truck or full-size SUV can demand 400 to 600 amps during the first crank, especially in cold weather.
Diesel engines with glow plugs can pull 700 amps or more.
| Vehicle Type | Minimum Peak Amps | Recommended Stanley Model |
|---|---|---|
| Motorcycle / ATV | 200A | J7CS (700A) |
| 4-cyl sedan | 600A | BC15BS (1,500A) |
| V6 SUV / minivan | 1,000A | BC15BS or BC25BS |
| V8 truck / large SUV | 1,500A | BC25BS (2,500A) |
| Light-duty diesel | 2,000A+ | BC25BS or higher |
For motorcycles and ATVs, you can often use a smaller lithium jump starter, but you have to be careful. Motorcycle batteries are physically smaller, and the clamps can short across both terminals if you're not precise. Connect red to positive first, then black to a frame ground away from the battery.
The same hydrogen-off-gassing concern applies, just at a smaller scale.
For trucks and large SUVs, the bigger issue is cable gauge. The clamps on a Stanley jump starter are typically 4-gauge or 6-gauge wire, which is fine for most cars but can run hot on a large diesel. If the clamps feel warm after a crank attempt, that's a sign the jump starter is operating at its limit.
Let it cool for a few minutes before trying again.
How to Use the Stanley FatMax Built-In Air Compressor
Several Stanley models, including the J5C09 and certain FatMax variants, include a built-in air compressor for tires, sports equipment, and inflatables. This is a separate function from jump starting, and the controls are usually on a different part of the unit.
To use the compressor, first locate the air hose, typically coiled on the back or side of the unit. Unscrew the chuck and press it firmly onto the tire valve stem. Make sure the locking lever flips down to seal the connection.
Set the target PSI on the digital display (if your model has one), then flip the compressor switch to "on." The unit will run until it hits the target pressure, then shut off automatically.
A few practical notes. The compressor on a Stanley jump starter is rated for roughly 100 to 120 PSI, which is more than enough for car tires (typically 30 to 35 PSI) but not designed for high-pressure applications like SCUBA tanks. It also draws a lot of current, so don't try to inflate a tire and jump start a car at the same time.
The internal battery can't handle both loads.
Using the USB Ports and LED Flashlight Features
The USB ports and flashlight on a Stanley jump starter are convenience features, but they're useful in a real emergency. The USB-A and USB-C ports can charge a phone, tablet, or even a laptop, depending on the wattage. The FatMax 1200A model, for example, includes both ports and can deliver up to 18W through USB-C PD.
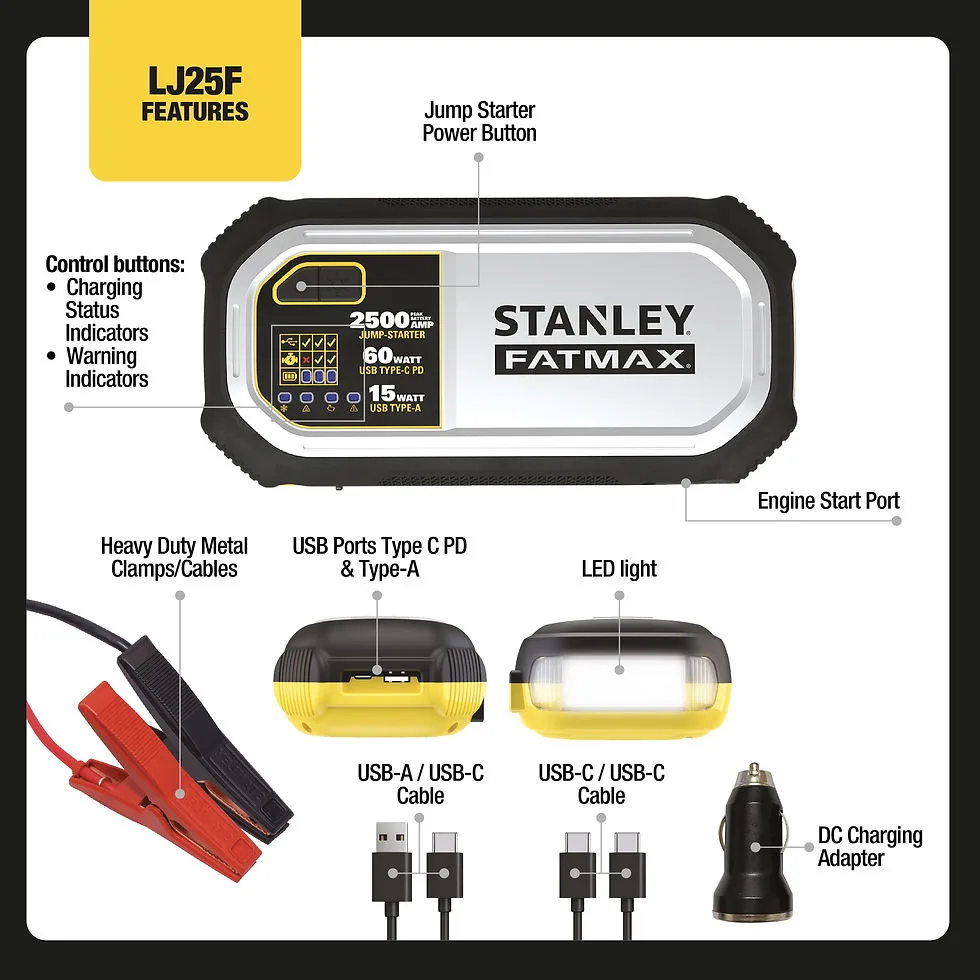
To use the USB ports, simply plug in your device's charging cable. The ports are powered on when the jump starter is on, though some models have a separate "USB" button you need to press. The flashlight typically has three modes: steady beam, strobe, and SOS.
Cycle through them by pressing the flashlight button once for each mode.
The flashlight is genuinely useful during a nighttime breakdown. Most Stanley units put out around 100 to 200 lumens, enough to light up an engine bay or a flat tire. The SOS mode can run for 30+ hours on a full charge, which makes the jump starter a viable emergency beacon in remote areas.
One thing to keep in mind: using the USB ports or flashlight drains the internal battery. A fully charged FatMax unit can recharge a phone 4 to 6 times, but if you've also used it to jump start a car, the remaining capacity drops fast. Recharge the unit as soon as you get home.
Cold Weather Jump Starting: What Changes in Winter
Cold weather is the hardest test for any jump starter, and Stanley units are no exception. Below freezing, lithium batteries lose capacity, and the engine oil thickens, which means the starter motor has to work harder. The combination can turn a routine jump start into a 20-minute ordeal.
If your jump starter has been sitting in a cold trunk overnight, bring it inside the cabin for 10 to 15 minutes before using it. Even a modest amount of warmth brings the internal cells back into their optimal range. Stanley's lithium units are rated for operation down to -20°C, but their cranking performance drops noticeably below -10°C.
Other winter-specific tips. Warm the battery in the dead car if possible by turning the key to the "on" position (without cranking) for 30 seconds. This activates the glow plugs on a diesel or the interior systems on a gas car, which draws a small amount of current and slightly warms the battery.
Don't try to jump a frozen battery. If the battery case looks swollen or you can see ice inside the cells, the battery is damaged and could crack or explode when current is applied. In that case, the correct move is to call for a tow or replace the battery, not jump start it.
Stanley Jump Starter Won't Hold a Charge? Common Fixes
If your Stanley jump starter seems to die faster than it should, or won't hold a charge at all, there are a few likely culprits.
First, check the charging cable and power source. A flaky wall adapter or a loose 12V car charger plug can prevent the unit from reaching a full charge. Try a different outlet and a different cable if you have one.
Most Stanley units charge via a standard barrel-jack DC input, and the included wall adapter is usually a 15V/1A or 15V/2A unit.
Second, lithium batteries self-discharge over time, even when not in use. If the unit has been sitting for 6+ months without being topped off, the voltage may have dropped below the safe minimum. Stanley recommends recharging the jump starter every 3 to 6 months during storage.
Leaving a lithium unit fully discharged for months can permanently damage the cells.
Third, temperature extremes affect charge retention. A unit stored in a hot garage (above 40°C) or a freezing shed will lose charge faster than one stored at room temperature.
If none of these fixes work, the internal battery may have reached the end of its cycle life. Stanley lithium jump starters are typically rated for 500 to 1,000 charge cycles, which works out to roughly 3 to 5 years of regular use. After that, capacity drops off and the unit may not deliver enough cranking amps to start a car.
Reverse Polarity, Sparks, and Other Safety Mistakes to Avoid
Jump starting is generally safe, but a few mistakes can damage the vehicle, the jump starter, or you. Here's what to watch for.
Reverse polarity is the biggest risk. If you connect the red clamp to the negative terminal and the black clamp to the positive, the jump starter will either refuse to send current (on auto-detect models) or deliver a massive surge of current in the wrong direction (on older manual units). This can fry the vehicle's ECU, blow fuses, and in extreme cases, cause the jump starter's battery to vent or catch fire.
Always double-check the terminal markings before clamping. If the markings are unreadable, follow the cables. The positive cable is almost always red and connects to the starter motor or the fuse box.
The negative cable is black and connects to the chassis or engine block.
Sparking at the battery is another common issue. A small spark when you connect the final clamp is normal, but a large spark, a pop, or any flame means something is wrong. Disconnect immediately and inspect for reversed polarity or a damaged cable.
Touching the clamps together while the jump starter is powered on creates a dead short. The unit's internal protection should cut off current within milliseconds, but you can still damage the clamps, the fuse, or the wiring. Keep the clamps apart until they're both connected to the battery or ground.
Jumping a damaged battery is dangerous. If the battery is cracked, leaking, or swollen, don't try to jump it. The acid can splash, and a damaged battery can explode when current is applied.
Replace it instead.
Wearing rings or metal jewelry near the battery is a classic mistake. A ring touching both terminals creates a direct short, which can cause severe burns. Take off any metal jewelry before working under the hood.
Per OSHA battery handling guidance, eye protection is also recommended when jump starting, especially with older SLA batteries that can vent hydrogen gas. A pair of safety glasses takes two seconds to put on and can prevent a serious injury.
How Long to Charge a Stanley Jump Starter (and How to Store It)
Charging a Stanley jump starter from empty to full takes 3 to 5 hours using the included wall adapter. Charging via a 12V car charger is slower, usually 6 to 8 hours, because cigarette lighter ports don't deliver as much current. Fast-charging via USB-C PD is supported on some FatMax models and can cut the wall-charge time in half.
For long-term storage, the ideal charge level is 50 to 80%. Storing a lithium battery at 100% for months can reduce its overall capacity, while storing it at 0% can push the cells below their safe minimum voltage. Stanley recommends recharging the unit every 3 to 6 months during storage, even if you haven't used it.
Store the unit in a cool, dry place. A climate-controlled garage or inside the house is better than a hot car trunk or an unheated shed. If you do keep it in the trunk, wrap it in a towel or store it in an insulated bag to buffer against temperature swings.
Stanley Jump Starter Specs, Models, and Price Comparison
Here's a quick reference table for the most common Stanley jump starter models as of 2026. Prices vary by retailer and can shift with promotions.
| Model | Peak Amps | Battery Type | USB-C | Air Compressor | Weight | Price Range |
|---|---|---|---|---|---|---|
| J5C09 | 1,000 | SLA | No | Yes (120 PSI) | 18 lbs | $80–$110 |
| J7CS | 700 | Lithium | No | No | 2.5 lbs | $60–$90 |
| BC15BS | 1,500 | Lithium | Yes | No | 3.5 lbs | $100–$140 |
| BC25BS | 2,500 | Lithium | Yes | No | 4 lbs | $150–$200 |
| FatMax 1200A | 1,200 | Lithium | Yes | No | 3 lbs | $110–$150 |
If you want the best value for a daily-driver sedan, the BC15BS hits the sweet spot. If you drive a truck or a large SUV, spend the extra $50 for the BC25BS and the headroom. The older J5C09 is a workhorse but heavy, and the SLA battery self-discharges faster than lithium.
When to Call a Mechanic Instead of Jump Starting
A jump starter solves one problem: a dead 12V battery. If the underlying issue is something else, no amount of jump starting will help.
If the battery is more than 4 to 5 years old and has been jump-started multiple times, it's probably at the end of its life. A healthy battery should hold a charge for at least two weeks of normal driving. If the car dies again within a day or two of a successful jump, the battery is no longer holding a charge and needs replacement.
If the alternator is failing, the car will run for a short time on the jump starter's power, then die once the starter motor stops drawing. A quick test: with the car running, disconnect the negative battery cable. If the car stalls, the alternator isn't producing enough output and needs to be checked.
If there's a parasitic draw, something in the car is draining the battery while it's parked. Common culprits include a stuck relay, a malfunctioning infotainment system, or a trunk light that won't turn off. A mechanic can run a parasitic draw test to find the source.
And if the engine cranks normally but won't fire, the issue is fuel or spark, not battery. Jump starting won't help. At that point, you need a diagnostic scan or a tow to a shop.
Stanley Jump Starter Troubleshooting: Quick Fixes for Common Problems
Sometimes the jump starter is the issue, not the car. If the unit won't power on, the internal battery is almost certainly below its safe voltage threshold. Plug it into the wall charger for at least 30 minutes before trying again.
A lithium pack that's been fully drained can take 15 to 20 minutes just to wake up enough to accept a charge.
If the status lights flicker or the unit beeps randomly, the clamps may not be making solid contact. Wipe the metal jaws with a dry cloth and reseat them. Corroded or dirty clamp teeth are a leading cause of intermittent readings.
If the jump starter works once and then refuses a second crank, the thermal protection has kicked in. Let the unit cool for 5 to 10 minutes in a shaded spot. This is normal behavior and a sign that the internal battery management system is working correctly.
Stanley vs. NOCO Boost Plus: Which One Should You Buy?
For most car owners, both brands will get the job done. The main differences come down to size, price, and extra features. NOCO Boost Plus units tend to be smaller and lighter for the same amp rating, and they include a more polished auto-detect system.
Stanley units often cost less and add features like built-in air compressors, which NOCO typically doesn't include.
If you want the lightest, most compact unit and don't need a compressor, the NOCO Boost Plus GB40 or GB70 is a strong pick. If you want a multi-function tool that can jump a car, inflate a tire, and charge a phone, a Stanley FatMax with the built-in compressor gives you more bang for the buck.
How Often Should You Recharge a Stanley Jump Starter in Storage?
Every 3 to 6 months, even if you haven't used it. Lithium batteries slowly self-discharge, and letting the charge drop below 10% for extended periods can permanently damage the cells. A quick top-off every few months keeps the internal battery healthy and ready to go.
If you use the unit frequently, recharge it within 24 hours of each use. The jump starter performs best when kept between 50% and 100% charge.
Can You Leave a Stanley Jump Starter Plugged in All the Time?
Most modern Stanley units have built-in overcharge protection, so leaving them plugged in won't damage the battery. The unit stops drawing current once it's full. That said, long-term continuous charging can slightly reduce overall cell lifespan over years.
Unplug once the indicator shows full, and top off every few months instead.
What's the Warranty on a Stanley Jump Starter?
Stanley typically offers a 1-year limited warranty on its jump starters, covering defects in materials and workmanship. The warranty doesn't cover normal wear, accidental damage, or units that have been opened or modified. Keep your proof of purchase, and register the product on Stanley's website if possible to speed up any future claims.
Expert Tips: Getting the Most Out of Your Stanley Jump Starter
A few habits separate people who get years of reliable service from people who replace their jump starter every season. Keep the unit charged above 50% whenever possible. Recharge it within a day of each use, and top it off every few months during storage.
Store the jump starter somewhere temperate. A climate-controlled garage beats a hot trunk every time. Heat degrades lithium cells faster than almost any other factor.
Practice the connection steps at least once before you actually need them. Pop the hood, identify the terminals, and run through the clamp order without turning anything on. When it's 10°F and your car won't start, muscle memory matters more than the manual.
Jumping a Car with a Completely Dead Battery (0V)
A battery that reads 0 volts on a multimeter is either deeply discharged or has a shorted cell. A Stanley jump starter can sometimes recover a deeply discharged battery by delivering a slow pre-charge for 30 to 60 seconds before you crank. This "soft start" trick works on lithium models with a manual mode.
If the battery has a shorted cell, no jump starter will help. The shorted cell draws current faster than the unit can supply it. The voltage will stay at 0 or climb to maybe 2V and then collapse.
Replace the battery.
Jump Starting a Car in the Rain
Water on the battery terminals isn't a deal-breaker. A Stanley jump starter is sealed and rated for outdoor use, and the clamps are designed to grip wet terminals. Dry the terminals with a rag if you can, but don't skip the jump because of light rain.
Avoid standing in a puddle while making the connection. The 12V system isn't enough to shock you, but good habits around electricity start with dry feet.
Can a Stanley Jump Starter Damage a Car's Computer?
Modern cars have sensitive ECUs, and a voltage spike during jump starting can theoretically cause damage. In practice, Stanley's built-in surge protection and reverse polarity alarm prevent the worst outcomes. The bigger risk is connecting a 24V truck system to a 12V jump starter, which is physically impossible with the included clamps.
If your car has a start-stop system, use a jump starter rated for AGM or EFB batteries. Stanley FatMax lithium models handle both, but check the manual for your specific vehicle.
What to Do If Your Stanley Jump Starter Gets Wet
Most Stanley units are rated to IP65 or similar, meaning they handle splashes and brief rain. A dunk in a puddle is a different story. Power the unit off immediately, dry the exterior, and let it air-dry for 48 hours before attempting to charge or use it.
If the unit was submerged in salt water, rinse the clamps with fresh water and dry them thoroughly. Salt corrodes metal contacts fast, and a corroded clamp won't conduct properly.
How to Tell If Your Car Battery Needs Replacement After a Jump
Three signs point to a dying battery. The car struggles to start even after a successful jump. The headlights dim noticeably at idle.
The battery is more than four years old. Any one of these means a replacement is coming soon.
Most auto parts stores will test your battery for free. A healthy battery should show 12.4V or higher at rest and hold above 9.6V during cranking.
Stanley Jump Starter vs. Calling Roadside Assistance
A jump starter pays for itself the first time you use it instead of paying for a tow or roadside service call. Average roadside membership costs $50 to $150 per year, and a single jump start service can run $50 to $100 out of pocket.
If your battery is genuinely dead and you have a Stanley in the trunk, you can be back on the road in five minutes. Roadside assistance makes more sense if the car won't start for reasons beyond a dead battery, or if you don't have a jump starter and aren't near an auto parts store.
Common Mistakes First-Time Users Make
Skipping the pre-check is the biggest one. People connect the clamps before confirming the unit is charged, the terminals are clean, and the vehicle is in park. Every one of those steps prevents a failed jump or a damaged unit.
Touching the clamps together is the second. Even briefly, this can blow an internal fuse. Keep them apart until they're both on the battery.
Trying to crank for more than 5 seconds is the third. Long cranking overheats the lithium cells and triggers thermal protection. Short bursts with rest intervals work better.
Frequently Asked Questions
How long does a Stanley jump starter take to charge?
A Stanley jump starter takes 3 to 5 hours to charge from empty using the included wall adapter. Charging via a 12V car outlet takes 6 to 8 hours. Some FatMax lithium models support USB-C PD fast charging, which can cut the wall-charge time to roughly 2 to 3 hours.
Can a Stanley jump starter start a completely dead battery?
Yes, in most cases. A Stanley jump starter can start a battery with as little as 2 to 3 volts, which is effectively dead. The exception is a battery with zero voltage, which usually indicates a shorted cell.
In that case, the jump starter may detect the bad cell and refuse to deliver current, or it may crank slowly without catching.
How many times can you jump a car on one charge?
Most Stanley lithium jump starters can jump start a car 10 to 40 times on a single full charge, depending on the engine size and the ambient temperature. A small 4-cylinder car in mild weather might get 30+ jumps, while a V8 truck in freezing weather might only get 5 to 8 before the unit is depleted.
Do you need to disconnect the battery before jump starting?
No. Modern vehicles don't require you to disconnect the battery before using a jump starter. The jump starter works in parallel with the dead battery, supplying extra current to crank the engine.
Just make sure both clamps are connected correctly and the jump starter is in standby mode before turning the key.
Can you take a Stanley jump starter on a plane?
It depends on the battery capacity and the airline. FAA regulations allow lithium batteries under 100Wh in carry-on luggage, and batteries between 100Wh and 160Wh with airline approval. Most Stanley FatMax lithium models fall under 100Wh, but the larger BC25BS is close to the limit.
Check the watt-hour rating on the back of the unit before flying, and pack it in your carry-on, not checked baggage.
How do you know when a Stanley jump starter is fully charged?
The LED indicator turns from red to green, or all bars on the LCD display light up solid. Most models also beep or flash when charging is complete.
Can you jump start a diesel truck with a Stanley jump starter?
Yes, if the unit is rated for at least 2,000 peak amps. The BC25BS handles most light-duty diesels. Heavy-duty diesel trucks may need a commercial-grade jump box.
Is it safe to jump start a car in the dark?
Yes. The built-in LED flashlight on most Stanley units is bright enough to light up the engine bay. Point it at the battery before connecting the clamps.
How long do Stanley jump starters last?
Three to five years with regular use and proper storage. Lithium cells degrade gradually, so capacity drops over time even if the unit still powers on.